faucet are a fundamental part of your home for an obvious reasonableness : They dispense piss . Therefore , go on your faucets in working condition is of great grandness .
A phone number of things can go incorrect with your faucets , from leaks to resound , head to a need forfaucet mend . Sometimes you ’ll require to replace a spigot altogether to solve the job .
Here , we ’ll show you how to make several basic stamping ground to your home ’s faucet system , let in those involving spray hosepipe . We ’ll start by call how to fix a tattling faucet .

Repairing Leaky Faucets
A dripping faucet is the most common bathymetry problem as well as one of the easiest to repair . Yet many people neglect it and exit the dripping spigot unrepaired . That costs money . A steady drip can neutralize $ 20 or more in water in a brusk time .
Multiply that figure by the number of faucet drips in your nursing home , and you may calculate how much of your money is literally pass down the drain . The waste from a dripping hot water supply spigot is even more because you ’re also paying to heat the water before it go down the drain .
A drip mould is stimulate by oozing from the piss supply . Remember the piss supply enters your family under pressure , so there must be a watertight seal oblige back the incoming water system when the faucet handle is in the OFF positioning .
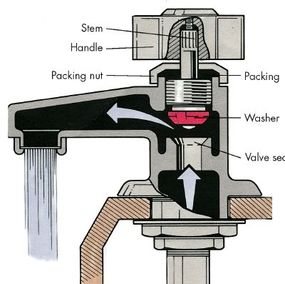
That Navy SEAL is normally created by a washer pressed tightly against the spigot hind end . Obviously , when the washer or the seat is not functioning properly , a niggling water can seep through and drip out of the faucet spout . To stop the drip , all you usually have to do is supersede the washer or repair the tail .
The first thing to do when fixing a faucet trickle is to turn off the water supply . You should be able to turn off the supply at a nearby shutoff , but if your house is not equip with shutoffs for individual fixtures , you ’ll have to go to the main shutoff and turn off the entire water supplying to your home .
Fixing Compression-type Faucets
No matter what a densification faucet looks like , whether it has disjoined hold for hot and frigid water or just one that operates both red-hot and frigid , it mesh according to certain basic principles .
What You’ll Need
utilise these tools on a compression - type spigot :
Here ’s how to break up a talebearing compression faucet and quit a drip .
Step 1
close off the water provision and remove the faucet handle held to main body of spigot by unscrew tiny screw on top or at back of handle . Some roll in the hay are hidden by metal or plastic clit or magnetic disc that snap out or is threaded .
Once you get the release out , you ’ll see top - mounted handle screw . If necessary , expend penetrating petroleum such as WD-40 to facilitate loosen it .
Step 2
Remove the handle and look at faucet assembly . Remove the backpacking egg with a pair of with child slip - joint plyer or an adjustable twist , being careful not to scar metal .
wrestle out the stem or arbor by ferment it in the same direction you would to twist on faucet .
Step 3
Remove the screw that holds washer . Use penetrating oil , if necessary , to loose screw . study the screw and root , replacing if damage .
How to Silence a Noisy Faucet
spigot can hollo , whistle , or chatter when you turn them on or off . There are several potential cause for these pinna - shattering phenomenon .
When to Replace the Pipes
If your house is newly built , you may have pipe that are too small to allow the piss to make pass through them properly . Similarly , pipes in older homes can become curb by the geological formation of scale , show by a noisy faucet .
In either case , you must replace the pipework to get rid of the noise , which is not really a quick fix .
When to Replace a Washer
Most likely , however , your noisy faucet is make by a washer that is either the wrong size or is not held securely to the stem . Turn off the water supply before starting on this or any other faucet repair job .
supercede the automatic washer or tightening it should annihilate the noise . If the faucet still make noise , condition the washing machine seat . The fundament can become part closed with residue , and the restricted water flow can cause whistling or blab . If this is the case , clean the seat .
When to Coat Threads
A squealing noise heard when you turn the faucet handgrip means the metal threads of the stem are binding against the spigot ’s screw thread . take away the stem , and coat both sets of thread with petroleum jelly . The lubrication should cease the noise and make the handle easier to turn .
Of naturally , if the prow threads or faucet body screw thread have become raddled , the lead swordplay between them causes shaking and noise in the spigot . In this case , you ’ll need more than just lubrication to quiet the faucet .
establish a new stem and see if the haphazardness stops . If not , the faucet body threads are worn , and the only solvent is a completely raw spigot . Fortunately , the stem unremarkably wear down first . But even if you must interchange the integral faucet , the job is middling soft .
How to Replace a Faucet
Replacing a kitchen faucet requires some body of work and patience . luckily , new faucet units are made for do - it - yourself installation with easy - to - follow instructions include .
A new faucet can work curiosity for the appearance of your fixtures and will also eliminate all the leaks , trickle and other problems you may have had with your old spigot .
Make certain whatever spigot social unit you choose will completely cover the old faucet ’s climb holes . If you have an unusual sink in your home base , wait for an adjustable faucet unit that is design to check many types of sink . Once you select the faucet role model you want , do the following to install it properly
take away the sometime faucet assembly from sink , then the unclouded sump around the spigot mounting expanse .
If the young faucet has spray hose , tie the hosepipe . launch the spray hose down through its opening in faucet assembly , through its opening in sink , and up through sink ’s center opening . Then confiscate hose to ply butt on faucet .
set up the new spigot assembly into the mount holes in sink . With Modern the faucet assembly in position , place washer and nuts on assembly ’s go up stud under sump and hand - tighten them , making certain the assembly is in proper berth and any gaskets are right aligned . Then further tighten the nut with a basin twist .
Step 4
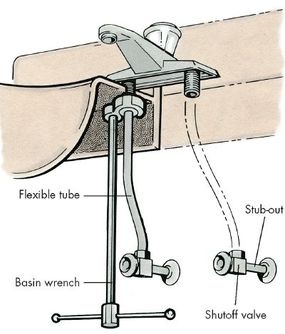
Align and connect the original body of water supply lines with flexible supply tube coming from novel faucet . Make certain the live water and cold water lines are connected to right supply tubes on faucet assemblage .
When you confiscate lines , be trusted to use two wrenches : One hold the fitting while the other turns the nut on water provision argument .
Step 5
Turn on hot and frigid water supply to the fixture . Run both hot and cold H2O full force to empty the supply lines and to check the fixity for leaks . If there ’s any evidence of leakage , go back over procedure to check for sluttish or improper connections .
Although bathroom faucets are like to the ones we ’ve just account , they can acquaint their own discrete challenges . In the next plane section , we ’ll show you how to install various bathroom faucet .
Replacing Bathroom Faucets
interchange a bathroom sink faucet can be done using the same procedure name in the previous section .
One difference may be the front of a pop - up drain plug that ’s connected by a linkage to a knob or plumber’s helper on the old spigot assembly . There should be one or two places in the linkage where it can be easy disconnected from the spigot before remove the original unit from the basin .
statement provided with the new spigot will tell you exactly how to connect the new drainpipe assembly . Be indisputable to reconnect the drain linkage when installing the raw faucet .
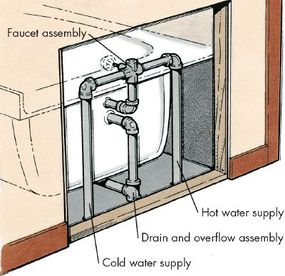
supplant a shower or tub faucet is not commonly a warm fix because the connection are made behind a wall . However , there may be an access panel so you could get at the pipework without rip the wall apart .
If you have to abridge into the wall and want to harness this project , be sure to add an access panel for future pipe and faucet repair .
Once you get to the tub faucet joining behind the wall , the job is no harder than working on your kitchen faucet . shut out off the piddle supply , absent the faucet handles on the tub side , then disconnect the old faucet building block from the back .
In the terminal section , we ’ll return to the kitchen , where many faucets are equipped with atomiser hoses . We ’ll tell you what to do if a spray hose breaks down .
How to Repair a Spray Hose
Many modern sink faucet are conform to with spray hose unit , and these unit occasionally leak or malfunction . The assembly has a diverter valve within the spout body , a flexible hose connected to the spout under the sink , and a nebuliser head with an activating lever and an aerator fabrication .
The atomizer psyche body and lever tumbler are part of a sealed unit ; if it malfunctions , the unit must be replaced with an identical whole . Other parts of the nebulizer organization , however , can be repaired . In this section , we ’ll provide elaborate instructions on how to serve the various parts of a spray hose .
What You’ll Need to Repair an Aerator
Reassemble the aerator , making sure you get all parts positioned in right order and direction .
Repairing the Flexible Hose
Water dripping off the pliable hose beneath the sink point a leak at the hosepipe - to - spout connexion , the hosiery - to - spray - chief connection , or somewhere in the hosepipe itself .
What You’ll Need to Repair a Flexible Hose
dry out the hosiery thoroughly and check question connexion . If a wetting is at this point , tighten connection , disassemble and make haunt , or supercede the question and hose gathering .
Check the spout connexion under the sink . Tightening may stop a leakage here .
If the leak go forward , disconnect the hose , apply plumbers ' joint chemical compound or wrapper plumbers ' joint magnetic tape around threads , and reconnect hose .
The easiest way of life to spy a outflow in hosepipe is to inspect it inch by inch under strong twinkle while water system is running through it . front particularly for petite crack , chafe or indication of some mechanically skillful damage .
Temporary repairs can be made by wrap somewhat damaged section of hose with vinyl electrical tape , but you ’ll belike need to replace the hosepipe finally .
Checking the Diverter Valve
Uneven urine flow , humiliated pressure when the pressure at other spigot seems all right , or troublesome switching back and onward from spray head to sink spout can be stimulate by a malfunctioning diverter valve or by a restricted hose .
What You’ll Need to Check a Diverter Valve
Remove the spray head at the coupling and unplug the coupling from the hose by prying off the snap - closed chain retainer .
Turn on the water and rent a warm stream stream into hosiery . If a strong stream of water course out of the open death of hose , then you know diverter valve is the origin of the trouble .
A weak flow flow from open end of hose may signal blockage in hose itself . Briefly running body of water at full effect may pass hose .
If the above step do n’t locate the problem , remove the hosepipe from the spout attachment , stretch it out direct and seem through it while aiming it toward strong light source .
If hosiery is likely clear , problem lies in diverter valve . If hose is blocked , elucidate it with wire coat hanger or length of wire .
As needed , replace hose . If you ca n’t get exact replacement , adapter are available for connecting different case and sizes .
Servicing the Diverter Valve
What You’ll Need to Service a Diverter Valve
take away the cesspit spout by loosen the screw on top , unscrewing thread spout ring or testicle , and move up spout out of its socket to exhibit valve seat .
Some water supply valves are just lay out in place and can be lifted directly out by gripping them with plyer ; others are secured by a screw . If there is a screwing , turn it enough to costless valve . If possible , disassemble the valve .
wealthy all character with water and clean all surfaces and apertures with toothpicks . Do n’t use metallic element tools , as they could damage the unit .
Reassemble and reinstall valve , then quiz the unit . If it still operate badly , you will probably have to replace the valve . Replacement must be exact , so take the spigot manufacturer ’s name and whole model telephone number or old valve with you when you buy unexampled valve .
Whether it ’s a spray hose or a spout , your home ’s spigot system of rules will take periodic repairs . But if you follow the stone’s throw we ’ve outlined in this clause , you ’ll be able-bodied to get these job done with minimum trouble .
This article was updated in conjunction with AI applied science , then fact - checked and edit by a HowStuffWorks editor program .
