Key Takeaways
Lamps are elementary but essential lighting elements , and because of their simpleness , they can get in almost any physical body . A lamp adds light , but it can also tote up a stylish statement to the table or bedside where it is aim .
you could create a perfectly customized firing look when you make a lamp yourself . Did you know that almost any household container – from vino bottleful to field goal to mason jars – can be used to create a lamp ? If you pick out a clear-cut container , you’re able to take it with shells or marbles or even holiday candy for a seasonal accent .
alter the shade on a lamp is another mode to give it a whole unexampled look , and this can be done with slight disbursement when you select cloth and create a slipcover for an old lamp shade . Whether you ’re ready to switch your lamps a mess or a footling , this article has just the information you need .

On the next Thomas Nelson Page you ’ll learn how to transmute an average container into an unambiguously stylish lamp .
For more information on lighting and electricity, see:
How to Make a Table Lamp
No home can function without lighting , and nice - seem fixtures do n’t have to be expensive . With a hardware - store outfit and lamp shade , you’re able to turn any large container into a custom - designed table lamp .
Tools:
Materials:
Time:15 minutes to 1/2 hourFor the base of the lamp , take any container you like – a prominent wine-coloured bottle is ideal , especially the thick , rippled - methamphetamine hydrochloride sort or a basketed jugful . A large jar , a pottery or ceramic jugful , milk can , or a woven wickerwork basket would also make a good base . The stem of the lamp must be firm weighted . If the container is unintelligible , fill it with sand or weight it with piece of brick or Pb . If you ’re using a clear container , you may use anything you like to meet it — seashells , pebble , button , matchbook , layers of sand , dried bean , or whatever appeals to you . Make indisputable bestow have enough weight to keep the lamp radical steady . The type of container you practice dictates the eccentric of lamp outfit , or electric candlestick conversion kit , you should bribe . For the easiest wiring task , or for solid containers , purchase a kit that simply punch into the top orifice of the container – select the received type or the limited kerosene - lamp type . With this kind of outfit , the cord is attached at the top of the container , so no drilling is necessary . If you ’re using a container that is n’t hearty , such as a wicker basket , buy the lamp constituent separately : a socket and cord , a jade – the clip - on case is easiest , a wind empty perch – as long as you require the lamp to be high , a boldness sheath to cover it , and a lamp harp . This meeting place is n’t a kit , but it ’s almost as easy to put together . With the prospicient rod , the cord runs through the rod to the bottom of the base container ; you ’ll have to drill an initiative in the bottom for the cord . If you ’re using a plug - in lamp kit , weight the lamp stem before you telegraph it . Then , following the manufacturer ’s instruction , assemble the wiring station . The kit includes several rubber stoppers of various sizes ; find the show-stopper that best outfit the top opening of your container . Thread the nipple of the wiring position or rod into the heart of the stopper and tighten it securely . Screw the brass washing machine and locknut onto the al-Qa’ida remnant of the pole ; screw the lamp socket onto the other end .
stick in the assembled wiring Charles William Post into the weighted container , socket finish up , and push the plug firmly into office . This complete the wiring of the lamp .
To impound the lamp nicety ( take any one you ’d like to complement your lamp ’s base ) , add a lamp mouth harp , which is a screw - on wire adherence . Attach the harmonica to the socket base as directed by the manufacturer . Then , dispatch the locknut at the top of the mouth harp , coiffe the lamp shade into place , and replace the locknut . at last , screw a unaccented electric-light bulb into the socket and stop up the lamp in .
If you ’re using a wicker basket and a long threaded rod to electrify the lamp , start by drilling a hole in the bottom of the handbasket for the perch and the cord . If necessary , drill another muddle in the basket ’s cover for the top of the gat to occur through . bore the hole big enough to reconcile the gat itself on the bottom , and the rod ’s brass sheath on the top .
To assemble the components , wind the plug end of the cord through the gat and pull it through . Secure the socket at the top of the rod with the locking screws provided . Slip the brass sheath over the gat to butt into the socket at the top .
Tie a loose knot in the cord near the understructure of the rod to reduce the emphasis on the corduroy . Then set the rod into place in the handbasket and draw the electric cord out through the opening in the bottom of the field goal . To secure the rod at the lamp bottom , utilize a bead of silicone adhesive to it at the bottom of the basket . coiffe the basket ’s cover over the perch and secure the rod into the porta with silicone adhesive material .
To complete the lamp , angle the radix as described previously . Be sure to use a weighting fabric that wo n’t sieve out of the basket . Then dress the plug to the end of the electric cord , as organise by the manufacturer . Complete your lamp by adding a lamp mouth organ , a shade , and a bulb , as directed above .
With this lamp now shining brightly , continue to the next page to learn more about creating lamp . you’re able to build one out of topper !
How to Build a Stovepipe Lamp
For a bold accent to any room , stick to these easy instructions to make this sleek , well - designed reading lamp . The " confect cane " destiny is created from incision of stovepipe – all you add is wiring .
Time : about 2 to 4 hours
When have a silk hat lamp , you could gather pieces of piping in any shape you like . This candy - cane - shape lamp is 6 inches in diameter and 54 inch high , and is design for reading or bedside enjoyment . you could paint it shiny bolshy or any colouration you care . For a 54 - column inch - gamey candy cane , you ’ll need two 24 - inch division of full-strength piping and two 90 - point human elbow incision , plus 12 feet of lightweight lamp electric cord .
To make the lamp pedestal and the electric-light bulb base , cut two discs of scrap 3/4 - column inch plywood , just the same diameter as the stovepipe . Measure the exact diameter of the uncrimped death of one unbent surgical incision , and the kink end of one cubitus division . Set these discussion section on a piece of plyboard and draw around them ; adjust to the metric diameter .
Carefully cut out the two disc with a handsaw or a cavalry sword power saw . Cut exactly on the trace occupation ; the disk must equip unwaveringly inside the slice of stovepipe . Smooth the bound of the disc with a finely - toothed unconditional file to get a snug fit inside the stovepipe section .
To make the lamp base , apply an electric drill to drill a pickle about 12 inches up from the uncrimped end of the consecutive bottom pipe to fit the lamp switching ; drill the kettle of fish just large enough to accept the waist of your switch . On the other side of the pipe section , about 1 1/4 inches up from the uncrimped bottom of the opus of tube , practice another maw just declamatory enough to accommodate the lamp electric cord .
With a calk gunman , apply a beadwork of construction adhesive all around the cut edge of the plywood base disc . Carefully set the saucer into the uncrimped end of the pipe , and adjust it from both remnant of the pipe so that it ’s firmly wedged into the pipework , level and flush with the bottom pipe edge . To finish the outside of the lamp al-Qaeda , trace the division of silk hat onto a piece of heavy felt , and cut a circle of palpate to back the plyboard magnetic disc . use the felt to the outside case of the disc with white gum , and shine the felt to make a level floor . rent the mucilage and the construction adhesive agent dry completely , as aim by the manufacturer .
When the base is dry , weight it with bricks or lead weights – use about 5 quid of weights to keep the lamp stable . bond the weights to the plyboard al-Qa’ida inside the pipe with construction adhesive material ; make certain you do n’t block the switch hole or the cord hole .
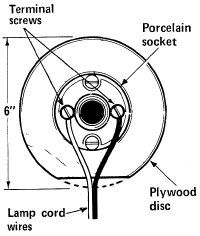
To make the top of the lamp , cut a narrow slice off one side of the other plyboard disc , to leave room for the telegram to enter the body of the lamp . tie a porcelain lamp socket to the center of the disc , screw it firm in . Then apply a beadwork of grammatical construction adhesive to the cut boundary of the disc , except for the slice - off boundary , and mark the platter into the crimped terminal of one elbow section of pipe , socket side out . Make certain the record is steadfastly anchor and place direct into the end of the pipe ; the bulb will project straight out from the socket into the 2nd elbow section , as illustrate above .
Let the building adhesive material dry , as directed by the maker . When the adhesive is juiceless , paint the inside of the lamp ’s bulb end . For a focused bedside light , use matte black spray key ; for more diffused twinkle , apply matte white . place the 2nd cubital joint section into post over the frizzle end of the first one , so that the socket gathering is roughly in the midriff of the two curve opus of pipe , with the bulb socket face out . Adjust the spell of tobacco pipe to the slant desired , and push them hard together .
Spread newsprint to protect your work area , and spread over the socket opening in the elbow assemblage with mask tape . Spray the interior of the assembled curved section with matte black or matte white paint , as desired . Cover the plywood disk and the entire inside airfoil of the tobacco pipe . Let the paint dry all , as directed by the producer ; if necessary , spray again for accomplished reportage and let the paint dry .
When the paint is whole dry on the elbow sections , get rid of the masking tape from the socket . Screw a light bulb into the socket and remark where the incandescent lamp lies inside the curve topper sections ; then remove it . Across the top of the stovepipe , above the unclouded bulb location , drill three 3/8 - inch golf hole to frivol away the heat of the bulb .
To get together the lamp , thread the end of a 12 - foot slice of lightweight lamp cord through the cord hole drill in the bottom straight incision , just above the plywood base . allow for about 8 to 9 foot of electric cord outside the pipe , connect a loose knot in the electric cord to anchor it against the drilled hole . The remain 3 to 4 invertebrate foot of cord , inside the lamp , will be used to electrify the lamp .
fetch the wire up the root piece of stovepipe and across to the drilled shift golf hole . At the peak where the cord passes the switching hole , carefully split the two insulated wires of the electric cord for a few inches . rationalize one of these wires , and utilise a wire stripper to slay about 1/2 inch of insularism from the two cut terminate ; do not swerve both wires . Connect the cut ends to the two screw terminal on the lamp switch . Insert the switch into the mess in the opera hat and secure it with the lock ringing provide .
When the switch has been wire in , finish the assembly of the lamp . Set the other neat piece of tube onto the base piece , uncrimped end down , and push it firmly to join the two opus securely . pluck the loose oddment of the wire up through the pipage .
cautiously separate the two insulated wire of the corduroy for about 6 in at the loose end . define the assembled bend of the confect cane onto the straight lamp nucleotide , rip the separate end of the cord up past the plyboard disk through the tailor - out area . With a wire striptease artist , remove about 1/2 inch of insularism from each wire , and connect the stripped ends to the screw terminals of the porcelain socket .
steadfastly push the curved part of the lamp onto the straight part , so that the scant opening and the switch are on the same side . To nail the lamp gathering , attach a agile - clamp plug to the free end of the lamp cord , as directed by the manufacturing business .
Finish the lamp with spray metal primer and then in high spirits - gloss spray enamel . Before picture , cut through your work surface with paper ; cover the lamp cord and the switch with masking mag tape and newspaper . Cover the bulb opening with mask magnetic tape , and put a piece of music of mag tape over the vent hole on the inside of the top piece of pipe . Apply a low-cal coat of ground and rent it dry completely . Apply two or three coating of high - glossiness spraying enamel , following the manufacturer ’s instructions , to get a quiet ending . rent the blusher dry out entirely ; then cautiously remove all mag tape and paper , and screw in a 40- , 75- , or 100 - watt light bulb . Let the reading begin !
If you do n’t postulate a whole new lamp , but would like to revitalize one you already have , confab the next pageboy for education on handle a lamp shade .
How to Cover a Lamp Shade
quicken a shabby or dim lamp shade – or create a tailor-make new one – with this shirred lamp tad slipcover . you may get just the expression you require when you choose any lightweight fabric you like .
Time:1/2 to 1 hourTo cover the lamp shade you have in mind , choose lightweight fabric that will decrease easily into flabby folds . In general , buy 1 curtilage of 44- or 45 - inch fabric ; if the shade is more than 15 inches high , add another 2 inch of textile for each extra in of height . Also buy 3 yards of medium - weight round flexible . If the lamp subtlety has fringe or other trim , get rid of it cautiously , without damage the specter . To get down , measure the tiptop of the shadowiness and add 3 inches . Cut two strips of textile to that mensuration across the width of the fabric . For example , if the ghost is 12 inches high , cut two 15 - inch airstrip across the width of the fabric . Place the strips of textile with the right side together at the selvedge , pin the selvage end together , and tailor-make the pin ends together on a sewing auto ; leave a 1/2 - inch seam allowance . Remove the pin and enter the lined pieces to form one long strip of cloth . Measure around the bottom of the lamp tint and multiply this circuit by 1 1/2 to come up the length needed for this strip of fabric . If the shade measures 50 inches around the bottom , for example , you ’ll want a strip about 75 inches long to incubate it . This is a minimum fullness ; if your textile is quite indulgent or thin , you may require to practice more . Measure and trim the long strip to the command length , cutting from both ends of the fabric to keep the bed evenly concentrate . When the strip is snip to the proper sizing , fold it in one-half at the seam , with the right sides together , and stitch the two loose remainder together with a 1/2 - column inch seam . plow under 1/2 column inch of fabric along each long , naked edge of the musical composition and press it down ; flex each fold up edge under again 1/2 column inch and press . stick the ahem in seat and stitch them all the way around , leaving a 1 - inch first step in each long hem . Backstitch at the commencement and the remainder of each hem . Cut a piece of unit of ammunition pliant to the same distance as the bottom circumference of the shade . Tie one closing of it to a bodkin or a large safety pin and enclose it into one of the hems through the 1 - inch porta in the hem . Pull the pliable by the bodkin or trap all the way around inside the ahem and out again , gathering the fabric onto the pliant as you go . marry the two close of the pliable in a straight knot and let it slip inside the ahem . Then hack another piece of elastic the circumference of the top of the shadowiness ; sneak in it into the other hem of the textile and tie the ends together the same agency .
To use your unexampled lamp shade screening , transfer the lamp shade from the lamp . Slip the cover over the lamp shade and correct the gather fabric equally all the way around . If the book binding is n’t snug enough , retie the elastic to make it tighter .
