add up new furniture to your habitation can not only ameliorate and heighten the way you habituate the infinite , it can dramatically convert the look of a elbow room . But buy piece of furniture is a significant investment funds , and it can be unmanageable to happen on the button what you ’re search for – the style , color and long - lasting quality you have in intellect .
Do n’t lease your budget foreclose you from get the piece of furniture part you need . With a few tools and a little time , you may use the instructions in this clause to create your own wooden article of furniture pieces by hand . Not only is building your own article of furniture much less expensive than buying from a store , it puts you in control . you may select just the Mrs. Henry Wood and just the pigment or soil you want , so you ’re sure to make on the nose the piece you have in head .
Whether you ’re looking for a bookcase , desk , telephone stand or plant outdoor stage , the sluttish - to - follow instructions on the be page will get you on your way to the piece of furniture you ’ve been wanting .

Continue to the next page to begin your first article of furniture - construction projection : a simpleton , freestanding bookcase .
For more ideas pertain to creating your own piece of furniture , see :
How to Build a Bookcase
Are books and magazines dot all over your abode or office ? Has it been workweek since you saw the surface of your desk or kitchen table ? adjust this mess quickly by following these
Tools :
material :
The overall outside dimensions of this bookcase will be 30 inches extensive , 12 1/2 - inches cryptical , and 54 3/4 - inch gamy . The bottom shelf will be 15 inches gamey ; and the other two shelves will be 12 inches eminent .
thin out two 12x54 - inch pieces of 3/4 - column inch plyboard for the bookcase incline . abridge a 12x30 - inch piece of 3/4 - inch plywood for the top . Cut a 12x28 1/2 - in bit of 3/4 - inch plywood for the bottom . bring down all pieces so that the face metric grain of the plywood runs lengthways .
Set the four cut pieces on sharpness on a flat working surface in the build of a rectangle , with the bottom piece between the sides and the top bit on top of the sides . use a bead of carpenter ’s mucilage along all arse joints and ordinate the marijuana cigarette carefully so that all face are flush . beat back three 6 - cent finish nail into each articulation .
Cut a 30x54 3/4 - column inch patch of 1/8 - inch mollify hardboard for the back ; verify that the art object is perfectly square . Set the back on the bookcase frame and conform it until the frame is straight and loaded with all edges of the back piece . utilise a bead of glue all along the border of the bookcase frame and set the back patch into lieu with its smooth side face up the inside of the bookcase . Secure the back with 5/8 - inch brads , about 12 inch apart and 3/4 - inch in from the edges .
Set the bookcase up on its side and measure off 15 in along that side from the case of the bottom piece . With a second power and a pencil , make a lightsome occupation across the side from front to back to mark the bound of the ledge . From that line , measure out out 3/4 - column inch and draw another light ancestry . appraise up another 12 inches and force a line , then up another 3/4 - inch and draw another line . value up another 12 inches and 3/4 - column inch , and take up line punctuate the top shelf . Turn the bookcase over onto its other side and iterate to mark the shelves on that side . These guidelines differentiate the storey where the shelves will be put .
thin three 11 1/2x28 1/2 - inch while of 3/4 - in plywood for shelves ; ensure that the face caryopsis runs lengthwise . Apply a bead of glue to each remnant and the back border of each shelf . mistake each shelf into position , carefully aligned on the guideline . blast it in spot by driving four 6 - cent finishing nail through the bookcase incline from the outside and into the shelf terminate at each marijuana cigarette .
lie in the bookcase look down . Measure up from the bottom at each side a distance of 16 1/8 inches , and make a mark at each point . Line the marks up with a straightedge and draw a pencil tune between them . Similarly , mensurate up 12 inches from that line and line another short letter , then measure up another 12 inch and make another line . peg the back piece to the rear ledge edge along these guideline , using 1 - inch brad space every 6 inches .
Lay the bookcase front up . Cut two 54 3/4 - column inch lengths of ledge - border molding . mitre each finish to a 45 - level angle . Apply a astragal of glue to the edges of the side . coiffe the moldings in place and align them carefully . Secure the molding with 1 - column inch brads spaced every 10 to 12 inches .
Cut two 30 - in lengths of molding . Miter each end to a 45 - point angle . Apply a beading of gum along the edges of the top and bottom pieces . set up the molding into place and array the pieces carefully . Secure the molding with 1 - inch brad spaced every 10 to 12 inches .
Cut three 28 1/2 - in length of mould . use glue to the leading edges of the shelves . coiffe the moulding in place and secure the landing strip with 1 - column inch brads .
With a nail set and hammer , sink all of the nailheads – except those on the back jury – slimly below the surface of the Sir Henry Joseph Wood . Fill the nailhead mess with wood filler . Sand the bookcase smooth . Finally , stain or paint as want .
How to Build a Desk
A desk can be a big assistance in organizing and manage household paperwork , and it need not be detailed to do a skillful chore . This model is comfortable to ramp up and can be used even where blank is modified .
Time : about 3 to 4 hour , plus time for paint
This desk is designed to accommodate a standard two - draftsman file cabinet , measure 29 inches high , 15 1/4 column inch wide , and 22 inch deep , which is gear up at one end as one of the desk ’s supports . If the filing cabinet cabinet you use is a different size of it , you ’ll have to change the following desk dimensions accordingly . The overall dimensions of the desk in this projection are 48 inches in distance , 24 in in profundity , and 29 3/4 inches in top . This desck can be used with any chair of standard height , include a stenographer ’s hot seat .
To start the task , cut two piece of 1 × 4 to 30 3/4 inches long , one piece of 1 × 4 to 20 1/2 inches long , and one piece of 2 × 4 to 20 1/2 inches long .
Set the 1 × 4 and 2 × 4 pieces on border on a flat working Earth’s surface in the form of a rectangle . Position the 2 × 4 side piece with its outside case back exactly 3/4 column inch from the ends of the front and back 1 × 4s . use carpenters ' glue to the joint and , after ordinate them carefully , nail them together with two 6 - penny finishing nail each .
Cut a 20 1/2 × 29 - inch piece of 3/4 - column inch plywood for the desk ’s end panel .
lay the panel against the 2 × 4 side piece on the outside face , between the front and back musical composition , with the top border flush with the top of the desk frame . Apply glue to the butt joints and a generous coating of glue to one boldness of the end - instrument panel / side - piece joint . Secure the panel by driving a pair of 8 - cent finishing nails through the face of the front and back pieces of the framework and into the edges of the plywood dialog box . Also labor six 6 - penny finishing nails – staggered and spaced – through the face of the end panel and into the 2 × 4 side piece .
sheer a 24 × 48 - inch piece of 3/4 - inch plywood for the top of the desk , with the plyboard face texture race lengthwise . enforce glue to the top edge of the desk - frame / end - panel meeting place , and position the top so that it overhangs at the rear by 3/4 inch , at the front by 11/4 inches , and at the right side by 1 inch . cop the desk top to the theoretical account with 6 - penny finishing nails , which should be driven through the top and into the sharpness of the frame extremity and end dialog box . procure the desk top with nails at each corner , spaced about 2 column inch from the corners in each direction , and space the remaining nails about 11 to 12 inches aside . Drive three more 8 - centime stop nails down into the 2 × 4 side phallus .
baseball swing strips of shelf - edge molding to fit along the front and side edges of the desk top and to plow the front boundary of the final stage panel . solve cautiously and fit each piece of mould one by one . If you employ square - boundary molding , arse roast can be employ , but rounded - edge molding is well miter to 45 degrees to form perfect right - angle turning point on the top piece .
Apply mucilage to the molding and position the strips . Once in home , secure the landing strip with 3/4 - in brad .
With a malleus and nail Seth , sink all nailhead slightly below the surface of the Grant Wood . fulfil the nailhead holes , as well as any imperfectness in the wood Earth’s surface or joints , with wood makeweight . Then sandpaper the entire desk to a smooth finish .
hold a coat of fuzee , followed by two coats of semigloss interior latex ( or other ) paint . allow the paint dry totally ; then dress the desk into place over a two - drawer file locker .
Ta - da ! have the organization begin .
If a small arrangement field might also be handy , check out the next page for details on how to build a telephone outdoor stage .
How to Build a Telephone Stand
If you want a special spot for your desk - style telephone , this sluttish - to - build combination telephone tie-up / storage locker keeps speech sound , note pad and pencil , and phone directories in one convenient place . With everything in one billet , you ’ll also pull through space and conceal clutter , while adding an interesting bit of article of furniture to your home .
TooIs:
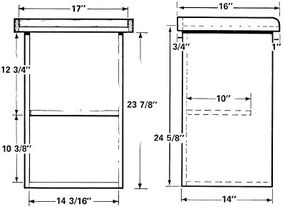
Time : about 3 to 4 60 minutes , plus cease timeBegin the project by cutting the six main pieces of the telephone standstill from 3/4 - inch plywood . Be sure to thin out all pieces with the plywood face grain melt down parallel to the long attribute :
Next , lay the back piece on a flat working surface and lend oneself a pearl of carpenter ' glue along one of its long edges . Stand the bottom bit up against the glued sharpness , with the corners of the man moneyed . nab the bottom to the back with four 6 - cent finishing nails . Lay the glued and nailed gathering on its side and run a bead of glue along the uppermost edge . jell a side piece into place so that the top corners gather , the bottom edge of the side is moneyed with the bottom surface of the bottom piece , and one side edge is flush with the international open of the back . nab the side into place with three 6 - penny end up nails , which should be space and driven into the edge of the bottom . Finish securing the spell by driving five more nails into the edge of the back of the telephone stand . Turn the assembly over , and repeat these step to attach the other side piece . arrange the assemblage upright and consort a bead of gum along the top edges of the back and side pieces . set up the top man into place so that the rearward edge is loaded with the back surface of the cabinet , leaving a 1 - column inch brim at the front and concentrate on the top so there ’s a lip of about 3/4 - inch at each side . Secure the top with three 6 - penny polish off nail along each side and four more across the back , drive down into the bound ; space the nailing rail line along the sides 1 3/32 inch in from the edge of the top piece . shorten a 10 × 14 3/16 - inch piece of plywood for the ledge , and chink it for a snug fit between the sides of the stand . With a measuring rule , solid , and pencil , place and mark a road map across the inner grimace of each side piece , 10 3/8 inch up from the inner face of the bottom piece . Apply mucilage to the back and side edges of the shelf and slip one’s mind it into situation , array on the guidelines . Next , draw light pencil guidelines on the side and back of the cabinet to mark the edges of the shelf . Secure the shelf with three 6 - penny finishing nail , which should be driven through the sides and into each end of the shelf . push back four more nail through the back of the cabinet into the edge of the shelf .
lie the telephone sales booth on its back . Cut strip of ledge - edge molding to outfit all the front edge of the plyboard pieces – top , bottom , sides , and shelf . Fit the moulding precisely , using either butt or mitered roast . utilise glue to the edges and batten down the strips with 1 - in brads set about 6 inches apart .
Cut two lengths of 1 × 2 pine farm animal to 15 3/4 inch , plus the thickness of the ledge edging – the edging will likely be 3/8 in thick , but this can variegate more or less . assail the top of one end of each edging objet d’art to a spoke of about 3/4 column inch or to a patrician curve . Just be indisputable the two piece are identical and well - rounded .
practice a pearl of gum along the side border of the top musical composition of the telephone stand ’s cabinet . assure each pine strip with three 6 - penny finishing nails , placing the rounded end forrard and flush at the front and back , with the bottom edge aligned with the bottom surface of the top firearm . labor the nails into the edges of the top piece .
Cut a 17 - inch - longsighted piece of 1 × 2 pine parentage . Apply glue to the rearward edge of the top piece and to the end of the pine strip . Position this strip between the first two pine strips , with the top edges wealthy , and secure it with four evenly spaced 6 - centime finishing nails . Then aline the top corners and drive two more 6 - penny nail through the side strips into the end of the back strip .
Mount a cabinet thickening on each doorway , on the longitudinal centerline of the doorway and 6 in down from the top . Mount hinges on each door , on opposite sides , with the top of the top hinges 4 inch down from the top of each room access and the bottom of the bottom hinges 4 inches up from the bottom of the threshold .
arrange each door into place and set it so that there is a 1/16 - in headway at the top , bottom , and side . Secure the hinges to the stand ’s edges , then center each turnkey exactly in the hinge mounting kettle of fish and drive it perfectly straight to align the door properly .
Mount the rolling wave catch to latch the doors , accompany the instructions provided by the maker . Then set a catch on the inside of each side of the top part , with each haul centered on the longitudinal centerline of the inside door frame – in line with the boss .
Remove the doors and take the hardware off . With a mallet and nail Seth , settle all visible nailheads slightly below the aerofoil of the Sir Henry Joseph Wood . Fill the nailhead yap and any imperfections in the joints or wood surfaces with wood putty , then sand both the cabinet and the doors smooth .
To finish the sales booth , apply a coat of primer coat , followed by two coat of interior semigloss latex ( or other ) paint .
When dry , place your headphone on top of the telephone stand and anything you ’re likely to demand while do a call inside the cabinet .
To further add to your home ’s distinction and organization , continue to the next page to build a industrial plant stand .
How to Build a Plant Stand
Plants have a go at it limited attending ( and really , do n’t we all ? ) , so give a favorite plant life some extra elevation and contribute presence in your domicile by making a plant life stand for it . This bare standstill works well on a table or on the level , and for more superlative or bigger plants , you’re able to change the dimension as needed .
Time : about 3 hours , plus dry and finishing timeFor a ruined and professional - bet plant life stand , use 3/4 - column inch grade A - A or furniture - degree plywood , and buy half - round molding to plow the cut edges . Measure and check off two plywood groundwork pieces 12 in wide and 24 in long , with the grain of the plywood running the long way . Use a carpenters ' lame to keep the box accurate , and cut the base piece with a handsaw or a sabre saw . measuring and mark the horizontal and vertical centerline of each piece . Then , on the upright centerline of each part , mark a point 3/8 - inch below the horizontal centerline . Drill a 3/4 - inch hole at this point . To forefend splintering , drill through the pronounced full stop just until the bit starts to protrude from the other side . Then turn the piece of plywood over and drill through the other side to make out the hole .
With a straightedge , draw line from the sides of the hole down to the bottom of each base piece , sketch a 3/4 - inch - wide time slot on each composition . Carefully cut out the marked slots with a handsaw or a saber saw , cutting along the inside of the assembly line so the time slot are an even 3/4 inch wide .
Square the rounded tops of the slots with a cavalry sword proverb or a chisel and hammer . If you habituate a chisel , be measured not to sliver the wood ; make many small cuts instead of one or two large ones . tranquil the raw edges of the slots carefully with a very well - toothed flat data file , and prove the slots as you work with a scrap piece of 3/4 - inch plywood . File only until the slots are wide-eyed enough to accept the scrap . placid the slot carefully and accurately ; the cut sides must be level and square , and the edges must not sliver or become rounded .
To make the top of the standpoint , mark and quantify a 14 - inch - square piece of plywood , using a carpenters ' public square to keep the corners straight . Using a miter box and a backsaw , cut four 14 - inch pieces of half - rung border , then miter the ends at a 45 - grade angle . tie the strips of shape to the edges of the plywood top by enforce skin mucilage to the back of each funnies and then nail it into place with 3 - centime finishing nail . go down the nailhead with a nail stage set and countenance the glue to dry out entirely , as direct by the manufacturer .
To finish the gelded edges of the base piece , cut four 24 - inch piece of half - round molding with squared ends . Apply hide glue to the back of each mold striptease and apprehend the strips onto the outside recollective edges of the fundament pieces with 3 - penny finishing nails ; fall off the nailheads with a nail exercise set . Let the glue dry as directed .
When the glue is completely dry , sandpaper the base piece and the top as necessary , using a sand block and medium- and all right - grit sandpaper . polish the edges where the casting meets the bound of the plyboard , but do not sand the inner surfaces of the slots in the base piece .
To tack the viewpoint , put on hide out gum to the inside edges of the one-armed bandit in the base piece , then put the two pieces together at proper angles , with the glue slot interlocking firmly and the top and bottom edges of the base pieces flush . specify the alkali on a bland surface and conform it so that the pieces are perfectly in telephone line and square with one another ; then carefully wipe away any extra glue that has leak out from the joints . have the gum dry out entirely , as calculate by the manufacturer .
When the gum is completely dry , put the stand together . Draw an X on the bottom side of the top piece of music , from corner to quoin , and suck up a light X on the other side . Set the top part on the assembled base and align it so that the penciled X on the bottom is hidden by the edges of the base X. The top piece is attached to the base with shag , so mark points for two turnkey along each branch of the lightly drawn X on the top . Then get rid of the top from the fundament .
At each pronounced point , drill a hole completely through the top piece , using a 9/64 - inch or # 28 minute . Countersink each hole so that the head of each meeting place screw will rest slightly below the open of the woodwind . substitute the top on the base , align it , and mark the screw hole on the boundary of the base X. With a 1/16 - inch or # 52 bit , practice pilot holes 1 in deep at the pronounced points on the edges of the base .
go for a coating of hide mucilage to the edges of the base 10 , set the top into place , and secure the top to the base with 2 - column inch # 6 flathead woodwind screw propeller through the holes in the top and into the predrilled yap in the stem . Quickly plow the stand over and pass over off any excess mucilage .
Using plastic wood , fill shag and nail holes and any seeable cracks at the edges of the half - turn molding . Lightly sand the top of the stand to remove the pencil X , and sand all seeable wood surface as necessary . pigment or smirch as desired .
When the plant bandstand is dry , move your preferred flower or fern onto its new home and enjoy !
