Any kitchen can profit from a little superfluous aid to detail to something that ’s not quite right – a run off space , awkward access to a frequently used cupboard or shelf , a worn - out countertop in an otherwise beautiful kitchen . Taking care of these details can change by reversal into generative and interesting projects , and can make your kitchen a more pleasant station to work and spend fourth dimension .
you could learn how to do it yourself in this article . pick up how to laminate a countertop , create a larder , install a peal - out ledge , and build a spice rack .
We ’ll get started in the next plane section by hear how to laminate a countertop .
For more information on making improvements to your kitchen, try the following links:
How to Laminate a Countertop
spread over a kitchen counter or a conceit with plastic laminate is painstaking , but not really demand . With care and patience , you may lie a plastic laminate tack on any blank , well - supported 3/4 - inch plyboard or particle board base .
Tools:
Materials:
Time : About 4 to 6 hours for a plain countertop
Tips on Buying Materials
Buy a sheet of fictile laminate big enough to cover the countertop totally , with a thin overhang on all slope ; buy precut laminate edge strips to finish up the sides of the countertop . Choose a nonflammable , water supply - solvent contact cementum , or use the adhesive recommended by the laminate manufacturer . lease a router with an edge - lop bit for plastic laminate ; if you do n’t have one , charter a sabre or circular saw with a fine - toothed carbide - bung blade . At least 48 hour ahead of metre , set the plastic laminate in the way where it will be used to bring it to the correct temperature and humidity .
Preparing the Counter Surface
Prepare the rejoinder surface carefully . fall off any protruding nail with a pounding and a nail set ; fulfill crack and cover railheads with plastic wood or wood putty . Sand the surface with a rap drum sander and a average - gumption sanding belt to smooth and level it thoroughly . If you ’re covering an old countertop , take out the old finish completely ; sand down to clean , bare Sir Henry Wood to provide a adept base for the laminate . Wipe off all junk and sanding debris and then go over the entire counter surface with a tack cloth .
Measuring and Cutting the Laminate
Carefully measure and nock the sheet of plastic laminate to the approximate sizing of the countertop ; it should be large enough to beetle the return 1/8 to 1/4 inch on all position . apply a carpenter ' square and a straightedge to make certain the marks are precise . Plastic laminates are very brickly ; wear safety goggles to garnish the laminate sheet . Support the laminate sheet firmly as secretive to the cutting seam as possible ; hold it down firmly to foreclose smashing and chipping . Carefully and slowly cut the sail as mark with a saber saw , a circular saw , or a table saw with a all right - toothed carbide - tipped steel . Cut the laminate face down with a saber adage or circular saw , face up with a board saw .
Applying the Edge Strips
Before laying the top sheet , cover the edges of the countertop with precut laminate edge strips , carefully butt together at the corners . bill and edit the front and side edge strips to the correct length . enforce contact cement to the back of each sharpness strip and to the edges of the countertop as directed by the manufacturer , using a nylon paintbrush or a saw-toothed broadcaster . Let the adhesive cure and examination for bonding forwardness as head .
cautiously press each edge flight strip into place over the cemented counter edge , first side strip and then front . The bottom of the strip should be affluent with the bottom of the boundary ; let the top of the border strip mystify up above the countertop . You must coordinate the edge strip utterly as you press it down ; once it makes contact with the cemented edge , it ca n’t be moved . Butt the strips steadfastly together at the corners of the sideboard , front strip over English . After apply each strip , go over it firmly with a roller or a rolling oarlock to bond it firmly to the counter edge .
wear upon safety goggles , trim the protruding upper edges of the boundary strips with a router and an edge - trimming bit for pliant laminates . With a belt sander and a medium - fine - grit sanding belt , sandpaper the track edges cautiously to impart them exactly loaded with the counter surface . If the edge strip sticks up only a little , router trimming is unnecessary ; use the belt sander to work the edge loaded . Use a fine - toothed flat file to smooth the edge in tight spots .
Applying the Countertop Surface
prepare the laminate sheet carefully into place on the countertop ; verify you do n’t disarrange the paper . Align the laminate sheet precisely on the countertop , butted firm against the paries behind the riposte , if any , and overhanging the counter somewhat on all open side . keep the laminate precisely in position , carefully slip out the brown paper or wax paper strips along the counter , pressing the laminate to bond it in position as you go ; be heedful not to get air bubbles form between the laminate and the countertop . If the countertop is a prospicient one , you ’ll require an assistant to hold the laminate in blank space as you remove the theme .
To adhere the sheet of paper of laminate firmly and evenly in place , go over the entire rejoinder control surface with a roller or a trilled personal identification number . Be sure to press out any air bubbles allow for between the laminate and the countertop .
To complete the countertop , carefully dress off the overhanging laminate edges with a router and an bound - crop chip for plastic laminates ; wear safety goggles as you work . apply a fine - toothed flat file to trim tight billet . Trim the boundary of the top laminate sheet precisely wealthy with the extraneous look of the sharpness strip . Finally , bevel the cut edge of the top bed sheet slightly with a fine - toothed flat file .
Cleaning Up
absent extra cementum from the complete counter with water or the cementum resolution ; expend water system or dissolving agent slenderly so it does n’t seep into the joints of the countertop . grate off great blobs of cementum with a flake of laminate ; do not habituate a metal scraper . Clean the countertop according to the manufacturer ’s instructions .
If you need to know how to make space in your kitchen , the next subdivision on how to build a pantry behind a door may be just what you ’re reckon for .
How to Build a Pantry Behind a Door
Kitchen storage blank is always at a premium , but there is possible computer memory behind every closed door – build this simple behind - the - door pantry to take advantage of it .
Time:4 to 6 time of day , plus terminate time
The attribute used here are for a pantry whole 211/2 inch wide and 60 inches high , with four privileged shelves . you could adjust these figures for a unit to fit a wide or narrow-minded door , for any height desire . Keep the outside width of the unit at least 7 inches narrow than the threshold , to allow for the doorhandle and provide the necessary headroom when the doorway is opened and closed .
Building the Pantry Frame
construct the frame for the pantry of 1 x 4 pine bloodline . measuring stick and mark two pieces of 1 x 4 60 inches long and six pieces 20 inches long ; use a carpenters ' lame to keep the final stage even . veer the piece of 1 x 4 with a handsaw or a power sawing machine .
Put together a rectangular boxful from the two 60 - inch piece and two of the 20 - inch slice , with the long side butted over the ends of the unretentive sides at the corners . At each niche , drill two hole for 1 - inch flathead Natalie Wood screws through the face of the long side composition ; countersink the turnkey hole so that the screw mind will lie flush with the surface of the wood . Set the side piece into attitude over the edge of the crossbreed piece , punctuate the nooky holes , and bore holes into the edge of the cross piece . implement a bead of carpenters ' mucilage to the cut edge of the cross piece and to the destruction of the side piece of music , fall in the while , and secure the corner with two 1 - inch flathead Sir Henry Joseph Wood screws driven through the drilled hole .
Making the Shelves
make out retaining strip and ledge support from 1 x 2 pine tree line of descent . Measure , target , and cut six pieces of 1 x 2 211/2 column inch long to hold stored goodness on the shelves ; measure and cut eight composition of 1 x 2 31/2 inches long for shelf supports . Plan the spacing for the pantry shelf , with improbable thing on the bottom and four shelves spaced as desired inside the material body . Measure the things you plan to store in the unit to determine the want ledge spacing – a secure spacing might allow 10 inch between the top of the frame and the first shelf , 10 inches from first to second and second to third , 12 inches from third to fourth , and 18 inch from the fourth shelf to the bottom of the skeletal system . Or , if you do n’t ask such widely spaced shelf , add a shelf to this canonic unit .
To make the shelves , assess down from the top of the frame along each side spell and score the ledge positions – ensure you quantify exactly the same on each side . The pronounced shelf positions do not allow for the thickness of the forest ; mensurate 3/8 inch down from each marked line to mark the tops of the shelf support pieces . Set a 31/2 - in 1 x 2 ledge accompaniment piece at each marked ledge level , on each 1 x 4 side piece . To batten the shelf supports , use 7 - centime finishing nails and carpenter ' mucilage . Apply a pearl of carpenters ' glue to the face of each shelf support and to the face of the side physique piece , as score . Set the support flat against the build , with its top edge on the button flush with the mark keep line of work , and smash through the extraneous boldness of the side piece into the face of the 1 x 2 funding wall bracket . Drive two 7 - centime terminate nails into each shelf support .
Use the remaining pieces of 20 - in 1 x 4 to make the pantry ’s four ledge . For each ledge , use a bead of carpenters ' glue to the bottom edges of the board ’s track stop , and to the top edge of the two ledge brackets that will support it . set up the ledge into place across the two brackets , and check that it ’s unbent and flush against the supports . Secure each end with two 7 - penny finishing nails from the top of the shelf into the bread and butter and two nails from the outside of the frame into the shelf boundary . Stagger the nails so they do n’t hit against each other .
Finishing the Pantry
To complete the ledge unit , nail 1 x 2 retaining comic strip across the front of the whole , one airstrip 2 inches above each ledge . assure the retaining strip with two 7 - centime polish off nail ride through each goal . To keep grandiloquent things in place on the bottom of the unit , collar two keep back strips across the open area , placed as want .
To complete the buttery , sand all rough spots and edges with medium - and then fine - grit sandpaper . key as desired .
Finally , give ear the pantry unit on the door , pore on the doorway ’s breadth and put conveniently on its height . expend three 2 - column inch angle iron across the top of the whole and three across the bottom ; tag the screwing holes , and Mandrillus leucophaeus , and set . secure the irons to the room access with 1 - column inch flathead wood roll in the hay . If the door is a vacuous - core type , be careful to attach the unit to the firm block inside the door – tap on the room access to locate the blocking . Hollow - heart doors are lug around the edge , and sometimes also have other block . Mark and exercise the mount up holes on the top and bottom piece of the larder social unit , set the building block into lieu , and secure it with screws force back into the drilled holes .
We have more storage solutions for your kitchen . On the next pageboy , you will learn how to make a bowl - out storage shelf .
How to Build a Roll-Out Storage Shelf
For more convenient memory access to pan or small gadget , build up this handy scroll - out ledge unit into a base cabinet .
Tools:
metre : About 4 to 6 hr , plus land up time
Making the Shelf
To fit a standard 18 x 24 - in base console , measure and cut a 131/4 x 211/4 - inch piece of 3/4 - inch gradation A - B-complex vitamin internal plywood for the roll - out shelf . Cut a 131/4 - inch piece of 1 x 2 pine stock . utilise a beadwork of carpenters ' gum to one 131/4 - inch edge of the shelf , and set the 2 - inch face of the 1 x 2 airstrip against the border , flush at the bottom and at each end . Secure the landing strip with four 4 - penny finishing nail .
make out two 22 - inch pieces of 1 x 2 . Apply gum to the side edge of the ledge . dress the two strips against the edges , moneyed at the bottom and at each end , and secure each strip with six 4 - penny stop nails .
Cut a 143/4 - inch objet d’art of 1 x 3 pine stock . Turn the shelf assembly upside down , and apply mucilage to the stay 131/4 - inch edge of the ledge . Set the 1 x 3 strip against the edge so that the end are moneyed , the top sharpness are flush , and the bottom border protrudes 1 inch below the bottom surface of the ledge .
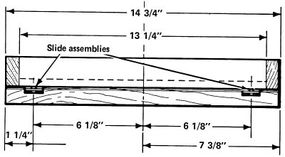
Attaching the Slide Assembly to the New Shelf
With the shelf still upside down , guide two line across the bottom surface from front to back , each 11/4 column inch in from the side . Center the upper half of a received 22 - inch - foresighted draftsman sliding board fabrication on each guideline , and attach the slideway with the screws offer . Installation pedagogy for draftsman glide vary from blade to stain ; follow the maker ’s specific installation instructions .
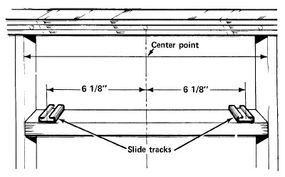
Attaching the Slide Assembly to the Cabinet
fix and set the front - to - back centerline of the storage locker ’s existing ledge , by measure the exact distance between the sides of the door scuttle and marking the midway point . Measure 61/8 in to both right and left of the center line mark , along the front edge of the shelf . With a carpenter ' square toes and a pencil , draw front - to - back line at right angle to the shelf edge at each of these points . Center the bottom one-half of one drawer slide fabrication on each of these guideline , and attach the slides with the screw provided .
Finishing the Shelf
Mesh the slide and wave the new ledge into seat in the storage locker , hold in for ease of surgical procedure ; there should be 1/8 inch clearance between the side of the door curtain raising and the shelf side , at each side . The locker door must be able to open far enough so that it leaves the cabinet opening all clear and does not obstruct the passing of the novel shelf . Make any glide adjustments necessary for quiet cognitive process .
Remove the axial rotation - out ledge and remove the playground slide one-half . With a nail set and hammering , sink the nailheads slightly below the surface of the wood . Fill the nail cakehole and any surface or joint imperfection with wood filler , and sandpaper the ledge tranquil .
To finish the shelf , apply a coat of primer and then two coat of semigloss interior latex paint , or whatever finish you care . allow the finishing dry completely between coat . Apply at least one coat of ending to the bottom of the ledge to seal off the wood .
When the finish is completely dry , replace the lantern slide halves and set up the ledge in the console .
On our final page , we will harness a familiar kitchen problem – spiciness wrack .
How to Build a Spice Rack
Even if you search long and tough , you may never be able to find a spicery rack to become you . This wrack is both easy to make and inexpensive .
Tools:
Time:1 to 11/2 hours , plus finishing time
Plan the spice rack to meet your container – stock spice cans are 21/2 inch recondite , and an 18 - inch rack holds 12 received cans . run along up the can or bottles you need to exhibit and assess them for the length , top , and depth the stand should be . Use 3/8 - inch grade A - B or furniture - grade plywood for a professional conclusion .
Cutting the Wood
To make the stand , use your measured property . Measure and mark the bottom panel on a piece of plywood , with the grain running the length of the ledge ; use a carpenter ' second power and a straightedge to keep your marks even . Cut the control panel out carefully with a carpenter’s saw or a cavalry sword adage . Measure and notice the two side pieces of the rack , just as broad as the bottom piece and high enough to lodge the spice container , either square or orthogonal . Cut the side pieces cautiously , making sure that their corners are square and that the two musical composition are on the button alike .
Drill a 1/4 - inch golf hole at one corner of one of the side pieces , evenly spaced from the two sides of the quoin . Set this piece on top of the other side part and utilize it as a templet to mark a matching hole . Carefully drill a 1/4 - column inch hole through the 2d side piece so that it exactly matches the first one . The corner with the drilled holes are the top front corners of the side bit .
criterion and mark a plyboard back gore 1/4 in longer than the bottom piece and 3 to 5 in higher than the side pieces ; reduce it out carefully . With the back dialog box laid flat , butt the back boundary of one side piece against one side of the back panel , with the bottom boundary of the side while flush with the bottom edge of the back . Carefully outline the back edge of the side composition on the back panel ; this outlined expanse will be cut out so that the side bit fits swimmingly into the side of the back piece . Repeat this procedure to outline the other side opus on the back . Then , being thrifty to cut within the retrace scheme , edit out out the marked corner of the back piece . Finally , criterion and cut a slice of 1/4 - in dowel to the precise distance of the untrimmed top of the back piece .
Assembling the Spice Rack
To tack the spicery rack , put on hide glue to the cutout edge , on one notch side of the back dialog box . Fit a side piece into the snick , with the drilled trap at the opposite top recession and the edges of the side piece flush with the back boldness and bottom sharpness of the back panel . plug the side piece with several 1 - column inch brad driven through the side and into the edge of the back instrument panel ; use a nail set to fall off the headland of the brads below the airfoil of the wood .
go for a drop or two of pelt mucilage around one end of the dowel , on the sour airfoil and not on the track final stage . Insert the glued last of the dowel into the hole in the side piece , push it from the privileged out , so that the destruction of the dowel is flush with the outside face of the side bit . Apply a drop or two of hide glue to the other death of the dowel and insert it into the drilled maw in the unattached side piece , from the inner face out . Then , holding the dowel pin in station , quickly glue and nail the 2nd side opus into topographic point . slump the nailhead with a nail set .
Apply hide mucilage sparingly to three thin edges of the bottom panel and slip it into place , butted firmly between the side opus and against the back of the rack . Nail the bottom small-arm firmly into station with brads driven through the back into the edges of the side piece and through the side pieces into the ends of the bottom piece .
Completing the Spice Rack
To complete the wrack , seize small plaque hangers to the upper rear bound of the back with the screws provided . Fill nail hole and imperfections with plastic wood , and sandpaper the rack as necessary with medium- and fine - grit sandpaper . smirch or paint the rack as desired .
