Whether you plan to use your terrace to toy with a crowd or to relax by yourself on a quick summer evening , you ’ll demand some furniture . However , patio furniture can be quite expensive – which is a good reason to conceive build up it yourself .
In this article , we ’ll show you how to work up terrace piece of furniture that is just as stalwart , attractive , and comfortable as the pricey article of furniture you ’ll find at a home melioration memory board . We ’ll give you well-fixed - to - understand , step - by - footstep instructions for build a picnic board with judiciary , patio bench , and an umbrella mesa . Continue to the next page for a detailed list of the tools and materials you ’ll necessitate to take up your patio - furnishing task .
For more information on patios and patio furniture, try the following links:
How to Build a Picnic Table and Benches
you’re able to build a sturdy and good - appear picnic table for about half the price of ready - made – a project well worth your time , in saving and enjoyment . Here ’s what you ’ll need .
Tools : measuring normal , pencil , carpenter ' square , handsaw orpower saw , C - clamps;power drillwith 3/8- , 7/32- , 7/64- , and 1/4 - column inch bits ; adjustable pull , hammering , large screwdriver , block plane , belt sander or sanding blockage .
Materials:2 × 6 and 2 × 4 sequoia stock ; 3/8 × 5 1/2 - in ( for board ) or 1/4 × 5 1/2 - column inch ( for benches ) carriage bolt , flat washer , and locknut ; scrap board , 10 - penny plebeian nails , masking tape , 5 1/2 - inch # 12 × 3 flathead plaque wood screws , coarse- , medium- , and ok - grit sanding belts or emery paper .
Time : about 4 to 6 hours for the table ; about 2 hr per bench .
The tabular array . Make the picnic table with redwood 2 × 6 and 2 × 4 stock , cut to a stock size . For the leg assemblage at each end of the table , measure and note two 2 × 6 ’s to a length of 28 1/2 inches , using a carpenters ' second power to make certain the ends are even . Cut the 2 × 6 ’s as note with a handsaw or a mightiness saw . standard and mark four 2 × 4 ’s to a length of 36 in ; cut them as marked . reprize to burn two 2 × 6 ’s and four 2 × 4 ’s for the other peg assembly .
To put each leg assembly together , lay two 2 × 4 ’s flat on a flat workplace control surface , parallel to each other and about 15 inches apart . Over these hybridization pieces , at right angles and aim to lie moneyed with the 2 × 4 end , set two 2 × 6 ’s for the two branch at that conclusion of the table , forming a square toes - overstep A shape . Set two more 2 × 4 ’s across the 2 × 6 legs , exactly over the first twosome of 2 × 4 ’s , to sandwich the wooden leg between two sets of braces . Using a carpenter ' square , aline and square up the assembly cautiously , and clamp it firmly together with C - clamps .
At each joint , practise a diagonal twain of 3/8 - inch hole through all three boards . Insert a 3/8 × 5 1/2 - inch pram bolt through each hole , place a washer and a safety nut on each bolt of lightning , and constrain the bolts with an adjustable wrench . Remove the C - clamps .
Repeat the procedure to build the second leg assembly , gain certain the bottom cross braces are position at precisely the same height as the bottom braces on the first set of leg .
Next , install a 2 × 6 stretcher between the two peg assemblage . Measure , St. Mark , and cut a musical composition of 2 × 6 to a distance of 68 inch . At each ending of the board , mark the lengthwise centerline of the control panel ’s breadth . On each stage assembly , mark the halfway stage of each remote bottom 2 × 4 cross piece .
Prop a ramification fabrication upright , and position one remnant of the 2 × 6 over the low hybrid pieces , with the end of the 2 × 6 moneyed with the external face of the hybridizing man . Align the revolve around marks and clamp the gathering together firmly . At each ending of the capstone , drill two 3/8 - inch fix through the stretcher and through each of the two cross pieces so that there are four pickle in each end of the copestone . Insert a 3/8 × 5 1/2 - in carriage bolt through each muddle to adjudge the coping stone to the 2 × 4 ; place a washer and a locknut on the end of each deadbolt . Tighten the bolts with an adjustable wrench and remove the clamps . Maneuver the second wooden leg assembly into position at the opposite end of the coping stone , and seize the stretcher the same elbow room to the bottom hybrid pieces .
Square up the leg assembly and coordinate them decently with one another ; to keep them in position temporarily , arrest a bit of scrap board across each side with 10 - penny common nails , close to the top of the stage assemblies . leave alone the nails sticking out a piddling so they ’ll be comfortable to remove .
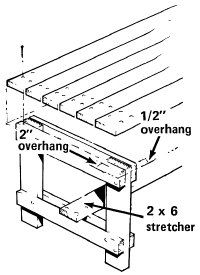
To make the tabletop , cut seven pieces of 2 × 6 to a length of 72 inches . ready the 2 × 6 ’s across the ramification assemblies , overhang the legs by 2 in at each ending of the table , with the ends of the boards exactly affluent on both closing . On each end of each board , score the point where the instrument panel lies over the centerlines of the two top cross pieces , so you ’ll have it off where to bore holes for the assembly screw . Then dispatch the 2 × 6 ’s for individual attachment .
Set the first 2 × 6 across the leg assemblies , overhang the legs at each end about 2 column inch and with its tenacious edge extending about 1/2 inch past the exterior of the leg assembly . Align the board carefully , flat across the leg assemblies , and clamp it into place or hold it firmly . At each marked line where the end of the board lie above a hybrid spell , drill two 7/64 - inch holes through the plank into the cross patch below it , to a deepness of about 2 1/2 inch ; wrap a scrap of masking tape measure around the Mandrillus leucophaeus bit to check off the proper depth point . Change to a 7/32 - inch bit and redrill the hollow to a depth of 1 1/2 inch . Each end of the board should have four hole in it , two through each cross piece . To fasten the 2 × 6 in place , drive a 5 1/2 - inch # 12 × 3 flathead brass Sir Henry Wood piece of ass into each of the eight predrilled holes , setting the screw until the heads are just flush with the control surface .
To complete the table , set the remaining six planks across the leg assembly and line up them for uniform space between planks , with the goal exactly wealthy and the last board overhanging the branch assembly about 1/2 column inch . Drill and screw down each plank successively .
If desired , use a block planing machine to slightly bevel all the expose corners and edge of the table ; slightly labialise all scupper edges with a knock smoother and coarse- , medium- , and fine - grit belts . Retighten all the bolts a scrap . Sand off any approximate spots with a belt sander , using first a coarse - backbone belt and then medium- and okay - gumption belts ; or sand by hand with a closure . provide the board bare to weather naturally .
The work bench . For each bench , measure and rationalize four pieces of 2 × 4 to a duration of 17 1/2 column inch , to make the bench legs . For the cross braces , touchstone and reduce eight pieces of 2 × 4 to a length of 10 1/2 column inch . expend a carpenters ' second power to check that your cuts are even . Put the leg assemblies together the same way the picnic tabular array is gather ; clamp the office together , drill the hollow through the legs and the couple , and bolt the braces to the pegleg . Use 1/4 × 5 1/2 - inch carriage bolts , flat washers , and locknuts ; constrain the testicle with an adjustable wrench . Then remove the clamps .
Measure and cut a piece of 2 × 4 to a 48 - in length for the bench stretcher . Mark the center of the dining table ’s width at each close , and distinguish the center point of the extraneous bottom cross patch on each ramification assembly . Prop the 2 × 4 stretcher flat across the low cross firearm of the ramification assembly , with the stretcher ends flush with the outside faces of the hybridisation pieces , and clamp it in station . Drill two 1/4 - inch holes through the stretcher and each of the two cross pieces at each remnant , so that each end of the stretcher has four holes in it . absquatulate the stretcher into place with 1/4 × 5 1/2 - inch stroller bolts , flat washers , and locknuts ; tighten the bolts with an adjustable wrench and then remove the clamps .
Straighten , straight , and line up the ramification assembly , and nail a scrap firearm of wood between them if necessary to hold them in position . Measure and cut two 2 × 6 ’s to a 72 - inch duration ; set them across the pegleg assemblies and adjust them , with a 1/2 - column inch gap between the two boards . Clamp the board to the leg assemblies .
At each end of each 2 × 6 , drill four 7/64 - in gob to a depth of about 3 inches , through the 2 × 6 and down into the upper crossbreeding man of the leg assemblies . Redrill the gob to a depth of 1 1/2 inches with a 7/32 - in drill . Drive a 5 1/2 - in # 12 × 3 flathead brass wood screw into each predrilled hole to fasten the judiciary - top plank ; set the screws so the head are just flush with the surface .
last , if desire , chamfer the let on edges of the bench slightly with a auction block plane , as above . round off all disclose edges somewhat with a belt sander , using successively finer - grit sanding whang ; or grit by hired hand with a engine block . leave behind the workbench bare .
On the next page , read how to make a maintenance - free terrace workbench that can be disassembled for soft storehouse over the winter .
How to Build a Patio Bench
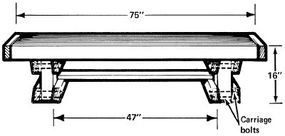
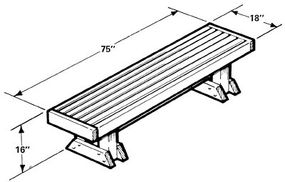
This patio bench is just right for prosperous outside seating area . The sequoia is solid and maintenance - detached ; the judiciary can be dismantle for winter storage . Here ’s what you ’ll demand .
Tools : assess dominion , pencil , carpenters ' square , hand saw or force saw , 30/60 - degree Triangulum or protractor , ascorbic acid - clinch , power drillwith 3/8 - in bit and bit extension , adjustable pull , cock , nail circle , block plane , belt sander or sand block .
Materials:4 × 4 and 2 × 4 sequoia stock ; 3/8 × 7 - inch and 3/8 × 5 - column inch carriage bolt of lightning , two-dimensional washer , and locknuts ; 6 - penny and 16 - penny brass or galvanized finishing nails ; coarse- , medium- , and o.k. - grit sanding belts or emery paper .
Time : about 4 hours .
grease one’s palms redwood stock and fastening ironware as specified above . To make the legs of the judiciary , measure and mark four pieces of 4 × 4 redwood to a duration of 12 1/2 inches ; use a carpenter ' square toes to keep the remainder even . Cut the legs as measured with a handsaw or a power saw . mensuration , mark , and cut eight 2 × 4 ’s for the leg cross braces . With a 30/60 - degree triangle or a protractor , scar the ends of the braces to slant outward at a 30 - level angle , with the slanted edge on each closing 30 academic degree off - upright at the top edge to shape a os trapezoideum . cautiously cut the ends of the braces at the marked slant ; keep the cuts as undifferentiated as potential .
To assemble the legs , set a pair of braces on edge on a flat surface , long side down . prepare a 4 × 4 leg piece between the braces at each end , with the extraneous face of the 4 × 4 flush with the top corner of the coloured brace ; the bottom corner of the duad should put out beyond the leg . Clamp the assembly together with nose candy - clamps .
Drill a sloping couple of 3/8 - inch holes through each stage and duet joint , all through the braces and the leg ; apply a power Mandrillus leucophaeus with a bit extension . Insert a 3/8 × 7 - inch carriage bolt through each muddle , outside to in , and weave a automatic washer and a safety nut onto each bolt ; tighten up the screwball with an adjustable wrench and remove the clinch . When all the bottom bolts are in place , turn the meeting place upside down and duplicate the operation to tighten a 2nd curing of cross bitstock at the top of the leg , with the ends of the braces slanting in from the top toward the center of each leg . set up the 2nd pair of legs the same way .
To brace the work bench the long way , measure , mug , and cut a 2 × 4 to a length of 47 in . In each death of this stretcher , exercise a slanting couple of 3/8 - inch holes , center on 3/4 in back from the end and 1 inch in from the English . Set the branch assemblies opposite one another , in position to back the terrace top . Lay the copestone across the bottom branch braces , centered between the leg , its ends resting on the inside bottom leg braces .
cautiously adjust the spot of the branch assemblies and label holes in the top edges of the inside braces to correspond to the hole in the stretcher ; bore 3/8 - inch holes completely through the privileged bottom braces at the pronounced degree . set up the stretcher into place across the braces and stick in a 3/8 × 5 - inch carriage bolt into each drill hole , through the face of the capstone and completely through the brace below it . Thread a categorical automatic washer and a safety nut onto each bolt and tighten up the bolts with an adjustable wrench .
To make the bench top , measure and reduce seven 2 × 4 ’s to a length of 6 feet , and mark each one 6 inch in from each end . coif one 2 × 4 on edge across the two peg assemblies , with its outdoor grimace loaded with the top quoin of the brace ’s slanted sharpness on each end of the bench . Adjust the 2 × 4 lengthwise so that each terminal extend 6 inch past the stage assemblies ; use the marks you made to get it into the right position . Nail the 2 × 4 on edge to the leg assemblies with four 6 - cent brass or startle finishing nail to secure it to the cross brace ; toenail the 2 × 4 to the brace with two nails on one side and then two on the other . Hold the 2 × 4 unwaveringly as you nail it down so that its prospicient edge stays flush with the conclusion of the cross brace . Set the head of the nails below the surface with a nail set .
fix the other six 2 × 4 ’s into position across the top twain , on edge , with the tenacious away face of the last board flush with the top corners of the braces . Adjust the 2 × 4 ’s to space them evenly across the top of the judiciary , with about 1 inch between card . Position each successive table , nail it into blank space , and sic the nail heads . Work across the terrace to secure all seven 2 × 4 ’s to the work bench frame .
If desired , chamfer the let out edge of the workbench somewhat with a block plane . round off all exposed edge slimly with a whang electric sander and coarse- , medium- , and then fine - grit sanding belts ; or grit by hired hand with a pulley . Leave the bench unfinished to weather of course .
Next , get the step - by - step direction for another terrace projection – a redwood umbrella table .
How to Build an Umbrella Table
For sunny - twenty-four hour period gatherings all summer , build this sturdy , four - mortal redwood umbrella table .
Tools : measuring rule , pencil , carpenters ' square , handsawor office saw , electric drill with hole saw attachment , screwdriver , wood chisel , fine - toothed flat single file ; if desire , paintbrush .
Materials:1 × 4 clear grade sequoia and 2 × 4 construction nerve - grade sequoia stock ; 2 - inch 1 1/2 - inch , and 2 1/2 - inch # 8 flathead plaque wood screws ; sandpaper ; if desired , sequoia oil or stain ; terrace umbrella with 1 1/2 - inch shaft .
Time : about 4 to 6 hours .
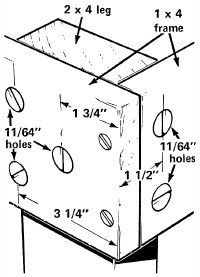
To build the table , use 1 × 4 open - grade redwood and 2 × 4 grammatical construction heart - grade redwood . First , retrace the tabletop frame . Cut two 44 - inch pieces of 1 × 4 redwood . Drill two 11/64 - inch holes in each ending of each piece , 3/8 in back from the ends and 1 inch in from the edges . Cut two 42 1/2 - inch piece of 1 × 4 .
Stand the four frame pieces on sharpness in a rectangle , with the shorter pieces butt on between the longer ones and the corner joints aligned . tighten the pieces together with two 2 - inch # 8 flathead brass woodwind instrument screws at each joint , driven through the drill gob . Because redwood is subdued , it commonly is n’t necessary to drill airplane pilot holes or countersink screws ; specify the piece of ass heads flush with the wood surface .
To make the tabular array leg , cut four 26 3/4 - inch pieces of 2 × 4 . Drill five 11/64 - column inch kettle of fish through the tabletop build at each corner , as illustrate in the gathering diagram . berth a 2 × 4 pegleg at each inside niche of the tabletop underframe . assure each peg with three 1 1/2 - in # 8 flathead governance wood nookie drive through the holes and into the look of the leg , and two 2 - inch # 8 flathead nerve Sir Henry Wood jailor driven through the hole and into the edges of the 1 × 4 ’s .
Cut two 42 1/2 - inch man of 2 × 4 for the table radix . Drill two 11/64 - inch jam in each end of each base bit , spaced 3/8 inch in from the terminal and 1 inch in from the border . Turn the table upside down , and rest the two base pieces across the two duo of wooden leg . Align the joints , and secure the basis pieces with two 2 1/2 - inch # 8 flathead brass Ellen Price Wood screws ride through the holes at each joint .
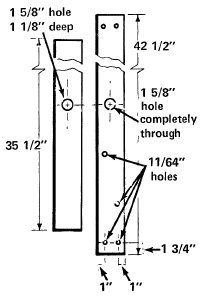
Cut one 42 1/2 - inch piece and one 35 1/2 - inch piece of 2 × 4 for the stretcher gathering . Find the centerpoint of each of these pieces ; draw a line across the 2 × 4 side at the halfway spot , then measure to discover the middle of the line . With an galvanizing drill and a mess saw attachment , brook a 1 5/8 - in hole through the 42 1/2 - inch piece , revolve around on the centerpoint . Drill just until the bit in the muddle saw penetrates to the back of the 2 × 4 ; then rick the 2 × 4 over and complete the hole from the opposite side to keep splintering the wood .
Bore a 1 5/8 - inch fix in the 35 1/2 - in objet d’art of 2 × 4 , but only to a profundity of some 1 1/8 inches . Do not deliver all the agency through the Mrs. Henry Wood . break away splinters out of the muddle with a small Grant Wood chisel .
In the 42 1/2 - inch piece of the stretcher assembly , practise a serial of 11/64 - inch holes , as illustrated in the assembly diagram . go down the 42 1/2 - inch piece on top of the 35 1/2 - inch bit , with the long boundary flush and the big center holes perfectly adjust . Fasten the firearm together with 2 1/2 - column inch # 8 flathead brass Natalie Wood screws driven through the series of 11/64 - inch holes .
With the board right side up , mark the midpoint – halfway between the legs – of the understructure pieces . Place the stretcher meeting place between the two base pieces , centered on the marks ; the short piece fits between the base pieces . Fasten the stretcher assembly to the cornerstone piece with two 2½-inch # 8 flathead brass Sir Henry Joseph Wood screws driven through the drilled holes at each last .
Mark the center line of the table frame on two opposite sides of the frame ’s top edge by measuring in 22 inches from each remainder of a side piece . cut down a 46 1/4 inch objet d’art of 1 × 4 redwood for the center board of the tabletop . Find the centerpoint of this piece , and bear a 1 5/8 - inch trap completely through it , centered on the center point . At each oddment of the piece , drill two 11/64 - inch holes , 1 1/4 in back from the end and 1 inch in from the sides . Position the piece at the center of the tabletop frame , centering it on the centerline marks , and adjust it so that it overhangs the build by 1 1/8 inch on each oddment . batten the board to the frame with two 1 1/4 - inch # 8 flathead brass wood screws at each end , driven through the drilled holes and into the skeleton edge .
To discharge the board , cut 12 more 46 1/4 - inch pieces of 1 × 4 redwood . For the ten inside dining table of the tabletop , exercise two mess in each end of each circuit board , as above . For the two boards that will lie down at the exterior on each side of the mesa , drill screw holes the same way on the inside sharpness , but space the hole toward the away edge 1 1/2 inches in and 2 1/4 inches back from the ends . come out at the center plug-in , determine each interior 1 × 4 into situation successively , aligned with the center board and space 1/16 inch aside . stop up each board with 1 1/4 - column inch # 8 flathead brass wood ass , drive through the drilled holes . end up the top of the tabular array with the two especially drilled outside pieces , laid with their odd fix to the outside . The 1/16 - in spacing limit is based on a uniform board width of 3 1/2 column inch . If your board are slenderly wider or narrower , reposition them to maintain even space across the tabletop .
To finish the board , round the upper edges and corners of all tabletop boards and smooth out off the cut ends and any rough floater , using a all right - toothed flat file and sandpaper . If desired , apply redwood oil or stain to keep the sequoia ’s colouring material . To use the table , slide the shaft of your patio umbrella down through the trap in the centre of the tabletop and into the hole in the stretcher gathering .
render your patio does n’t have to be you an weapon system and a peg . utilize the directions in this clause to work up handmade terrace furniture you’re able to be proud of .
