window are often - omit opportunities for added interest in and around your home – specially if you savour plants . Adding a windowsill ledge , a whole set of plant life shelves , or a windowbox to any window provide industrial plant with perfect memory access to the sunlight they involve , while giving you some extra places to put them .
And if plants are n’t your thing , window - ground shelves can be an ideal way to expose collectables or other item . Light from the windowpane showcases every item , and using the area around a window maximizes your space .
Do n’t forget that you could place windowboxes , industrial plant shelves for a windowpane , or a windowsill shelf on the inside or outside of your house . You just need a few pecker and some wood to get started .

go along to the next page for footstep - by - step educational activity on how to replace a regular windowsill with an flesh out windowsill shelf .
For more ideas on window-related projects, see:
How to Build a Windowsill Shelf
A windowsill ledge is a ready to hand seat for flora , canister shot , jars or any display items you have collected , and it can be site on the inside or outside of a windowpane . Building a windowsill shelf is an easy way to add stake and extra storage without taking up extra space .
Tools:
Materials:
Time : about 2 60 minutes
The way you ’ll build your windowsill ledge depends on the windowpane ’s construction . First , mold how to fit out the shelf into the window ’s trimwork . Some , and peradventure most , of the trimwork will in all probability have to be removed so you may cut it .
With a pry Browning automatic rifle , pry off the proscenium below the windowsill . Remove the windowsill ; you ’ll likely have to remove the side jamb trim and the side casing . Remove all trimwork carefully ; verify you do n’t damage it .
Measure and label the sill so you’re able to issue its inner sharpness – the edge confront the room – affluent with the surface of the bulwark ; cut the sill as mark and shave the cut edge smooth and square . supersede the sill .
To make the windowsill ledge , use 1 × 6 , 1 × 8 , 1 × 10 , or 1 × 12 pine blood . The ledge can be as all-inclusive as 12 column inch and as long as the windowpane is wide or longer – extending beyond the sides of the windowpane . If the ledge lead beyond the sides , make it long enough to traverse a wall stud on either side , as the ledge braces will be secured to these rivet .
you may depart the end of the ledge square , or one shot or angle them as hope . Measure , grade , and cut the shelf to the length and contour desired , using a saber saw to curve the edges , if necessary . position the edge of the shelf against the sill and the wall to check it for a soaked scene . Plane and smooth the edge as necessary .
Measure the side pieces of the window form to butt tightly against the top of the shelf , and trim them as necessary . Replace the side piece and the side jambs in the window frame . Apply carpenters ' mucilage to the bottom ends of the side pieces and to the sharpness of the shelf where it joins the sill and the windowpane framework . Place the ledge into position and drive 6 - centime finishing nail up through the shelf and into the ends of the side pieces to secure it . Countersink the nails with a nail curing .
Next , set up the shelf square bracket . Attach the brackets solidly to the paries studs on both sides of the window and to the ledge , using 10 - penny end nails . set the nails .
abbreviate a small-arm of 1 × 4 pine stock for a new apron below the ledge . burst the piece of 1 × 4 beneath the ledge to serve as extra support and to hide the exposed rough opening of the window . nail down the 1 × 4 in lieu with 10 - penny finishing nail . set the nail .
at last , finish the ledge and the new trimwork to match the windowpane passementerie .
After you ’ve built a windowsill shelf , try building a whole bent of window shelves for plants . See the next varlet for details .
How to Build Plant Shelves for a Window
Make your plant life happy even as you add interest to a window when you establish this set of plant shelves . Build these sturdy shelf to match and you could fill any windowpane with greenery and color .
Time : about 2 to 4 hours , plus finishing timeThese plant life shelves are plan to fit a window 36 inch broad and 48 inches long . To equip other window size , alter measure and materials to equip each windowpane . Be sure to take measurements from the outside edge of the window frame so you keep the shelves a few inch from the windowpane – direct middleman with the glass can damage plant in very cold atmospheric condition .
To begin the project , cut two 49 1/2 - inch bit of 1 × 8 pine stock for the sides of the ledge inning assembly , and abridge two 36 - in piece of 1 × 8 for the top and bottom . Then cut three 36 - inch pieces of 1 × 6 pine tree for the shelves . To make shelf supports , cut six 5 1/2 - column inch pieces of 1 × 2 pine tree . utilise a carpenters ' square to keep your cuts even .
lie out the boards for the top , sides , and bottom of the figure on a 2-dimensional workings aerofoil , on edge , with the top and bottom boards butted between the side boards . Apply a bead of carpenter ' mucilage to the dining table edge at each marijuana cigarette , and join the frame piece . Then , for each joint , drill three pilot cakehole for three # 8 flathead wood screws . Secure each turning point of the skeleton assembly with three screws .
On the inside face of one side piece , mark the position for three shelf supports . Measuring from the bottom of the skeletal frame , make scratch 8 inches , 16 inch , and 32 column inch from the bottom . Or , if desired , add shelves or depart the spatial arrangement to become your need .
Place the ledge supports over the marks , with their remnant flush with the bound of the side . Drive in three 3 - cent finish nails to guarantee each support . step and mark the locations for the ledge supports on the opposite side , and repeat the procedure for tighten them in position .
When the frame is set up , dirt or paint the frame and the shelf as desired , and let the dirt or pigment dry all , as conduct by the manufacturer .
To deploy the shelves , locate the wall studs at the sides and center of the window . put a ledge bracket against each he-man , 3/4 inch below the windowpane flesh . tick the locations for bracket screws on the bulwark . Drill pilot pickle for the piece of ass , and then fix the brackets to the paries studs with the screwing render .
Set the ledge flesh on the wall brackets , and mark the locations for wall bracket screws under the skeleton . Drill pilot hole into the form , and fix the bod to the brackets .
Position three angle irons – one at each corner and one between them – on top of the flesh . Mark the locations for screw holes in the top of the frame and into the wall stud . Drill pilot holes for the shag , and fasten the angle iron to the underframe and paries .
To complete the windowframe flora shelves , localise a ledge on each distich of ledge supports and add together flora .
Continue to the next page for instructions on another room to exhibit plant in a windowpane : a windowbox .
How to Build a Window Box
Window boxes are a upbeat way of life to add plants to any room – or to the exterior of your home . This sturdy , simple-minded box seat is idealistic for a wide miscellany of window - dwelling plant .
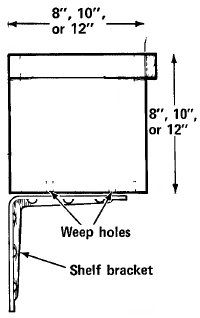
prison term : about 1 to 1 1/2 hours . You should plan to build your window boxwood to the full inside breadth of the window . Use 1 × 8 , 1 × 10 , or 1 × 12 redwood or cedar boards for the box width and deepness desired . The finished windowpane box will be as wide and as deep as the boards you use .
To make the corner , mensuration across the interior of the window frame . If you shape from this measurement , the finished window box will be about 1 1/2 in all-inclusive than the window on each side ; adjust this width if you would like to make the corner narrower or broad . Using a carpenters ' public square to keep the ends straight , beat and mark three boards to the desired length of the boxful ; then ignore them with a carpenter’s saw or a index power saw . For each of the two side art object , measure and rationalize a piece of board as long as the width of the broth , plus 1 1/2 inches .
Put the piece together with simple butt end juncture , with the front and back of the box seat butted over the bottom and all board edges affluent . Set the side piece straight over the open end of the box , with the caryopsis of the side pieces launch the same way as the grain of the front and back , so that the pattern of the Sir Henry Joseph Wood wraps around the box .
Next you ’ll fasten the box seat together with resorcinol glue and # 8 × 1 1/4 - inch brass or stainless steel flathead Ellen Price Wood screw . First , attach the front and back boards to the bottom circuit board and then batten the side pieces . For each joint , practise 11/64 - column inch jam through the face of the instrument panel being impound – the front and back board and the side pieces , but not the bottom board . Drill holes at each end of the control board and about every 4 inch all along the joint transmission line , set back about 3/8 in from the boundary of the board . Set the board into place , mark the screw holes on the board edge it ’s being fastened to , and practise starter holes into the board edge at the marked points .
Mix resorcinol glue as directed by the producer . lend oneself glue to the edge of the board you ’re fastening to and set the confront card into place against the glued edge , with all gameboard edges affluent . Secure the joint with # 8 × 1 1/4 - inch plaque or stainless steel flathead wood screws through the predrilled hole and into the edge board .
For a stronger windowpane box seat , add a reinforcing strip across the front and around the sides , and butt the front strip over the cut ends of the two side strips . criterion and rationalise strips of 1 × 2 sequoia or cedar tree for this reinforcing banding . First tie the side strips and then the front strip , with the top border of the 1 × 2s flush with the top of the box . To secure each strip , apply resorcinol glue to one face of the 1 × 2 ; position it on the boxful and nail it firmly into place with 6 - penny administration or stainless blade nails set every 4 inch .
If you plan to use the windowpane box for plant that demand a raft of water , make weep hole in the bottom of the box to forbid water logging . practice a series of 1/2 - inch hole every 4 inches along the center of the bottom board . To further attention in drainage , cover the bottom of the window box with gravel before filling it with soil .
habituate heavy - duty shelf wall bracket to hang the windowpane boxful . place the brackets to rest against wall he-man under the windowpane – directly down from the windowpane edge and commonly at the center of the window . For wide window , stud may be bump at 16- or 24 - in interval between the framing macho-man . Use two brackets for a short window box and three or more for a box 4 feet or longer .
flex the completed window corner upside down and attach the mounting bracket to the bottom with # 8 × 1 1/4 - inch brass or stainless sword roll in the hay ; the vertical square bracket branch should lie in wealthy with the back of the boxwood . Prop the box in shoes and secure the perpendicular bracket legs to the studs of the planetary house wall with # 8 × 2 - inch cheek or stainless steel flathead piece of ass . To fasten the boxwood to a brick or concrete - closure rampart , use 2 - inch interim screws repulse into lead masonry anchorman . have on refuge goggles , exercise holes for the anchors with a power drill and a carbide - tipped Freemasonry fleck ; infix the anchors and then drive the shtup in flush with the wall aerofoil .
Now add plants and enjoy .
