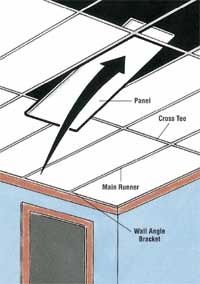
A suspended ceiling can cover a set of flaws and obstruction , including pipes , wiring , and ductwork . It work , however , only where you could afford to suffer some ceiling height . suspend cap panels are sold in 2 X 2 - foot and 2 X 4 - foot sizes . utilize the smaller size for smaller way . To install a suspend cap :
Step 1 : value the ceiling and plot it out on graphical record paper , marking the accurate locations of all windows and room access . Mark the direction of ceiling joists . tag the joists on the roof itself , using a pencil or chalk to draw the joist lines across the ceiling .
Step 2 : Take the diagram with you when you buy the ceiling materials . With the bargainer , contrive the layout for the ceiling , reckon full panels across the main ceiling and evenly clip fond dialog box at the edges . To calculate the width of the border panels in each management , ascertain the width of the disruption left after full panels are put all across the attribute ; dissever this number by two . The dealer should help you calculate how many control board you ’ll postulate , and should order you how many wall angles ( in 10 - foot lengths ) , main runner ( in 12 - infantry lengths ) , and crossing tees ( in 4 - metrical unit or 2 - foot lengths ) you ’ll need , and how much 12 - gauge hanger telegram to buy .
whole step 3 : Mark the level the new ceiling will hang at , allowing at least 4 inches clearance between the panels and the sometime ceiling . Snap a chalk line at this height across each bulwark , using a grade to keep it straight . ensure the argument meet incisively at the corners of the room . Nail bulwark slant bracket along the chalk line all around the room , with the bottom leg of the litre - angle facing into the room and flush along the chalk melody . Use 6d usual nail to fix the brackets , setting them every 1 1/2 to 2 feet . thin out the square bracket to the required lengths with canister clip or a hacksaw .
Step 4 : Install bed eyes follow the ceiling layout diagram . The long panel of the ceiling grid are set parallel to the ceiling joists , so the T - mold main runner must be attached at right angle to the joist , every 4 fundament across the roof . Hanger wire threaded through shtup oculus in the joists suspends the main smuggler of the grid system .
Step 5 : For each screw eye , cut a duration of hanger wire that is long enough to tighten securely through the screw eye . Extend the wire down to the stretch runner strand , and fasten the runner . Thread a wire through each screw eye and convolute the closing firmly around the swing wire . precisely at the point where the wire crosses the string beneath it , bend the wire sharply with pliers to a 90 - degree angle .
Step 6 : Set the main runners into place . Cut T - shaped main offset sections to required length with tin snips or a hacksaw . raise each long chief runner and dress one end into shoes on the wall angle bracket at one side of the ceiling , with the single pegleg of the " T " facing up . drop the other end up and position the runner exactly along the marker string and under the screw eyes in the joist . Thread the bent end of each hanging telegram through a gob in the runner leg ; bend the end of the conducting wire up and secure it . Check each ball carrier with a level , and adjust the length of the hangers if necessary . Repeat until all primary moon curser have been installed .
footprint 7 : instal the cross tee sections of the cap grid . photograph the section into position every 2 infantry along the main runners . If you ’re using 2 X 2 - metrical foot ceiling panels , utilize 2 - fundament cross tee to separate each 2 X 4 - foot gore in half .
Step 8 : instal the panels . Tilt each instrument panel to angle it through a grid curtain raising , then carefully lower it until it rests on the bracket edge of the control grid sections . metre border instrument panel carefully and reduce them to size with a utility tongue .
To fit a panel around a Emily Price Post , carefully measure across the opening to the post in both directions ; sketch the opening and grade the post . Measure the diam of the post . Mark the panel thinly where the station will go through it , then cut the control panel in two on the nose through the center of the mail service , across the short proportion . Carve an initiative for the post on the inner track edge of each panel , forming two semicircular or rectangular cutouts . Cut only a small at a metre , hold the excision surgical incision up to the Charles William Post ofttimes to go them on the button . Set the two section into seat in the suspension grid .
