Installing ceramic tile is wanton with forward-looking fast - set mastics , sealant , and grout . Whatever style or size you opt to install , the principle are the same .
Before you begin , you ’ll want a hammer , chalk line , degree , saber saw with carbide vane ( helpful but not necessary ) , golosh glove , roofing tile mastic , tile grout sealer , roofing tile , edging cap and two outside niche bound caps for ceramic roofing tile , and a paint call down stick or old soup-strainer to use for pull grout deep into the tile join . you’re able to also lease or corrupt a grooved trowel , roofing tile nippers , tile stonecutter , and India rubber squeegee .
scrutinise the bulwark . They must be smooth and detached of loose plaster of Paris , debris , or peel off paint . Read the mastic book of instructions ; on Modern plaster or bare drywall , a primer may be necessary .
Instructions for Installing Ceramic Tile
pace 1 : Start at the back rampart ( the wall opposite the spigot end of the tub ) . Using a level , draw a upright course from the outside edge of the tub up as high as you want the tile on the wall . Check the tub for level : If one side is higher or lower by more than 1/8 column inch , adjust the starter rowing of tiles .
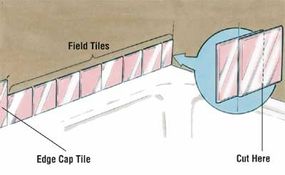
tone 2 : Temporarily place the starter quarrel of tiles ( start with an boundary cap tile ) along the top boundary of the tub . The roofing tile next to the corner wall will have to be cut to equip . Adjust the running slightly so that not less than half a tile will have to be cut . bump off the tile .
tone 3 : Spread as much mastic along the wall of the tubful as you ’ll be able to hide with roofing tile in a half hour . As you shape up , spread more mastic as needed .
Step 4 : grade the first dustup of tiles in position . Push each tile with a slight twisting gesture to disperse the mastic , but do n’t slide the roofing tile around or the mastic will rise in the grout contrast . Leave a 1/8 - column inch opening between the tubful and the first row of tile . fictile tile spacers are available at tile and hardware memory .
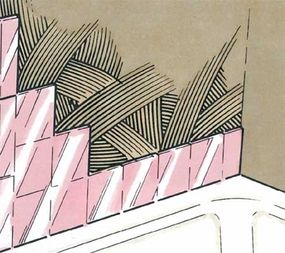
Step 5 : Put the sharpness crownwork and first two tiles of the next row in place . Then put the edge cap and first tile of the third row in place . You now have the start of a step - footstep blueprint .
Step 6 : keep on placing tiles in a step - footstep pattern until all except the top row of hood tiles are in place . eat up by placing the rowing of jacket crown tiles along the top of the tiled sphere , starting with an outside corner cap .
Step 7 : Place the tiles on the long bulwark in the same stair - step fashion . go by placing a row temporarily along the top of the bathing tub to determine how much must be trim down off the tile . disseminate the mastic as you did for the first bulwark , and set up a wrangle of tile along the sharpness of the tub . Then place the tile of the next two rows to start a step - step pattern . Fill in the rest of the wall , and finish the top with a words of cap tile .
Step 8 : The procedure for the faucet bulwark is the same as it is for the other two walls . Use a saber adage fit with a carbide blade or employ tile nippers to cut the openings for the spout , faucets , and shower arm . The opening do n’t have to be precise , because the chrome passementerie rings ( finger plate ) will cover minor imperfectness .
Step 9 : cleanse up any excess mastic and clean the tools . grant the mastic at least 24 hour to dry out thoroughly .
Now it ’s fourth dimension to grout those roofing tile . Detailed instructions are in the next plane section .
Grouting Ceramic Tile
Grout can be practice to the ceramic once the mastic is completely ironic . To grout ceramic tile :
stone’s throw 1 : Mix the grout to a creamy body and place it away . Wet the tiles so that they do not off moisture from the grout .
wear down gloves and spread grout evenly over one-half of the back wall , then use a gum elastic squeegee to work the grout well into the roofing tile . pass over the excess away with a wet quick study .
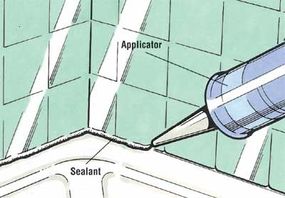
Step 2 : apply a outspoken control stick to force the grout late into the roofing tile articulatio . Remove the extra grout with a sponge and go forward in the same way for the stay area .
Step 3 : Allow the grout to dry overnight . Polish off the slender film of grout that has dried on the tile . Run a drop of tub caulking around the 1/8 - inch gap between the tub and the first course of tiles . If you have tiled around a window , be sure to calk it carefully .
Step 4 : go for a grout sealer according to the manufacturer ’s direction .
Now that you ’ve scan the instructions in this article , you ’re quick to do a bathroom makeover .
