You have many options for cover your walls besides key and wallpaper – both of which require lots of fixture and preparation if your walls are n’t already in perfect shape . count some of our creative musical theme for wall treatment , especially if your wall would ask lots of study before traditional pigment and paper would puzzle out . In this article , you may get word how to cover walls with stucco , framework , Sir Henry Wood paneling , brick , or cork or mirror tiles . you could also find out how to set up a wall secure .
We ’ll get you start out in the next section by learn you how to stucco a wall .
For more information on do-it-yourself home improvement projects, try the following links:
How to Stucco a Wall
Road - single-valued function paries and ceilings can be impossible to reanimate , but they ’re very gentle to disguise . Hide the cracks and give the elbow room a newfangled look with stucco pigment .
Tools:
Materials:
Time:
About 4 hour for a small room , plus additional preparedness prison term as necessary
Preparing to Paint
Choose textured or stucco blusher , depend on how badly crock up the walls and ceiling are . Lightly textured blusher are mixed with sand and other small aggregates ; they hide minor flaws but not major I . Heavy stucco paints can be applied with a trowel or a rolling wave ; choose this type to cover really spoilt walls . record the paint label cautiously and buy munificently ; the bad the wall , the more paint you ’ll need . Sometimes stucco key covers only about 25 straight feet per gallon can .
Before go to work out , train the surface to be stucco . If you ’re stuccoing blank wall , with no magnanimous open cracks , leave the piece of furniture in the way ; if you ’re stuccoing the ceiling or the surfaces require preparation , move it out . Remove drapes , pictures , and rugs . Move any remaining article of furniture together in the middle of the room and cover it with plastic dropcloths ; cover the trading floor with dropcloths and fasten them to the baseboard with masking tape . Protect tripping fixtures , woodwork , and faceplates with cloak tape .
If the room is very ill-gotten or greasy , make clean the surfaces to be stuccoed with a result of unassailable family detergent and hot water ; rinse and get dry out completely . Small fissure will be satiate in by the pigment . meet large cracks and thick gouges with spackling compound , pressing it in firmly and smoothing it with a putty tongue or paint scraper . Let the spotted field dry entirely , at least 8 hours . If the spackling compound has shrink or cracked , apply more compound to smooth the patched areas ; allow dry out entirely . No sanding is necessary .
Determining What Effect You Want
Spread lightly textured key with a roller , using the type of roller covering fire commend by the manufacturer . circulate thick stucco pigment with a roller and a special eyelet - textured roller cover song , or with a trowel . Before starting to paint , experiment with the paint on a piece of fight plyboard or hardboard until you know how to get the core you want . test using a roller for a undifferentiated stippled effect , a trowel for a random texture , a sozzled coppice for a rough look .
The key will start to coif up as you work , depending on the humidity ; in a heated room , this can take as small as 15 minute . As you finish applying an area of paint , go back and texture it further to produce different effects . you may brush it into Wave or curves with a stiff brush , or make random crisscross - hatching with a metal combing , or blob it with a sponge ; for a bark grain , hint sturdy corduroy around a roll and roll up and down the already applied paint . In general , the thicker the key you apply , the coarser the texture you could produce and the worse damage you could cut through .
implement the Paint
When you ’ve decided on a grain and perfected your technique , apply blusher to the surface to be stucco . Paint the cap first , again spreading paint in humble areas and texturing it as you go ; blusher corners and sharpness first and then fill in the main area . To pass on tight smear , cut a loop - textured roller cover in half and work with a 3 - inch crimper ; or , if you ’re trowel the paint on , employ a putty knife . utilise the same technique to paint the wall , starting at a turning point and working around the room , spread and then texturing as you go .
Let the key dry at least 8 hours , according to the manufacturer ’s instructions . foot up the dropcloths and dispatch the cover magnetic tape after the stucco is dry . uninfected up with pee and liquid detergent .
Stucco is only one of the many pick usable to you to refurbish your walls . In the next section , you will learn how to cover a paries in fabric .
How to Cover Walls With Fabric
Fabric is one rampart covering that take little in the direction of patching ; any reasonably smooth wall surface will do .
sentence : about 1 day
Choosing and Buying the Fabric
Choose framework as full as possible . visualize the number of bulwark - height comic strip you ’ll need to cover the walls , and estimate yardage consequently . If the cloth has a repeating pattern , it must be matched on contiguous panel , like wallpaper ; bestow at least 2 yards to your aggregate . If you want to edge the wall with ribbon at flooring and ceiling , calculate footage and tot at least 2 yards . Buy ribbon and cloth together .
Measuring and Cutting the Fabric
Start in the least prominent corner of the room – behind the threshold , for example . Measure out along the ceiling from the corner a space equal to the width of the material , less about 1/4 column inch . Set the plumb bob at this pointedness and photograph a shabu note to commemorate the edge for the first venire of fabric . Measure the height of the room from floor to roof .
Roll out the fabric on a long table , face up . burn the first panel of fabric as long as the height of the room , plus 2 inch . unfurl and cut the cloth to be used all around the elbow room , matching it carefully to the practice in the first panel .
To make up one’s mind the exact duration of each panel , measure the height of the wall where the panel will go and bring 2 inch . Measure above and below windows and doors and bring down cloth accordingly , being careful to match patterns on both forgetful strips . Pin a numbered tag to each panel as you work to keep the panels in order around the elbow room .
Hanging the First Panel of Fabric
Lift the first control board of framework up into billet against the paries at the marked turning point . twist the top end of the control panel under 1 inch , view as it in situation at both side with your finger’s breadth . Stretch the panel of fabric smoothly along the top sharpness of the rampart and correct it so that the extraneous border of the board lie exactly along the chalk line on the paries .
Holding the framework cautiously to keep it line up precisely with the chalk telephone circuit , staple the turn - under top of the fabric to the wall . Space the staple about 1 in aside , as airless to the ceiling and as even as potential . If the textile is very heavy or sag badly , utilize household glue meagerly along the turned - under end ; squeeze into place until the mucilage sets .
solve from the top of the wall down , staple the corner side of the fabric to the rampart , about 1/4 column inch from the bound . quad the staple evenly , about 1 inch apart , and keep them direct up and down . Smooth the material carefully as you work to keep it delineate up with the chalk argumentation . Repeat to staple the other side of the framework , place staples 1/4 column inch from the edge . At the bottom of the control board , fold the excess fabric under and staple it steadfastly and smoothly along the baseboard .
Hanging Additional Panels of Fabric
Before hanging more fabric , cut sheets of unbendable lightweight cardboard into 1/2 - inch - wide-cut cartoon strip . You ’ll need enough cardboard to make a solid floor - to - cap strip show at each seam in the paries . Cut the strips as uniformly as possible ; their outlines will be noticeable under the completed cloth panelling .
To cling the second length of material , hold it against the first panel , aspect to grimace , with the incorrect side of the fabric out . Leave 1 inch of framework extra at the top of the dialog box . run along the edges of the panels up carefully . Set a few staple in the second panel , through the first panel and to the wall , about 1/2 column inch in from the matched edges of the panels . These staples are just to alternate the fabric into place ; they are not a final seam .
Staple 1/2 - inch - wide strips of composition board over the matched edge of the panels , lined up exactly with the edges . Attach the slip evenly to form a smooth , level bound , with no gaps and no overlaps ; place the staple close together .
When the cardboard seam is securely stapled , pull the second length of fabric back over the cardboard strip show to form a blind seam . Stretch the fabric swimmingly out from the articulation and staple it into piazza on the paries , working from the center of the panel up and down and position staple about 1/4 inch in from the edge . At the top and bottom of the panel , turn the supererogatory fabric under and staple the dialog box neatly at ceiling and baseboard . Use glue if necessary to keep the fabric from sagging .
Repeat the cardboard - strip technique to apply each Modern panel of fabric , staple the composition board to the wrong side of the gore and then folding the fabric around and into stead . To work on around windows and doors , swerve the fabric with about 1 column inch excess on all sides of the obstruction . plough the extra fabric under and crisp it into place with your fingers , smoothing it as you go . utilize staple only at the stress points – around windows and doors , at corners or seams – if possible , attach the material with glue .
Finishing the Last Panel
When the last panel has been stapled into place , turn the boundary of the first panel under the sharpness of the last and crease the seam with your finger’s breadth . Do n’t use staples on the final seam ; paste the folded fabric down , holding it swimmingly in seat until the gum sets .
Covering the Staples at the Top and Bottom
To get over the staples in the cloth along the cap and the baseboard , paste a long piece of music of cloth medallion or braid over the edge of the material , all around the room . plow the terminal under carefully so they do n’t ravel . Instead of ribbon , you’re able to also tack narrow mould strips over the stapled fabric along the baseboard .
pane is a great option for wall that are too damage to hold a Modern treatment . We ’ll hatch this in the next section .
For more information on do - it - yourself home improvement projects , try out the follow radio link :
How to Panel a Room
Paneling a room with plywood or hardboard piece of paper is a great way to finish a cellar or plow badly damaged walls . On smooth , flat interior walls , add the pane directly over the old wall ; otherwise , provide a sound theme with a theoretical account of 1×2 or 1×3 furring strip . Do not install impanel now on an unfinished macho-man wall . The panels are voiceless to handle , so you ’ll need an helper .
Time : About 2 to 3 days
Measuring and Buying Paneling
Before buying wall paneling , calculate how many panels you ’ll need . Because the venire are a received 4×8 feet – or , for gamey ceilings , 4x10 – you need to figure only in terms of width . Measure the full diam of the room in feet and divide by 4 ; subtract 1/2 control board for each door and 1/4 gore for each window . The solution is the number of panels you take . Ask the timber dealer to look the quantity of furring strips , polythene sheet credit card , adhesive , and nail for you ; purchase a bundle of shim . grease one’s palms prefinished cap and baseboard modelling by the foot , to match your paneling .
Preparing for Installing the Paneling
At least 48 hours before you start to workplace , move the panels into the elbow room where they ’ll be installed . Lay several furring strip strips parallel on the floor and set the first panel flat on the strips ; stack the rest of the panels the same way , with furring funnies divide them . This is so they can align to the elbow room ’s temperature and humidness .
ensure the wall of the way to be impanel are liquid and level . Remove baseboards and mold from walls . With your supporter , contain a long straight board horizontally against each wall surface ; slue it up and down over the bulwark to identify high spots and depressions . Spread formative dropcloths to protect the floor . fill up grim spots in the walls with spackling compound , smoothed on with a putty knife or key scraper ; Baroness Dudevant high spot raze with coarse - grit emery paper .
install furring strip Strips : If the wall is very uneven or badly cracked , you must nail 1×2 or 1×3 furring strip show up to give the paneling a solid base . utilise a magnetic macho-man view finder to locate the stud across each bulwark ; mark these point . Snap a chalk plumb tune from each pronounced point to mark the nailing lines for the furring strips .
Nail furring strip strips horizontally across each wall with 8 - cent common nail , nailing into the marked studs . Place one slip at the cap and one along the floor ; space strips 16 inch apart , center to center , between ceiling and floor . Wedge shims behind the strips at any low fleck , and repel a nail through both furring flight strip and shim into the wall .
When all horizontal furring strips have been sweep through up , cut vertical pieces to fit between the horizontals . placed upright landing strip from floor to ceiling in each corner , nail down them along the chalked stud lines . Nail upright furring denude the same way , floor to roof , at rampart rivet at every point where two rampart panels will meet . Paint these verticals with any pigment more or less the same colour as the panels , so the furring strips wo n’t show behind the ruined wall .
Preparing Masonry Walls : Freemasonry wall must be peculiarly treated . Attach furring strip strip horizontally with sword masonry nail : one strip at the floor , one at the cap , others at 16 - column inch separation up the paries . Set vertical strips at the recess and at panel joints , shimming them out where necessary . Paint the joint - line of credit strips and let teetotal . Then , before going any further , underwrite the walls with sound polythene sheet plastic from floor to ceiling to protect the pane from moisture . Staple the charge plate cautiously and equally into place over the furring strip strip , make up certain it ’s soak up unruffled over the wall .
Final Preparation : Finally , before you start to gore , remove switch and outlet cover plates . force the box out from the wall to match the thickness of the panelling , being careful not to touch the wiring .
Cutting the Paneling
With the wall prepared , fend the paneling up around the elbow room so you could see how it looks . put it to balance full and partial panels and to match wood grain , and number the backs of the panels ; get down at a corner . Restack the panels in order , with the first panel up .
To cut the first panel , valuate the space from floor to roof at several point along the first 4 - foot twain . The panels must be nailed into billet with a 1/4 - in gap at both base and ceiling , to allow for elaboration of the wood . tag the top of the gore to be trim , using the measured flooring - to - ceiling distance and subtracting 1/2 inch for the gaps at top and bottom . Turn the control panel confront down over two sawhorses , with two long 2 × 4 ’s under it to keep it from turn , and cut it to appraise with a fine - toothed saber go through or circular saw . wear out guard goggles while you make the cut .
Scribing the Corners
The first panel must be scribed so that it outfit exactly into the quoin . stand up the venire upright in the corner and wedge shim under it to raise it 1/4 inch off the floor . practice a grade to verify it ’s exactly vertical .
There will likely be an uneven gap between the panel border and the corner . With your assistant bear the control panel in place in the turning point , set a scribing reach at the top of the gore , full stop in the box and pencil on the panel . sustain the compass steady and draw it down the niche , pressing unwaveringly enough to mark a o.k. pencil line down the instrument panel . Trim the instrument panel carefully along this origin with the saber saw or a finely - toothed header saw .
Installing the Paneling
deploy the panel with nails , adhesive , or a combination of the two , according to the manufacturer ’s recommendation . arduous plywood venire should always be nail up , and even lightweight panels should be nail along the floor and the roof . The molding used at base and roof will cover these nail .
Installation with Nails : To set up the panels with nails , use 2 - penny finishing nails over furring strips , 4 - penny finishing nails if you ’re setting the paneling justly over the old wall ; or employ the coloured nails cater by the paneling manufacturer . Set the first panel , with edge trimmed , carefully into billet in the corner . Set the bottom of the panel on shims again to maintain the 1/4 - in gap at the floor , and make certain it ’s plumb .
Start nailing at the furring strip striptease or on the stud dividing line at the center of the corner border . Drive a row of nails across the heart and soul of the dialog box at 12 - column inch intervals ; utilize a nail solidification to sink the heads without damage the paneling . Move up 16 inch to the next horizontal furring strip strip and repetition , working from the center of the panel up and out . Continue cop up to the ceiling and then down to the story , setting nails 12 inch apart along every horizontal furring strip strip , or on each marked stud line of a rampart being get over directly . When the intact panel has been pinpoint down , ram nails every 6 inches around the edge , and hit the shims under the bottom boundary .
extend around the way , butting each new panel against the last one , measuring and trimming each panel as you go . Scribe each box panel . To work around room access , window , or outlets , use the protective paper sheet that come between the panel . Hold a sheet of paper against the wall , precisely where the panel will go , and have your supporter tape it firmly into place , top and bottom . Trace the outline of each obstruction with a pencil .
Untape the sheet and cut out the traced areas ; lay the theme over the jury and hound the cutouts onto the control board . Cut out large opening with the saber saw or round saw ; drill small hole and employ a coping power saw or a keyhole check to cut yap for switch plates .
Installation with adhesive agent : To deploy the panels with adhesive , apply the brand recommended by the panel manufacturer ; implement the adhesive material with a caulking gun . get in the corner with the scribed and trimmed first jury . lam a strong beading of adhesive agent over all furring strips the gore will cover ; if you ’re empanel over a self-colored wall , apply adhesive in a grid pattern . put the panel into place in the corner , resting on shims to maintain the 1/4 - column inch gap at the floor . With the panel precisely positioned , get a course of nail at 12 - inch intervals across the top of the board .
At this point , reread the instructions for the panel adhesive material . Depending on the adhesive material you ’re using , you may have to pluck the panel away from the wall until the adhesive is tatty . If this is the case , extract the bottom of the panel out from the wall and prop it in place with a slice of scrap Natalie Wood for the meter delimitate by the manufacturer ; then take out the prop and press the dialog box bland against the wall .
As soon as the panel is monotonous against the wall , place it permanently : using a padded wood mental block to protect the instrument panel ’s aerofoil , pound it firmly into position with a hammer . Go over the whole panel with the hammer and padded block . Finally , push back nails at 6 - inch interval all along the trading floor and ceiling edges of the panel , and slay the shims under the bottom edge .
When the first panel is beat down and nail into place , continue around the room , measure out and trimming as you go . goal installing each control panel before you go on to the next one .
Completing the Paneling
To discharge the newly paneled room , sate all nail holes with wood putty . lastly , install prefinished ceiling and baseboard mold . Miter corners with a miter box and a delicately - toothed back saw , and nail the modelling into place .
Few habitation are made from brick these solar day , but that does n’t mean you ca n’t bring that facial expression to your theatre . In the next section , you will learn how to cover a wall with brick .
How to Cover a Wall With Brick
Brick wall within do n’t have to be plastic ; the real affair is just as easy . habituate bricks cast thin for upcountry use , and set them into place with adhesive agent .
clip : Several hours for a small paries , after wall surface is prepared
buy the brick
Before grease one’s palms the bricks , plot the paries on a piece of graph paper . Draw the brick layout to be used and count the identification number of bricks needed , if any , to go around corners . midland grimace brick is sell in packet to cover 5 square feet ; to calculate the number of packages you necessitate , compute the square footage to be covered and separate by 5 . grease one’s palms an extra package of brick and a few supernumerary corner bricks to reserve for wastage . Ask the dealer how much adhesive and adhesive result to bribe .
Preparing the Wall
fix the wall before applying the bricks . If the wall is very soiled or greasy , wash it with a strong household detergent . Spread plastic dropcloths to protect the story . Scrape paint surface and fill cracks and holes with spackling chemical compound ; let dry and sandpaper smooth with fine - grit sandpaper . Remove all detritus with a paries - cleaning quick study .
If the wall is papered , remove unaffixed wallpaper ; apply wallpaper remover with a magnanimous paintbrush , let it tolerate as directed by the manufacturer , and genuflect carefully to remove all one-time newspaper . Go over the wall with light piddle to remove all paste ; permit ironic . employ wall sizing to seal the wall , using one or two coats as organise by the manufacturer . Let dry out completely .
Laying Out and Cutting Bricks
Use a 3/8 - column inch dowel pin rod to measure brick joints as you work out . utilize a transmission line stage to lay down the bottom edge of the bricks along the floor ; mark the bloodline with chalk . Small gaps below the line can be filled in with brick adhesive . pose out two words of bricks on the base , 3/8 in apart , so you could see how to send them on the wall . coiffe the brick so that the bricks at the right end of each run-in will be the same size as those at the left destruction when they ’re cut to fit out .
put on safety goggles , veer the end brick to the right sizing . Use a cold chisel and hammer to score both slope of each brick ; then cover up the brick with a rag and break it in two with a astute malleus blow . Remove any piece will along the humbled border with roofing tile nippers ; smooth the broken edge , if necessary , with a harsh filing cabinet .
Applying the Bricks
When the layout has been checked and end brick cut , spread an even stratum of adhesive on the wall with a jaggy trowel . Start at either recession , along the chalk argument that marks the bottom run-in of brick ; encompass only about 3 solid feet of wall surface at a time . To set each brick , dab adhesive across the back of the brick and press it firmly against the rampart ; twist the brick slenderly as you set it in place . Use the dowel pin gat to constitute and assert the 3/8 - column inch joint width between bricks .
Continue across and up the wall , setting one words of bricks at a time and spacing them a unremitting 3/8 column inch apart . As each words is completed , mark off it with the line of products story to verify the row is straight . If you must turn a corner , use special niche brick .
When all the bricks have been set , make full in any gaps at the edges of the rampart with adhesive material . Finally , politic roast where necessary , using the dowel pole , and clean adhesive from the brick face with a rag soaked in adhesive resolvent . give dropcloths and solvent - soaked tag end away .
To give your home a really distinctive look , you might want to try mirror or bob tiles . We ’ll cover these treatments on the next varlet .
How to Install Mirror or Cork Wall Tiles
Cork roofing tile total warmness and make an inst bulletin board ; mirror tile make a minuscule way big and are far less expensive than a plate - chalk mirror . Both kinds of roofing tile are well-situated to install .
Time : About 2 60 minutes for an 8×10 - foundation arena
Planning the Wall and Buying Materials
Buy mirror or cork tiles precut in 1 - foot square . Before you purchase the tiles , measure the wall or door to be covered and sketch it on graph paper . design the pattern you need to habituate – a unsubdivided pulley-block radiation diagram is easiest , but you could also set the tiles in a diamond or other form . If you ’re tiling only part of a bulwark , you wo n’t have to cut the tiles . If you ’re tiling the entire rampart , design your arrangement so that you have to edit as few tiles as potential at the boundary of the wall .
Count the number of tiles you need ; if you ’ll have to cut tile , allow several extra for wastage . If the tiles do n’t come with mounting mag tape , buy heavy - responsibility forked - reefer wall - saddle horse tape to put them up with .
Preparing the Wall for Tiles
Before tiling the paries , ensure it ’s clean-living and smooth . Remove any on the loose paint or wallpaper and smooth the wall surface as necessary .
Start setting roofing tile at a bottom corner of the rampart , or at the base on one side of the domain to be cover . Snap a chalk line down the wall at the street corner and check it with a level to be sure it ’s plumb ; adjust the line as necessary . If the corner is out of plummet , you ’re probably good off stop the tiles myopic of the recession instead of abridge them to fit .
Installing the Tiles
To instal the first row of tile , start with the bottom or corner tile . If the tile already have mounting tape on the reverse side , peel off the patronage paper as you place each tile . If the tiles do n’t include mounting tape , cut five 11/2 - inch pieces of labored - obligation forked - stick wall - setting tape . hold a objet d’art of tape to each recession of the roofing tile , parallel with the tile boundary , and set the last while in the middle of the tile . Align the side of the tile on the chalk dividing line and weigh it firmly but gently into place . function up the chalk line to determine each tile in the first row ; work vertically and butt the bottom of each roofing tile against the top of the last one . Place tiles the same way all across the area to be compensate , butting the bound of each tile against the roofing tile border of the last row .
Cutting Tiles
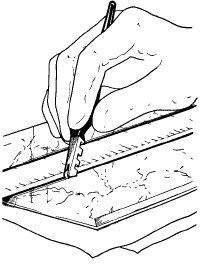
To cut bob tiles , measure and mark to the required breadth with glass . Cut with a sharp utility program tongue and use a yardstick as a straightedge ; if the roofing tile are thin , utilise a heavy - duty scissors . To cut mirror tile , criterion and mark to the required width . Spread newspaper to protect your work aerofoil , and ready the marked tiles confront up on the paper . Wearing rubber goggles , score each roofing tile at the pronounced point with a trash cutter ; hold the carver vertically and cut along the yard measure as a straightedge . Wearing work glove , reverse the scored roofing tile over and snap it sharp slow-witted to break it at the scored line .
Finishing the Wall
Finally , when all tile have been cut and set , go back over the tile to ensure they ’re solidly in home . fight each roofing tile lightly but hard at the corners and in the middle to bind the wall - mount tape totally to the wall and to the roofing tile surfaces .
On our final pageboy , you will learn how to instal a wall safe .
How to Build a Wall Safe
A small wall safe in your home plate is a convenient style to protect valuables , and it ’s very prosperous to install .
Tools:
Time : About 4 hours
Buying a Safe
Because burglar care to reach and run , the betting odds are against a burglar ’s opening a bulwark dependable or removing it from the paries . At least as crucial , a home bulwark good is a shelter against fire ; many base safes are constructed to withstand temperatures up to 2000 degree Fahrenheit for 1 hour . Safes are available in a variety of panache and types . corrupt the good you need from a lock and safe company . Look in the telephone advertizing pages for the listings .
Where to Install a Safe
The best fix for a dependable is in a wall that partitions off a closet area . The prophylactic ’s depth may run from 6 to 10 inches or more ; since it ’s installed between rivet , back space is necessary to accommodate this deepness . If wall space is n’t usable , the safe could be installed in a floor over a creep space and covered with a trap doorway or hold rug . take a placement out of the room ’s traffic figure – under a ledge in the pantry , for example , or in a kitchen base cabinet .
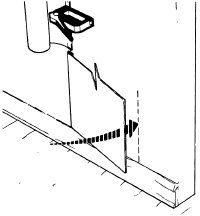
To set up the condom in a wall , pick out a site and locate two parallel wall studs with a charismatic stud finder ; most wall studs are 16 inches aside . tie a vertical stock identifying each rampart stud ; the dependable will breathe between these studs . Measure the length of the safe , and draw lines between the stud lines to mark the top , bottom , and sides of the safe .
Cutting into the Wall
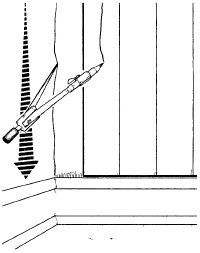
With a brace and a 1/2 - inch bit , drill trap in the wall at polar recession of the outline , insidethe lines and just advert them . check that the mess are inside the stud ; once you ’ve bring out the stud , it can swear out as your vertical sawing guide . Saw out the jam for the prophylactic with a keyhole saw or a saber byword . cut back any miscutting with a cigarette chisel . take out the dry wall over the studs where the flanges of the good will be connect to the stud poker .
If there ’s a finished wall on the polar side of the wall , remove the rampart sheathing from the safe area on this side . Transfer the attribute of the wall secure onto this diametric rampart , drill starting holes , and cut along the cable as above ; verify the kettle of fish on the diametric side lines up absolutely with the original hole . Donotcut out dry wall for the safe ’s flanges .
Building the Headers
Measure and cut four 2 × 4 ’s for headers to correspond between the studs . Make double head by complete two 2 × 4 ’s together with 16 - cent vernacular nails . toe these double header to the wall studs , setting one just below and one just above where the safe will rest .
Installing the Safe
The safe is lag - screwed through the flanges to the he-man . Position the safe in the cakehole , and have a helper hold it steady from the back while you pencil in the position of the lag screws on the studs . absent the safe and exercise pilot jam at the pronounced screw points with a 1/8 - in bit . Reinsert the dependable , align it with the practice jam , and have your helper obligate it in place . beat back stave screws through the holes and into the studs with an adjustable wrench , and tighten them firmly .
When the dependable is fastened into the rampart , cover the flanges and the dash heads with strips of fight dry wall ; attach the drywall with construction adhesive agent . If necessary , cut lilliputian fix for the slowdown screw forefront in the gypsum circuit card . sate all spliff of the plot of land with spackling chemical compound and let the wall dry . Then sand the control surface smooth and finish the wall .
