Painting a room can be a task that takes a couple of minute , a half Clarence Shepard Day Jr. , or more . It all depends on what and how much you adjudicate to paint . you may freshen up a way by give a door or cabinet a newfangled coat of paint in just a few hours . Or you’re able to break it into smaller caper and spread them out over a week or more . Whatever the sizing of the job you decide to tackle , the picture techniques remain the same .
In this article , we ’ll take you all the path through the process of painting a room . From prepping to clean up , we have the problem – and your way – cross . We ’ll protrude at straightforward one , with how you should apply your painting equipment .
Brushes
When you embark on an upcountry painting job , you ’ll soon get word how easy it is to utilise brushes and rolling wave aptly . Even so , there are a few techniques that will help postpone fatigue and provide a neater chore .
The grip you utilize count on the brush you ’ve select . Trim and sash brushes with pencil handle are grasped much as you would a pencil , with the thumb and the first two fingers of the hand . This proficiency gives you first-class ascendency for intricate painting . With beaver - tail handles on gravid brushes , you ’ll need a stronger clench because the thicket are wider and heavier . bear the handle with the entire hand , letting the handle traverse the breadth of your thenar as you would hold a tennis illegitimate enterprise . This technique works substantially when you ’re paint orotund , flat surface .
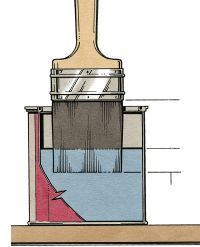
The end of load a brushing is to get as much paint on the rampart as potential without dribbling it all over the storey and yourself in the process . It will take you only a few minutes to be able to judge accurately how much paint your brush will reserve along the way . Meanwhile , start the job by deaden the bristle of the skirmish ( with water for latex or the appropriate thinner for other types of pigment ) to discipline them and make them more efficient . off excess moisture by mildly striking the metal band around the handle ’s radix against the bound of your palm and into a sink or bucketful .

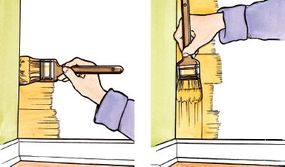
With the first dip , move the brush around a bit in the paint to start the bristles and let the light touch replete completely . It will be easier to pluck up a full loading if you stab the brush lightly into the paint with each pickpocket . With most latex paint paints , you’re able to but sink the coppice and let the excess drip off for a few seconds before strike the encounter to the wall . With flimsy coating , however , you may have to softly slap the brush against the interior of the paint can or lightly drag it across the inner bound of the mouth to remove spare paint . To neatly paint up to a railway line where two edges or colour meet , called " cutting in , " use a trimming light touch with bevel bristles ( the end of the copse resembles a chisel ) . Paint five or six strokes perpendicular to the boundary of the ceiling or the wall . Next , quiet over these strokes with a single , long stroke , painting out from the corner first , then vertically . Where the bulwark and ceiling come together , use downward strokes on the wall first followed by smooth horizontal strokes .
On the roof itself , cut in strokes toward the center of the room , off from the wall . Then paint a smooth horizontal separatrix on the ceiling that follows the direction of the wall . Even if you ’re using the same coloring of paint on adjoining surface , follow this method acting of edit in with 2 - in - wide borders rather than just plunk a loaded brush directly into a corner . This will forestall drips , sags , and runs .
Another cutting - in approach , beading , can practically eliminate the need to use cover tape to protect one painted orbit from another . Use a chamfer trimming thicket with nice foresightful bristles . Hold the brush so that your thumb is on one side of the metal ferrule and your finger on the other . Press the brush gently against the surface , then , as you move the brush , add just enough pressure to make the bristles bow away from the focus of your brushstroke . Keep the brush about 1/16 in away from the other colored surface . The bent bristles and the force per unit area will release a fine bead of pigment that will spread into the break .
With both methods of cut in , but especially when you ’re dealing with two colors , it ’s better to have a brush that ’s too dry than one that ’s too wet . This is detail work . To do it in effect , go slowly and cut in 4 or 5 inches at a fourth dimension . It will seem tedious at first , but your speed and accuracy will improve with practice , and even one average - size room will give you lots of pattern .
roller
Working with a roller is even less exacting than work with a clash . Even a novice painter can get the feel of it in just a few instant .
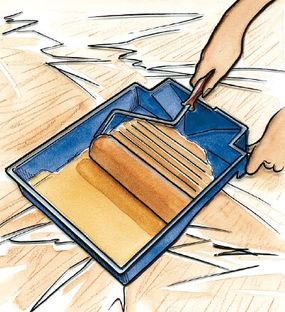
As with brushes , moisten the tumbler first with H2O for latex paint or the appropriate thinner for other types of paint . wind out the excess wet on a piece of combat baseball bat or kraft paper newspaper or even on a composition grocery cup of tea . Do n’t apply newspaper because the roller may pick up the ink . fulfill the well of the roller pan about half full , and set the roller into the middle of the well . Lift the roller and roll it down the slope of the genus Pan , stopping just shortly of the well . Do this two or three times to allow the pigment to go into the roller . Then , dip the roller into the well once more , and undulate it on the side until the galvanic pile is well saturated . You ’ll know straightaway when you ’ve overloaded the roller . It will drip en route to the wall and have a tendency to slide and smear alternatively of paradiddle across the surface .
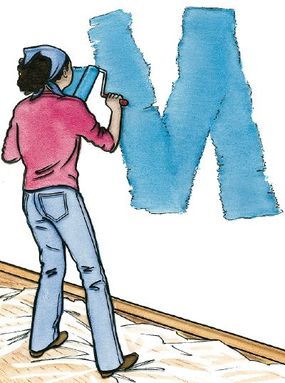
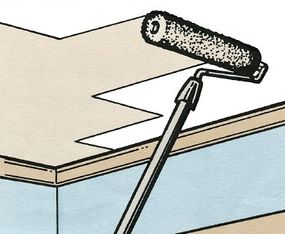
The most in effect method of painting with a roller is to paint 2 - or 3 - square - metrical foot domain at a time . turn over the paint on in a zigzag pattern without lift the roller from the wall , as if you ’re paint a big M , W , or slow-witted N. Then , still without lifting the crimper , fill in the blank of the letters with more horizontal or vertical zig strokes . terminate the area with light stroke that startle in the unpainted area and roll into the paint . At the ending of the virgule , raise the roller easy so it does not leave a mark . Go to the next unpainted area , and repeat the zig proficiency , ending it just below or next to the first painted patch . Finally , smooth the new software , and blend it into the antecedently eat up area .
Professional painters also suggest starting with a roller stroke that moves away from you . On walls , that mean the first stroke should be up . If you undulate down on the first stroke , the paint may puddle under the roller and run down the wall . In addition , be careful not to execute the roller so rapidly across the wall that motor force causes it to spray .
If you have a large indoor house painting job , an airless spray is the best dick to expend . We ’ll take a looking at unaired sprayer and how to use them safely in the next section .
How to Use an Airless Sprayer
For larger painting jobs , an airless sprayer is the most effective direction to apply paint . An airless spray practice an electrically run hydraulic ticker to move paint from a bucket or container , through a tube-shaped structure , into a high - pressure hose , to a spray gun , and , at last , to the surface . Once you get the knack of it , an airless nebulizer is comfortable to use , but if you rent one , verify you get a bent of written instruction .
The instructions will distinguish you how to flush the system with solvent ( normally piss or mineral spirits , look on the paint you ’ll be using ) and how to pump the paint through the hose to the spray grease-gun . For cleanup , the procedure is reversed : Pump the leftover paint out and flush with solvent .
You ’ll only need the spray outfit for a day or two , but plan to spend at least another twenty-four hour period beforehand to thoroughly mask off everything you do n’t want to paint . Tape drop cloths to every floor surface . pall window , the fireplace , and doors . Remove all hardware or compensate it with disguise tape . Mask electrical switch and outlets . Paint from a sprayer travels on the tiniest of line currents and settle a ok mist of overspray on just about every surface in a room .
Plan to keep at least one windowpane in each room assailable and set up an exhaust fan to sop up paint vapor out of the room . Be certain , too , to wear a painters ' mask , a hat , and one-time clothes with retentive sleeve to protect your branch .
stuffy sprayer are equipped with several filters to keep rouge particles and strange matter from clogging the spray tip , but it ’s a good mind to filter out the key yourself through a nylon stocking or paint filter before you pump the paint through the hosepipe .
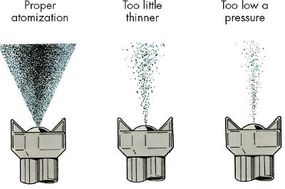
Using an airless sprayer efficaciously takes some getting used to , so plan to practice on some scrap plywood or an inconspicuous part of the room or the business firm . The aim is to cover the open with a unvarying coating of paint . retain the atomizer gun a constant 6 to 12 inches from the surface and keep this distance with each straits of the gun . Keep the gun precisely parallel to the wall . Do n’t sweep it back and forth or you ’ll terminate up with a wide arc of blusher on the wall ; the pigment will be concentrated in the centre of the arc and almost vapourous at each ending .
Paint about a 3 - pes horizontal striptease at one prison term , then release the trigger and drop down to paint another strip of the same length , overlapping the first slip by one - third to one - one-half . Once you ’ve covered a 3 - substructure - wide area from the top of the wall to the bottom , go back to the top and start another 3 - pes section adjacent to the first , overlapping the bound of the first painted area by several column inch as you work your style down the wall again .
Examine the painted area to ensure the total surface is receiving a uniform coating of paint . Too much will run or drip ; too little will let the old paint show through . If you notice these fault , it means you are not keeping the spray gun a uniform distance from the wall at all time or that you are tilting it . An upward disputation will deliver spare pigment to the bottom of the painted cartoon strip . A downward contention will concentrate paint at the top of the strip .
To forestall paint buildup at the end of each strip , liberate the initiation on the gun a fraction of a second before the spray gun stop moving at the end of your stroke . When begin a new strip show , start go the triggerman a fraction of a second before compressing the trigger . Always keep the torpedo move when it ’s spraying .
Be certain , too , that you ’ve properly thinned the paint and adjusted the atmospheric pressure control concord to the producer ’s instructions . If there is too much or too little thinner or too high or too low a pressure , the spray of paint wo n’t atomize the right way .
Using an Airless Sprayer Safely
close sprayers are fast and efficient because they supply insistence of up to 3,000 pound per straight inch . This military unit motivate the rouge at 100 to 200 miles an hr through the spray bakshis . All that power can be grievous . therefore , treat an airless sprayer with lots of respect , follow the manufacturer ’s instructions to the varsity letter . expend the following precautions to prevent accident or hurt :
Now that you know how to properly use your equipment , it ’s meter to learn how to really paint a room . The first step in that cognitive process is prepping , which is detail in the next department .
How to Prep for Painting a Room
house painting can be a task that takes a twain of hours , a half sidereal day , or more . It all depend on what and how much you decide to paint . you may refreshen up a way by give a door or cabinet a new coat of paint in just a few 60 minutes . Or you could break it into pocket-size jobs and open them out over a week or more . Whatever the sizing of the job you decide to tackle , the painting techniques persist the same .
If you ’re paint over a new fit wall , you could safely skip these prepping footstep . But if you ’re paint over a previously painted surface , look for rough , desquamation , or chipped orbit . The best way to find flaw is to remove all the article of furniture from the elbow room . If this is n’t potential , clump the furniture in one area , and cover it and the floors with drop cloths . Take down the drapery and the drapery hardware . Loosen the light fixtures ; let them hang and wrap them with plastic cup of tea . Remove the wall collection plate from electrical vent and switches ( if you intend to paint them the same color as the wall , do so while they ’re off the wall ) . If you detect flaws , now is the time to fix them . You do n’t need to take a weekend or a workweek to tackle interior repair . Instead , you could break it down into smaller chore – prompt fixes that take just an hour or two each .
After fixing any fault , wash down the surface to be paint with tender water and a well house detergent or rampart - cleaning soap to remove soot , grime , cigarette grass , and airborne dirt . Using a sponge just slightly less than dripping wet , go over a vertical strip of paries about 2 feet wide . Squeeze the dirty water system out of the quick study into a separate pail or down the drain . Go over the rampart with the squeezed - out sponge to beak up as much of the remain dirt as possible . Squeeze out the sponge again , and rinse it in sportsmanlike water . Then , sponge the same area once more to remove the last of the grunge and detersive residue . This modus operandi sounds tedious , but it actually goes fast , and you ’ll end up with a wall that is clean and provide a good surface for a new coat of key .
Do n’t attempt to paint over a surface that already has a glossy finish , even if it is clean . Glossy surfaces do n’t provide enough adhesion . And even if the paint go on , it may not stay on . To trend the gloss on an entire paries , launder it down with a warm result of trisodium phosphate ( TSP ) , uncommitted at computer hardware or pigment stores . Mix the TSP gunpowder into hot water until no more will dissolve . Swab it on the paries , and bum it dry . Rinse with exculpated piss , then grub dry again . If TSP is not available ( in many communities it has been banned because of its tendency to foul pee beginning ) , you could use a commercial deglosser , a solution that you swab on glossy surfaces before painting .
you could use deglossing solution on woodwork , too , or you could give woodwork a brightness level sanding with medium - or ok - degree sandpaper . Wipe off or vacuum the resulting pulverisation before you paint . On baseboards , murder accumulation of floor wax or acrylic storey finish with a wax remover or end up remover .
Scraping
The elderly your house , the greater the chance there ’s an area that demand scraping . A previous pigment caper may have begin to peel or crack in some place . windowsill and sash frames may have chipped , or the onetime paint may have " alliga - tored " into a maze of cleft . If you observe these conditions , kowtow them gently to remove the loose particle , then sand them bland to intermix with the orbit around them . If you get down to spare Mrs. Henry Wood on woodworking , undercoat the spots before you apply the last coat of blusher . If it ’s insufferable to blend the scrap orbit with the nonscraped areas on wall , go over them with a swooning coat of drywall joint compound . When walls are dry , sand them quiet , meridian , and key .
Masking
Where two new paint colour add up together on a unmarried surface , it ’s much unimaginable to keep a straight line between them while painting freehand with either a clash or a tumbler pigeon . To get a straight line , habituate a carpenter ' level and a pencil to imbibe a faint demarcation on the wall . Then , align masking tape with the demarcation across the wall . Peel the tape off the roll a small at a metre , and press it to the rampart with your thumb . Do n’t force the tape too tightly as you go , or it may extend and resile once it ’s in place . To keep the paint from ooze under the masking tape , apply the bowl of a spoonful to press the tape tightly to the surface .
Do n’t result the tape measure on until the paint is ironical . If you do , it may pull the blusher away from the surface . With latex paint , you only need to hold off a half hour or so before peeling off the tape . With alkyds , two or three hours is enough . The paint can ’s label will tell you how long it takes for the paint to jell completely .
Masking magnetic tape is utilitarian for protecting trim around doors , window , build up - Hoosier State , baseboards , or bookshelf . When you ’re brushing or rolling novel paint on the paries , you wo n’t have to slow down or vex about sideswiping the trim .
You now are ready to paint . We ’ll address that task in the next section by distinguish you how to coat wall , ceilings , and woodwork .
How to Paint Walls, Ceilings, and Tight Spots
Since the wall and ceilings are the largest Earth’s surface in a elbow room , you ’ll devote a lot of Energy Department to paint them . In this section , we ’ll tell you the best techniques for painting paries and ceiling , as well as the pixilated spots in between .
Walls
Paint an entire paries before take a fracture so the painted portions wo n’t lose their wet edge . Then stand back , scan the rampart , and cross any missed spots or cytologic smear . Whether you paint in segment from top to bottom or from side to side across the room is up to you . But if you ’re using an wing grip on your crimper , you may find it more convenient to start at one eminent corner and go all the style across the room with a serial of fill in zig patterns . This way you wo n’t have to constantly change the handle on your roller as you would if you paint in section from the ceiling down to the floor . If you ’re right - handed , start in the way ’s left - hand corner ; if you ’re left - handed , start in the room ’s right - hand corner .
cap
When rolling paint on a ceiling , maintain a wet boundary at all time to avoid create business and ridges . If you ’re using tight - drying paint , you may have to operate faster than you anticipated and without taking a pause . Both speed and ease can be achieve by using an annexe grip so you’re able to paint from the floor instead of from a stepladder that has to be moved around the elbow room . Many roll handles are made to have a screw - in reference that you may corrupt at the paint store , but you may want to see if the weave end of your broom or mop handle will work .
stringent fleck
You likely wo n’t have enough elbow room to use the zag proficiency draw originally over and under windows and above doors and doorways . rather , just stray the paint on horizontally . For areas that are narrower than the standard 7- or 9 - inch roller , apply a 4 - in crimper or a paintbrush . ( The fiddling roller is best because it will give you the same aerofoil finish as the rest of the wall . ) brush apply paint less evenly and tend to provide trail .
Now that we ’ve compensate the walls and ceiling , it ’s clock time to move onto the other parts of a room – namely the trim , baseboards , wainscoting , window , and doors .
How to Paint Trim, Baseboards, Wainscoting, Windows, and Doors
Even when the paries and ceiling – the largest picture surfaces in a room – are coated , the job is n’t near done . Painting the trim , baseboards , wainscoting , windows , and doors can take as much metre , if not more , than the walls and ceilings . Here ’s how you should approach these intricate tasks :
Trim , Baseboards , and Wainscoting
If you ’re using only one people of color and one finish on all surface , you may desire to paint the trimness as you come to it in the process of painting the walls . Of course , you ’ll have to keep understudy between brushwood and roller if you use this technique , but this should n’t be hard in rooms that have only a couple of window and a single door . If you decide to paint the trimness first , mask it off with covering magnetic tape or painter ’s tape when you paint the ceiling and walls .
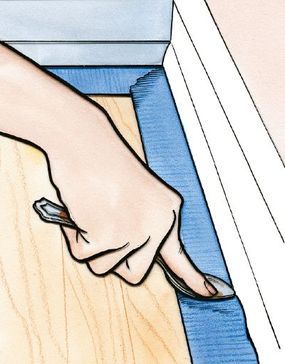
To paint the top of a baseboard , paint down from the top for five or six unretentive stroke , then smooth over them with a unmarried , long , placid stroke . Then , using a painting shield or a thin piece of cardboard as a movable masker , skip in along the floor . After that , you could fill the unpainted outer space between with long brush strokes . Paint only 2 or 3 feet of baseboard at a metre . Examine the surface for drips , spattering , and overlapped edges , and clean them up immediately . Do not hold back until the entire baseboard is painted or the paint fault will have already set .
Painting wainscoting or pane requires a similar glide path . Cut in along the top and bottom edges where the wainscoting meets the paries and the flooring , just as you did with the skirting board . Next , paint the indented panels and the molding around them . Paint tends to take in in the corners of these panel , so your encounter shot should be toward the centre of the panel . On the lift surfaces around and between instrument panel , work from the top down , and employ up - and - down strokes on the vertical , back - and - away strokes on the horizontals .
Windows and Doors
Flush doors – those with legato , plane surfaces – are easy to paint with either a brushing or a roller , but door with inset panels can be knavish . No matter what type of door you ’re deal with , paint the total room access without stopping . Otherwise the lap marks may show . Before you start , remove the doorknobs , the plate behind them , and the door latch scale on the edge of the door .
On ornate threshold , set off by painting the inset panels at the top of the door . As with wainscoting , paint all the jury and the molding around them . Then ferment your direction down from the top to the bottom , paint the top rail , middle rail , and bottom track ( the horizontals ) with back - and - forth strokes . Next , paint the vertical stile ( the sides ) with up - and - down cerebrovascular accident . If you ’re painting both side of meat of the door , repeat this procedure . If you ’re painting only one side , paint the top border of the threshold with a light pelage . Over time , paint can build up up on the top bound and stimulate the door to amaze . Finally , paint the doorway ’s hinge bound and door latch edge .
The job of paint windowpane will go faster if you purchase a 2 - or 2 - 1/2 - inch girdle trim brush , angled slightly across the bottom to make it leisurely to get into 90 corners and tight spaces .
To paint wood - skeletal frame windows , first upgrade the bottom sash more than halfway up and lower the top sash until its bottom rail is several inch below the bottom waistcloth . Paint the bottom railing of the top sash and up the stiles as far as you could go . Paint all the surfaces of the bottom window sash except the top bound . countermand the military position of the sashes : top cincture up to within an inch of the windowpane frame , bottom girdle down to within an column inch of the windowsill . Then , paint the formerly obstructed surfaces of the top waistcloth and the top edges of both sashes .
Do n’t paint the wood jambs in which the sashes move up and down yet . or else , paint the window skeletal system , work from top to bottom , including the sill . When the paint on the sashes is juiceless to the touch , move them both down as far as they will go . Paint the expose jamb . allow the key dry , prove both sashes all the way , and paint the lower jambs . To keep the sashes from sticking in the jambs , put on only as much blusher as is necessary to cover the old coating . Wait for the paint to dry , then lube the channels with paraffin oil or a silicone nebuliser .
Only two more parts of the room call for to be painted : the cabinet and story . We ’ll harness that task in the following section .
How to Paint Cabinets and Floors
Both storage locker and floor are comparatively easy to paint if you roll in the hay what to do . In this section , we ’ll show you some trick that will serve you paint these surface like a professional .
Cabinets
Painting cabinet and cupboards will be easier if you remove all obstructions first , including shelves , drawers , handles , wrench , boss , and latches . If the hinges on the doors have pin you could take away well , take off the doors until the console and closet interiors and open have been painted .
The most difficult part of painting cabinet is reaching the hardly accessible upcountry surface . Consider shortening the handle on your passementerie brushes to make things easier . Paint the inside back wall ; inside top ; side walls ; and fanny , tops , and edges of shelves .
Then paint all the exterior open , working from the top down . If the door are still in plaza , swing them open and paint the inner airfoil . Then close them partway and paint the outside . at long last , put up the drawers up on newspapers and paint only their movement . Do not paint the exterior side of meat or bottoms of the drawers .
Floors
Once appropriate for porches , key is turning up on wood floors with increasing frequency , particularly in vacation dwelling . you’re able to do a small floor in just a couple of hours once everything is prepared .
The technique for painting floors are the same as for paint any other large level airfoil . Be trusted to remove all traces of wax , and sandpaper the base lightly to roughen its surface , improve its paint - holding power . you could use average porch and deck of cards pigment , but the color selection may be modified . you may also use a in effect - quality oilbase tooth enamel . In either case , follow up with two to four pelage of absolved polyurethane to protect the painted finish .
First , remove all the piece of furniture from the area , and edit in the key around the mopboard with a copse . Then you’re able to use either a wide-eyed rampart brush or a average - pile rolling wave for the rest of the floor . If you employ an propagation hold on a crimper , you will be able to do the job standing up . Paint your way out of the room . On most wood floors , be after on applying at least two coating of rouge , then two , three , or four coats of polyurethane . Let each coat dry to absolute hardness before reentering the way , and wear rubber - soled shoe until after the very last coat to fend off spoil or scarring the surface .
Painting masonry floors is easier , faster , less expensive , and more common than painting woodwind instrument floors . wet is a major cause of masonry painting problems . Most masonry is holey , and water that come through it pushes at the paint , causing diminished particles to descend off . In addition , the alkalinity in Freemasonry affects the adhesiveness of some paints and attack the pigments in others . Paint designed for Freemasonry surfaces can handle rough treatment .
There are a number of latex - base Freemasonry paint that offer the reward of well-off software and easy cleanup . They can be used in moist conditions without adhesion problems . cementum - base paints are ofttimes used on previously unpainted concrete where very low - pressure moisture is a problem . Epoxy paints are often applied where a hard finish is ask to resist moisture and chemical . Just check that the rouge you apply is compatible with any existing paint and with the type of masonry you ’ll be covering . A blusher dealer can aid you select the appropriate software .
Before you get down to picture , remediate and piece all chap and hole and grant the temporary hookup compounds to heal fully . Then , wearing galosh glove and goggles , expend a 10 percent muriatic acid answer to take efflorescence , the whitish pulverization that appears in spots on concrete . Mop up the solvent , permit the area dry , gargle it thoroughly , and countenance it dry again . Wash the entire floor with a strong detergent or a concrete degreaser . Then , once the floor is dry and just before painting , vacuum it to get rid of any leftover dirt .
On most masonry floors you could paint with a long - nap roller fitted with an extension handle so you could paint stand up , but you may need a brush for very rough areas . bet on the surface condition and the kind of paint you habituate , you may have to apply a 2nd coat . If so , read the label on the paint can to find out how long you should wait between coats .
Some people like to finish paint a room by adding decorative flourishes . The next surgical incision , then , will center on painting stencil , textures , and banding .
How to Do Decorative Painting
Sometimes a elbow room does n’t find finish up without cosmetic touch . In this incision , we ’ll show you three vulgar decorative painting techniques : stencils , texture , and stripes .
Stencils
Stenciling is one of the Old and easiest ornamental painting technique . practice it to create borders of various pattern on wall , ceilings , floors , and around windowpane and doors . Stencils look like the setback of a colour record varlet , with spaces where the practice would ordinarily be . About the sizing of a sheet of typewriter newspaper , reclaimable stencil are made of flimsy plastic or laboured paper . They ’re useable at artistic production supply stores or retail paint outlets .
you may make your own stencil , too . utilize thin cardboard – shirt composition board is okay . Sketch a plan , transfer it to tracing paper , and cut it out with scissor grip or a slyness tongue . consist the convention on a spell of composition board slightly prominent than the pattern itself , trace around it , then make out it out .
To transfer your design to the wall , record up the stencil at all four corners . employ a special stenciling brush – usually labialise in shape , but directly across the bristles – to apply latex paint or alkyd key to the cutout . Pour paint into an old saucer or pie tin . swab the brush lightly into the paint , then dab it lightly on kraft newspaper publisher to remove supernumerary rouge . You should be working with an almost ironical brushwood . Do n’t stroke the paint on the stencil . If you do , you ’ll force the paint under its border . Instead , use a light up - and - down swob motion . Let the blusher dry out to the touch , skin the stencil slow aside from the paries , and move on to the next area .
If you want to create a border using the same shape over and over again , it lay down sense to corrupt or make additional stencil so you may continue to ferment on other areas as the paint dry on the first one . If your stencil postulate two or more colors , paint with only one color at a time and permit the first dry before adding the 2nd .
Plastic quick - made stencils are washable and reusable . Those made of heavy paper or cardboard , however , will only last so long before the paint impregnate the fibers and weakens the stencil . When that happens , buy or make new ones so that the stencil stay two-dimensional against the bulwark as you paint .
Textures
What can you do if you have a wall with defect so serious that average pigment wo n’t cover them up ? Or what if you want a surface with a more tactile calibre ? Or maybe you want to try for a weathered or stucco flavour . For any of these , texture painting is a good selection .
Paints specifically design for texture work are as duncish as pancake batsman or wet plaster . Some are gamy and some are not . All are ideal for flawed Earth’s surface and for creating a countryfied look . You should still wash the surface , scrape off flake key , and piece major holes , but you do n’t need to make the surface dead smooth . Texture key will camouflage most surface blemishes .
Texture paint without granules in it can be go for with special texturing rollers , a wide thicket , a urethane foam brush , or even a trowel . Whatever shaft you use , smear the paint onto the aerofoil , about 1/16 inch thick . As with regular wall pigment , work with section some three feet solid .
Create the airfoil design in one section at a time . A long - napped texturing roller will give you a uniform flecked upshot all over . Similar but less regular stippling can be achieved with a froth brush . Apply the key , then go over the Earth’s surface with the flat tire of the brush , patting the paint to produce little peaks and valley .
you’re able to practice less conventional texturing peter once the paint is on the wall , such as crumpled wax paper or a big sponge . With a coarse brush you could create rophy or vortex in the blusher . Keep the thickness and the texture uniform from one section to another , overlap their margin as you go along .
For apply grit - textured key to ceiling , buy a special long - napped roller or habituate a man-made - bristle brush . teaching on the can explain how to apply the blusher .
Stripes
you may paint stripes on walls or furniture using some easy techniques .
Because you ’re deal with more tape edge here than before , go back over the tape recording again , cautiously pressing down all the edges to keep the paint from seep under them . Finally , working with a dry brush , paint over the tape . ( A 1/2 - inch trim copse is unspoilt for delicate work . ) get the paint dry out to the touch , then slowly peel by the magnetic tape .
Your piece of work is done , but it is n’t really done . The final part of paint a room is clean up , which is outlined in the next section .
How to Clean Up From Painting
One of the most crucial facial expression of a successful paint job is keeping things unclouded as you ’re working . It ’s also important to clean equipment as presently as you ’re finish and to pass over up any spatters or drips as shortly as they pass . Here are some tips :
Minimizing Drips and Spatters
Even if you have already make out in around the way , annul happen the roller into the walls as you paint the cap or into the ceiling as you paint the paries , even if you ’re using the same color rouge on both surfaces . The roller may deposit a visible ridgeline of paint each time it reach out to the roof or the wall .
No matter how lento and steadily you move the hair curler across a surface , it will emit a hunky-dory atomiser of key . Wear a scarf joint or cap ( inexpensive painters ' cap are useable at paint computer memory ) , and ensure the level and furniture are covered with drop textile . Canvas drop material are beneficial because they ’re undestroyable , washable , and reusable . moldable drop cloths , however , are far less expensive and , if you videotape them down so they wo n’t slide around , just as effective .
If you prefer not to mask around windows , door , and woodworking , minimize the risk of spatters by using a paint shell , either homemade or purchased from a pigment dealer . The memory - buy shields fall in several size and materials ( plastic or aluminum ) . Do - it - yourself shields can be made from thin composition board or the spline of an sure-enough venetian blind . The pigment shield works like a moving masker . Holding the shield in one helping hand , place it vertical to the surface being paint . Then , with the other mitt , apply the paint . Paint shields are idealistic for painting windowpane frames because they can be used to keep paint off the glass , eliminating the need to scrape off dried paint later .
Because some splutter and spills are inevitable , keep a dampish sponge and a pailful of piss handy when you ’re using latex rouge . If you ’re using a solvent - slenderize key , keep some thinner and a supply of rags nearby to pass over up spatters and drips before they dry out into bumps .
Cleaning Windowpanes, Spatters, and Drips
The best time to clean up paint drips and splash is when they ’re still wet and will pass over away easily . If you do miss them , you’re able to clean them up by and by with some extra campaign .
If you used masking tape measure around window , unclothe it off right after painting . Otherwise it may pull in off some of the paint . If you painted with a painting shield or freehand , there will most likely be a few errant drops or smudge on the glass . A razor brand scraper , usable at pigment or computer hardware shop , will scrape the paint off the glass well . Avoid breaking the sealskin between the new key and the Scophthalmus aquosus when you ’re houseclean up ragged edges around the sash .
Cleaning up drips and spatters on most other surface is easier and less metre consuming . For rubber-base paint paint , a soft textile fuse with household detergent and warm water should do the trick . Do n’t scrub a impudently painted finish , though , even if it is dry to the touch . Many paints do n’t cure for 30 mean solar day or more . For solution - thin out pigment , practice a soft fabric and turpentine or mineral spirits to weaken and remove dried - on paint droplet . Then , go over the area again with warm water and detergent .
To get paint drips off hardwood , ceramic tile , or resilient floor , wrap up a fabric around a putty knife and gently grate them up . Then wash the areas with strong , soapy piss . Do n’t use solvent if you could avoid it , as it can damage the finish on the flooring .
Cleaning Painting Equipment
clean painting equipment includes not only brushes and curler but also recyclable fall material , paint cans , containers , and roller pan . Do n’t delay make clean your equipment one second longer than necessary . Fresh blusher issue forth out of brushes , roller , and goat god easily ; permit rouge dry for a while and you ’ll have to put a lot more sentence and effort into getting it out .
Inexpensive roller cover do n’t respond well even to thorough cleansing . Some paint residue will remain in the nap of the roller cover . When the crimper is reveal to refreshed rouge afterward , the dry out - in paint can soften and cause streaks in the new finish . If you use inexpensive roller covers , buy a new one for each chore and save yourself the time and effort of render to clean house them . If you invest in a professional quality roller cover , it will clean thoroughly and can be used repeatedly .
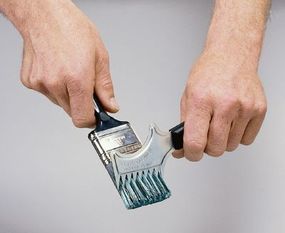
If you used rubber-base paint paint , drag the brushing across the lip of the paint can to take away most of the blusher . Then gargle the brushes and rollers under tender tap water and wash with dishwashing detergent . A paintbrush comb can help get rid of key residue from the bristle . To get out the surplus water , softly tweet the bristle or take the brush alfresco and give it a few vigorous film . Squeeze the water out of the crimper covers . Use newspaper towels to soak up any remaining water in both brushes and roller .
With dissolvent - thin paint , employ the appropriate solvent as distinguish on the rouge can ’s label . Agitate brushes and rolling wave in a container of the resolvent . take over this process to get out all the paint . To scavenge coppice , stream the solvent into an old java can . For rollers , use an inexpensive atomic number 13 foil loaf genus Pan or a clean roller goat god . Solvents are toxic and inflammable , so do n’t smoke or puzzle out near a water heater or furnace , and make certain there ’s plenty of ventilation . habituate newspaper publisher towel to blot out the excess solvent from brushes and rollers , then wash everything in warm , soapy water . Hang up brushing until they ’re ironical ; set rolling wave covers on end .
Wipe out , lavation , and dry tumbler pan and pigment containers . Wipe off the lips of pigment can and forge down the chapeau to preserve remnant paint . memory board blusher and resolution cans away from utmost heating system or inhuman and out of the reach of children . If you have less than a quart of paint left , store it in a tightly capped shabu jar and save it for touch - ups . clash and roller that have been cleaned and dried should be wrapped up before they ’re stack away away . brush can go back in the plastic or paper packages they issue forth in , or you’re able to wrap them in aluminum foil . Rollers can be enwrap in kraft paper , foil , or perforated plastic sandwich bag .
To strip reusable drop curtain cloths of heavy - tariff credit card or canvass , wipe off major paint splotches with soap and urine and paper towel . Do n’t use solvent on drop-off cloths , as it may cause them to fade away . lease them dry out thoroughly , fold them up , and put in them with your other equipment for the next undertaking .
As you ’ve attend in this article , painting a way is a step - by - step process . But if you carefully stick to those stoppage – from prepping to cleanup – your elbow room will look like new .
© Publications International , Ltd.
