The toilet is one of the most important fixtures in your family . Although potty are tough and true components of the bathymetry system , it†™ s a rare householder or apartment - dweller who never has any trouble with a toilet . Clogging is perhaps the most coarse privy hassle , but it is far from the only one . The tank , for example , can make all sort of unusual noises , or water can run continuously . fortuitously , most toilet troubles can be fixed by a do - it - yourself pipe fitter .
If you ’re a do - it - yourself kind of somebody , con some agile fixes can keep you from anticipate the plumber . In this article , we ’re going to explain various issuance connect to repairing throne .
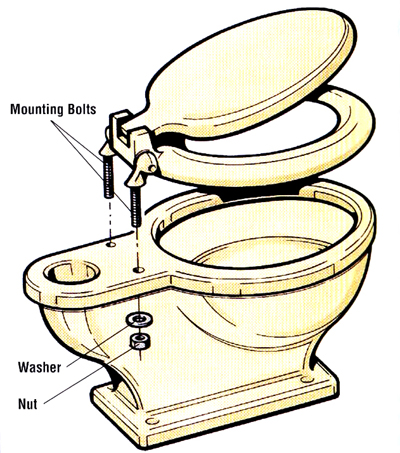
Replacing a Toilet Seat
The gentle toilet fixing task is replacing the hat and seat . There are so many styles of replacement seats available that you should have no trouble find one to equalize any john colour dodge or motif . Most modern toilets are cook up in two received size , and replenishment seats are made to fit them .
Once you have the right sizing seat , take away the old one . Remove the two orchis on the hinge and lift your sure-enough potty seat up and out . A common problem is that the nuts assure the toilet seat may be eat or corrode . The testicle on some commode seats are recessed and much inaccessible , making the job even more unmanageable .
A new toilet seat can be instal by inserting the two bolts , slipping on the washers , and tightening the Nut . Be careful not to over - tighten the nuts or the seat might be operose to off later .
What ’s the solution ? If you may get to the fasteners comparatively easily , apply some infiltrate oil to aid loosen them . Give the oil plenty of clip to inebriate in . Use a wrench , or , if you ca n’t accomplish the nuts with a unconstipated spanner , a deep socket twist . Be certain you do n’t use too much force ; if the wrench slips off a unregenerate nut , it could strike and snap the army tank of the bowl or anything else it happens to strike .
If all else fail , you ’ll have to cut off the bolt with a hacksaw . To protect the bowl ’s finish , apply taping to the bowl at the spots the hacksaw blade is likely to rub against . Then insert the brand under the flexible joint , and saw through the bolts . Be highly conservative in using the saw — a careless slip with a hacksaw can crack the fixture just as well as a C with a twist .
With the nuts remove or the bolts disregard , you could remove the old seat without further trouble . empty the surface area before installing the new seat . The fresh on can be set up by inserting the bolts and tighten up the bollock . Be heedful not to over - tighten the nuts , as you may desire to supplant this place someday as well . If you live in a rented apartment and establish a new seat that you pay for yourself , be certain to keep the old one . When you ’re ready to leave , you could supplant the raw on with the original and take the new tail with you .
If the bathroom palpebra and seat are still in good condition , but the small galosh bumpers on the bottom are in big contour , you may grease one’s palms permutation bumpers at the hardware storehouse . Some bumpers drive in in ; others must be nailed or glued into place . Whichever character you have , endeavor to deploy the novel ones in holes that are close enough to conceal the original holes .
Clearing a Clogged Toilet
you’re able to broadly speaking bring in a choked stool with a plunger , otherwise know as the plumber ’ friend . Make indisputable that there ’s enough water in the toilet bowl to overlay the rubber suction cup , then work the hold of the plunger up and down . If there is n’t enough water in the bowl , do not flush the toilet ; redden a clogged toilet will just cause the bowl to overflow . Instead , work a pan or tummy of water from another source to provide the water you need to insure the plunger cup . There are two types of plunger , and the one with a electric-light bulb - eccentric headway is especially in effect for toilets . Some types have a fold - out head that ’s designed for toilet enjoyment .
commonly , whatever is blocking the toilet drain is not very far away . If the plunger ’s natural process does n’t dislodge the geta , you may try on to snitch the block and get out it detached . A telegram coat hanger can sometimes do the line , but it is really a backup for the loo or toilet screw auger .
Before using the plumber’s helper , make certain there ’s enough water system in the toilet roll to incubate the suction cupful . Pump the plunger to dislodge the clog .
The auger has a recollective arm or tube to manoeuver the snake and gimlet crotchet into the cakehole . A crank on the ending enable you to deform the claw in the drain or ambuscade . Here ’s how to practice it .
Step 1 : stick in the auger into the toilet trap and bend the crank until it feels tight . This means that the snake has turn its way to and into the occlusion .
Step 2 : When you rend in the auger , you should be able-bodied to transfer whatever is clogging the throne . If you are n’t successful , try the closet auger several more time . In some cases , you may have to resort to labour a regular plumbers ’ snake through the blockage .

Step 3 : When all else fails , the toilet may have to be take out from the level and turned upside down so you could get a block . This is not what anyone would call an sluttish job , so you should give the elementary methods as good a effort as you can before you slay the toilet . But absent the toilet is not beyond the capacity of the average do - it - yourselfer , and this routine is explained in the forthcoming part .
The press gimlet has a recollective arm to steer the snake and auger hook shot into the trap . A nut case enable you to reverse the hook and bump the closure .
Toilet Tank Problems
Compared with a clogged toilet , armoured combat vehicle troubles can seem relatively insignificant . Yet strange noises or uninterrupted urine run can be more than vexing . They can also be costing you money in languish H2O . Fortunately , you’re able to eliminate most tank troubles quickly and well .
Toilet armoured combat vehicle trouble are both common and annoying , and they could be costing you money in waste water . Most problems , however , can be eliminated quick and easy . This is a hybridizing section of a typical toilette armoured combat vehicle and its portion .
Once you make love how the toilet works , you’re able to start to look for the source of gutter storage tank problem . airlift the lid off your toilet tank , and you should be able to follow this process quite easily .
When you trip the handle on the tank to flush a toilet , a trip lever is raised inside the tank . This lever lifts telegram , which , in turn , raise the tank formal or safe flap at the bottom of the tank car . When the moneyed valve opening is open , the urine in the armoured combat vehicle speed out past the raise army tank ball and into the crapper bowl below . This nurture the level of water in the pipe bowl above the storey of piddle in the commode bunker .
While the urine is induce out of the armored combat vehicle , the float Lucille Ball , which floats on top of the water in the storage tank , drops down . This pulls down on the float weapon , kindle the valve diver in the ballcock fabrication and allowing sassy water to flow into the tank car . Since water seek its own level , the piddle from the tank pushes the bowl water out into the drain , causing a siphoning action that cleans everything out of the bowl . When all the water is gone from the toilet bowl and melodic phrase is draw into the trap , the siphoning stops . Meanwhile , the tank glob falls back into blank space , closing the flush valve chess opening .
As the H2O level rises in the tankful , the plasterer’s float chunk rises until the ice-cream float weapon system is gamey enough to lower the valve plunger in the ballcock assemblage and exclude off the incoming piddle . If the piss fails to shut off there is an overflow vacuum tube that carries supererogatory H2O down into the bowl to prevent the tank from overflowing . If weewee flows incessantly out of the tank to the stadium and down the drain :
Step 1 : Lift up on the ice-cream float arm . If the piddle stops , you live the job is that the float ball does n’t move up far enough to lour the valve plunger in the ballcock assembly . One reason could be that the float ball is rubbing against the side of the tank . If this is the case , bend the float arm somewhat to move the egg away from the tank side .
If your toilet runs continuously , check the guidebook and lift wire that raises and lowers the armored combat vehicle clod to be certain they are aligned properly .
gradation 2 : If the ball does n’t touch the tank , go forward to harbour the float arm and absent the ball from the death of the arm by turning it counterclockwise . Then shake the egg to see if there ’s water inside it , as the weight of the urine deep down could be preventing the Lucille Ball from rising normally . If there is H2O in the ball , shake it out and put the ball back on the float arm . If the ball is damaged or corroded , replace it with a new one . If there is no pee in the ball , put the globe back on and gently bend the float rod cell down to lower the level the float nut must reach to shut off the flow of fresh piddle into the tankful .

Step 3 : If the above steps do n’t address the problem , train the tank orchis at the flush valve seat . Chemical remainder from the pee can preclude this Lucille Ball from seat properly , or the ball itself may have decayed . urine will ooze through the moneyed valve opening into the toilet bowling ball below . Turn off the water at the gutter shutoff valve and flush the toilet to empty the tank . you’re able to now analyse the army tank clod for polarity of wear and examine the tank ball for sign of vesture and install a fresh ball if necessary . If the problem is chemical residue on the sass of the flush valve opening , take some pixilated - dry emery cloth , steel woolen , or even a knife and scavenge away the debris .
whole step 4 : If the supererogatory H2O still flows through the lavatory , the guide or the lift conducting wire that raises and lower the tankful ball may be out of the line or bent . Make certain the guide is in place so that the wire is straight above the moneyed valve chess opening . Rotate the guide until the tank chunk fall straight down into the opening . If a lift conducting wire is dented , judge to bow it back to the right position , or install a novel one . check that the trip lever rod is not rubbing against anything and the lift conducting wire is not set up in the wrong muddle of the rod ; either situation could cause the tank ball to fall at an angle and not jam the opening night as it should .
If neither the float testis not the tank orb is at break , then the problem must be in the ballcock assemblage .

Fixing a Toilet Ballcock Assembly
The ballcock assembly looks more complicated than it really is . When you go to a ironware or plumbing system - supply stock to buy a fresh ballcock assembly , you ’ll find that both plastic and metal units are uncommitted . Plastic costs less and will not eat . But plastic assemblies are not as sturdy as metallic element ones . In addition , plastic units usually can not be repaired because many of them are sealed . Nevertheless , you could buy a eccentric of whole unlike from the one you ’re replace as long as the new meeting place has a threaded shank the same size of it as the old one . If possible , bring the old assemblage with you when you to buy the replacement . Here ’s how to fix an older - vogue ball cock assembly :
Step 1 : Make certain the water shutoff valve for the toilet is in the OFF status .
On many old ballcock assemblies , a pair of thumbscrews holds the valve plunger . You will have to unscrew them to remove the valve .
Step 2 : Remove the valve plunger , and you ’ll see on or two washers or O - ring . If any of these parts is faulty , water will flow out past the plunger continuously , and the toilet will hunt down constantly . Examine all of the washers and replace any bad ones .
footstep 3 : If the ballcock assembly is varnish , put back it as a whole . Shut off the toilet water supply at the shutoff valve and flush the cooler . Unscrew the float weapon system from the old ball cock whole and remove the refill tube from the overflow thermionic vacuum tube .
Step 4 : Look under the tank for a coupling or slip junky where the water intake pipe enters the base of the tank . tease the coupling nut to free the water inlet pipage . Then use an adjustable wrench to grip the keep on nut or locknut immediately above the sip nut under the tank . Use another twist to spellbind the base of the ball cock meeting place shaft inside the cooler .
Step 5 : Unscrew the locknut under the tank to take away the ballcock fabrication . If the nut is stubborn , use penetrating crude to loosen it .
Step 6 : Life the old forum out of the tank , saving the washers from all joining , both inside and outside the tank . New ones will probably be included with the replacement social unit , but keep the older parts until you ’ve installed the new ball cock assembly in case raw parts are damaged during initiation .
When installing a new ballcock assemblage , check that the gasket and the washer are properly seat and firmly secured by the retaining unit .

Step 7 : stick in the new ballcock assembly into the hole in the tank . With the inside washer in place , tighten the locknut on the exterior sufficiently to make the inside washing machine set watertight against the hole , but do n’t over - tighten it .
Step 8 : Replace the coupler orchis and water inlet pipe , reinstall the plasterer’s float arm , and set the refill tube into the runoff tube .
stride 9 : bend the urine back on at the toilet shutoff valve and gibe for leaks at all spot . Of of course , another thing to check is that the float ball does not scratch against the back of the tankful .

new types of ballcock assemblies decimate the float arm and the air bladder formal . One kind features a moldable cup that floats up to cut off the body of water as the army tank fills . you may congeal the water level in the tank by adjusting the billet of the plastic loving cup on a pull rod . One reward to this type of ball cock assembly is that it lets the water run full - force until the tankful is fill . It then shuts the weewee off immediately , eliminating the groaning noise some toilets make as a float arm gradually closes the valve .
One type of stop - powered valve rests close to the bottom of the armoured combat vehicle ( left ) ; it eliminates the plasterer’s float bollock and plasterer’s float branch . Another type ( right ) uses a flapper cover , move up by a chain .
Another eccentric of ballcock also eliminate the float nut and plasterer’s float arm . This is a humble unit that rests almost on the bottom of the armored combat vehicle ; it ’s diaphragm - powered valve senses the level of the water from down there . Moreover , since it requires no tools , this forum is an easy unit to install . To install these new ball cock assemblies :
stride 1 : Turn off the tank ’s water provision shutoff valve . Then flush the toilet to enfeeble the armored combat vehicle . cadge up any water persist in the armored combat vehicle before legal proceeding .
Step 2 : hit the sometime ballcock assembly , following the subprogram outlined above . Slip the parts over the water inlet pipework under the storage tank in this order : coupling nut , rubbing washing machine , cone washer , and retaining or mounting nut .
stair 3 : set up the new unit of measurement inside the tankful , fitting the draw shank down through the cakehole over the water supply pipework and making sure the gasket fits into the hole . get going tightening the retaining or the mounting nut under the tankful onto the meander shank : hand - tighten it only . Push the washers into place and hand - tighten the coupling testicle under tank car ; be heedful not to over - fasten it .
gradation 4 : Inside the army tank , attach one goal of the refill electron tube to the tank ’s well over pipe and target the other remainder on the stem of the substitute social unit .
stair 5 : open up the water system provision valve to fill the cooler . The water degree in the tankful can be adapt by a thickening on the new valve unit .
Solving Common Toilet Problems
What can you do if too small water come from the tank to flush the toilet bowl clean ?
stone’s throw 1 : Check the water storey in the storage tank . It ’s probably too low . If the water story does n’t reach within 1 ½ inches of the top of the overflow tube , bend the air bladder arm up slightly to allow more water enter the tank .
footmark 2 : If the pee level is right but there ’s still not enough water coming from the army tank to clean house the arena the right way , the problem may be the storage tank ball on the loaded valve sit the bottom of the tank . The ball is in all probability cast off too soon because the guide is set too low . Raise the guide , but make indisputable it remain in lineage with the rise telegram . If the guide and the conducting wire are out of alignment , the tank Lucille Ball will not cast off straight into the valve fundament first step , and the toilet will run continuously .

Step 3 : Look for other suit of short flush . The small ports around the underside of the pot bowling ball ’s rim can get clogged with residue from chemical substance in the pee and prevent a sufficient amount of storage tank H2O from running out into the bowl . A small-scale mirror can help you examine the hole , and a piece of music of telegram coating hanger or an offset Phillips screwdriver — if one is available — can ream out any choked debris .
Here ’s another vernacular job among toilets . Toilet tanks can sudate and drop onto your floor just as the pipe can . There are jackets designed specifically to outfit over the tank and take up the moisture . There are also drip pans that fit under the tank to enamour the dripping condensation so that it does n’t damage your bathroom floor . A gimmick called a temperator valve is another way to scrap armoured combat vehicle diaphoresis . The valve provides a regulated mixture of hot and frigid weewee , which lessens the difference between the temperature inside the tank and the temperature of the fence in air . It is this departure in temperature that causes condensation , or sudation . Consider install a temperator valve if the water in the tank is commonly below 50 degrees Fahrenheit .
A temperator valve requires you to hook up a hot - water line to the valve , which may be quite inconvenient if there is no such business line relatively close to the toilet . Moreover , the temperator valve does not prevent the water inside the army tank from cooling between flushings : thus , condensing can still pass off even on a temperator - equip toilet . A news leak may be due to escaped connexion or bad washer on the spud pipe or where the H2O inlet organ pipe and ball cock assembly are bind to the storage tank . put back any worn gaskets or washer and stiffen all of the nuts , then essay with bluing in the water .

It is also potential that water is ooze out from under the toilet bowl . The wax halo Navy SEAL that joins the arena to the drain outlet may be bad . If this is the case , the bowlful must be remove , and a fresh gasket set up . If the leak is due to a cranny in the tank or bowl , the whole toilet must be replaced .
Replacing a Toilet
Removing and replacing a can is not a labor to be take in charge without beneficial ground , but it is sure as shooting not beyond your capability . When you ca n’t unclog the toilet by less drastic means , bump off it is the solution . Maybe you want a more forward-looking toilet , maybe the pipe bowl or the tank is cracked , or peradventure the fixity leaks around its base . All of these billet call for removing and reinstall the former gutter or installing a new fixture .
Although there ’s nothing difficult about murder and replace a toilet , local plumbery codification may prohibit anyone but a accredited pipe fitter from doing the business . Check the codification for your community to make certain it is okay for you to undertake the project . To interchange a commode :
Step 1 : Measure the rough - in distance — the distance from the wall behind the bowling ball to the center of the toilet level drain . Measure from the wall to the center of either of the two grip - down bolts , one on each side of the potty , that hold the regular to the floor . If there are two bolts on each side , measure to the heart and soul of the rear bolt .

The temperator valve, which requires both hot-water and cold-water supply connections, can reduce toilet tank sweating.
Step 2 : Select the transposition toilet unit using the harsh - in length so that it will fit properly in your john . you’re able to replace your old toilet with a more modern fixture , but you must ensure that the unexampled unit will fit into the distance between the drainpipe and the paries . you could install a smaller unit , but you could not put a larger toilet into a space that was interest by a smaller mend .
Step 3 : Shut off the water supply to the toilet tank , then remove all the urine from both the tank car and the stadium . Trip the flush handle to pass most of the water system from the tank car . Then douse up whatever water is left with a parasite . Bail out the piss in the bowl with a small container , and then use a sponger to dry out out the stadium entirely .
footstep 4 : If the armoured combat vehicle is connected to the wall , off the hanger bolts inside the tank that fix the army tank to the paries . Then polish off the pair of bolts at the bottom of the tank that plug into the armoured combat vehicle to the pipe bowl . Remove the armoured combat vehicle and set it out of the way .
The temperator valve, which requires both hot-water and cold-water supply connections, can reduce toilet tank sweating.
Step 5 : Remove the jacket crown over the hold - down thunderbolt at the base of the bowlful if there any . Most of these cap are made of ceramic to equalise the stadium . Some type are moderate on by plumbers ’ link up chemical compound and can be pried off with a putty knife ; others are threaded and can be unscrewed . After removing the caps , brush away the dried compound before proceeding .
Step 6 : murder the hold - down orchis or bolts . These may be exceedingly stubborn , but some penetrating crude oil should make remotion much easier . Save the washers and bolts if you will be reinstall the bowl . Once the hold - down nuts or bolts are out , there ’s nothing else holding the bowl to the floor . Caution : To prevent sewer gas from backing up the drain , you should plug the possible action while you shape . Tie a corduroy around an old towel so it wo n’t light through the opening , and hole this hype into the drain .
whole tone 7 : Remove the stadium . Because the stadium and the tank can crack from just one sharp blow to the porcelain , spread out an old piece of carpeting on which you may place the fixtures . You should also have a bucket and grub handy to soak up the water you could n’t bail out earlier . With your work surface prepared , shake the bowl mildly back and away to loosen it , and then lift it straight up . It weights about 60 or 70 pounds . Set the bowl on the piece of carpeting .
The temperator valve, which requires both hot-water and cold-water supply connections, can reduce toilet tank sweating.
Step 8 : visit the exposed drain . If necessary , reset the drain . Once the pipe is unmortgaged , you’re able to keep with the replacement of the toilet .
Step 9 : Putting in a raw lav and reinstalling the erstwhile one are done in the same way . With a putty knife , grate away all the previous putty or other waterproofing material from both the bottom of the bowl and the trading floor rim .
Typical installing of a two - piece floor - mount sewer .
The rough - in aloofness can be measured with the can in office by measuring from the wall to the center of the halt - down bolt , or to the center of the rearward bolt if the mending is take hold by two brace of bolt .
audit the floor where the toilette was . If the level has moulder , it will have to be rebuilt before the toilette can be installed . reckon on how bad the damage is , the rebuilding may call for the trading floor , the subfloor , and even the joists . In this case , have a carpenter rebuilt the damaged area before you add the toilet . Also inspect the rim and the bolt that come up from the flange . If the rim is damaged or the bolts are strip , supersede the faulty part of parts before you go any further .
whole tone 10 : instal a new sealer anchor ring on the water outlet opening on the bottom of the fresh bowlful . With the fixture upside down , set the sealer ring into post on the bottom of the bowl . If the floor rim is recessed , you ’ll need a gasket with a plastic sleeve in the ring . This arm should face toward you as you lay it , since it will go into the soil pipe .

Step 11 : Apply a uniform bed of the toilet - trough set chemical compound about 2 1/8 inch thick around the edge of the bowling ball at the base . This compound is available at ironware stores and plumbing - supply stores .
Step 12 : off the plug from the drain or dirt pipe . Turn the pipe bowl right side up and place it down over the flange , guiding the bolt into place . Press down securely , and give the roll a tenuous twist to make indisputable the wax ring seats properly against the flange . site a level across the bowl to check that that it is plane . Move the bowl as needed to level it , but do n’t disturb or break the stamp of the wax ringing or the lavatory will leak .
measure 13 : script - stiffen the egg to hold the arena to the flooring . Do not over - tighten the nuts , or else the fixture may crack . surface the hold - down nuts and bolts with toilet bowling ball set compound and reinstall the caps .
dance step 14 : If the tankful and bowl are separate fix , you should now attach the tank . Rebolt a bulwark - mounted army tank , or reinstall the bolt of lightning and washers that connect a bowl - supported storage tank . Replace any damaged piece . If the tank and bowl are connected with spud pipe , apply pipe joint chemical compound to the thread of the tater slip-up nuts and constrain them in blank space .
stride 15 : Reconnect the water supply inlet tobacco pipe to the tan , ensure the ballcock forum is properly impound , and turn the water back on .
Lots More Information
Related HowStuffWorks Articles

The temperator valve, which requires both hot-water and cold-water supply connections, can reduce toilet tank sweating.
