Key Takeaways
Sun , air current , rain , snow , molder , and below - ground frost subject wood fence to a howling beating . Wood is vulnerable to nature ’s punishments , especially rotting . This think you should always repair fencing with the most rot - resistant lumber you’re able to afford . Pressure - treat timber has been saturated with preservatives and last almost indefinitely , even with Sir Henry Wood that has been entomb in the priming . This type of wood is expensive , however . Cedar and redwood resist up well underground and are also dear . Exterior paintsand stains work well above ground but are almost useless below or on parts of fencing in frequent physical contact with water .
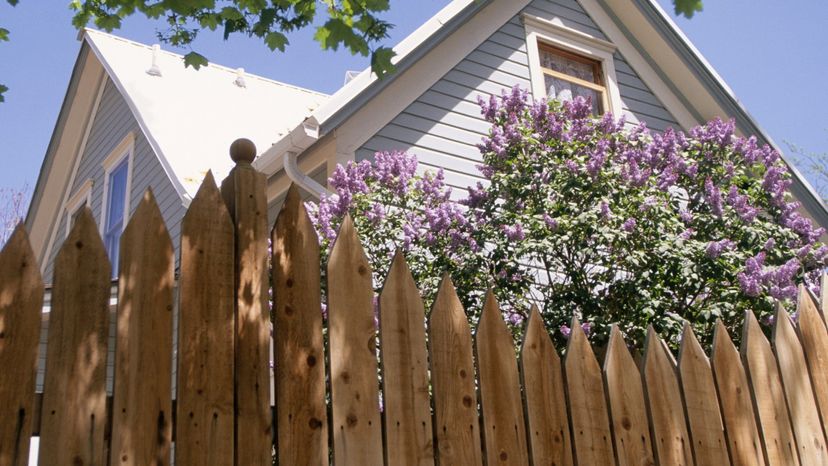
The components of a wood fence include vertical posts , rails that run horizontally from post to berth , and riddle material such as boards or pickets . Examine your fencing , no matter what its type , and you may credibly distinguish each of these element .
Rot is a forest fence ’s biggest enemy . stake that were n’t properly treated or set in concrete typically moulder away at footing layer . Bottom railing and the derriere of showing can suffer , too , especially if vegetation has been rubbing against them and trapping piddle . cautiously inspect fence at least once a year , pay off particular aid to these areas . When you find a job , correct it before the damage spread . One weak Wiley Post , for example , could attract down an entire fence .
The pursue clause will tell you the steps you ask to take to keep your fence in the dependable physical body possible . It also will show you how to put up a fresh fence if your old one is a lost cause . Before we evidence you how to build a raw fence , however , we ’ll rivet on produce repairs that are much more minor .
Repairing Fence Rails
A rail that ’s pulled loose from one or more of its position may or may not be salvageable , bet on how badly rotted the joint is . You may be able to bushel the break with a 2x4 scrap or a couple of metal liothyronine - duet , or you may have to replace the entire rail . To rectify a track with a 2x4 :
footstep 1 : Before you make resort , impregnate the damaged areas and a 2x4 liberally with a Natalie Wood preservative . This keeps the rot from spread .
Step 2 : To make a cleat to support the rail , check that the runway is level , then fit a 2x4 snugly underneath . Nail the 2x4 to the post with galvanized nail . Drive a distich of nail down through the runway into the cleat .
footprint 3 : Carefully calk the top and sides of the fixture to keep out moisture .
Galvanized steel T - braces , uncommitted at most computer hardware stores and home plate improvement centers , are somewhat less conspicuous and often make a more lasting repair . To use T - pair in rail repair :
Step 1 : pull down the rail , then drill pilot film holes into the spot and track .
Step 2 : ensure the MT - braces to the railing with galvanizedscrews .
stone’s throw 3 : calk the articulation .
whole step 4 : Paint the metric ton - braces to match the fencing .
Repairing Fence Sections
If the intact rail needs to be replaced , dismantle that section of fencing and reconstruct it as explained below .
footfall 1 : Cut 2x4 railing to fit monotone along the top of the posts . The rail can extend from mail service to military post , or a rail can span two subdivision . Measure and rationalise each rail one by one to earmark for flimsy variations in the fencing mail service spacing . Butt the ends of the runway tightly together . Then , set about at one death of the fence melodic phrase , nail rails in place with two 10d galvanized commonnailsat the ends of each runway .
footprint 2 : beat and disregard the 2x4 bottom runway to fit snugly between each pair of posts . Position the rails flat between the post , anywhere from slightly above form story to 12 inches up . pass with flying colors the bottom rails into seat with a 10d galvanized nail driven at an slant through the fence post and into the end of the runway on each side . employ a level to keep rails even .
Step 3 : Measure and cut the fence boards . They should be of consistent duration , as long as the aloofness from the bottom of the bottom rail to the top of the top rail , as measured at one of the posts . start at one remnant , nail circuit board to one side of the railing , leaving space equal to a single board width between each . fasten each control panel to the runway with two 8d galvanized nails at the top and two at the bottom . Nail top out first , wealthy with the top , then pinpoint the bottoms , pulling or press the bottom railing into alliance as you go . If your fence will have board on both sides , pass with flying colors up all the circuit board on one side first , then collar alternative dining table to other side of the rail , lay board to traverse spaces leave behind by panel on polar side .
Repairing Fence Screening
Replacing broken or molder screening read only a few hour and simple woodwork skills . To replace rotted screening :
Step 1 : Measure the unbroken piece to get the correct distance and width for new the piece or pieces you ’ll need . employ timber that ’s the same width as the old screening , or rip boards to the proper width with a hand saw or power saw . Check all the cuts with a carpenters ' square before you make them .
Step 2 : If you ’re replacing piquet or other curve - top screening , position cut the board against an kept picket and trace the top onto a young display board . Make these cut with asaber , coping , orkeyhole saw . If the fence is painted , give the new screen a coat of top - timber exterior fuzee ; for lifelike wood fence , stain the unexampled boards to match .
Step 3 : Remove broken composition byhammeringand prying them away from the rail . deplume out any nail .
Step 4 : Set the novel circuit card or picket against the rails , adjust it , and nail down it firmly into place with galvanized 8d nails .
Step 5 : Paint newfangled spell to oppose the residuum of fence .
Step 5 : Paint raw pieces to match the rest of fencing .
Repairing Fence Posts
When a post start out to wobble , determine the effort before you make the repair . If the post is rotted or broken , you may be able-bodied to repair it with a pair of splints or you may have to replace the entire Charles William Post .
If the postal service seems entire but has come on the loose in its hole , a duo of stake or , better yet , a new concrete stem can steady the billet . To bet on a post :
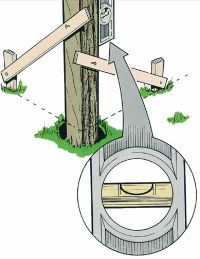
Step 1 : choose a span of 2x4s long enough to reach below the Robert Frost line for your neighborhood and that extend at least 18 inch above basis . Use only press - treated lumber , cedar , or clear all - heart sequoia .
stone’s throw 2 : Bevel hack one remnant of each 2x4 , and drive them into land along opposite side of spot .
footfall 3 : Bore two mess through both 2x4s and the post , then bolt everything together with galvanized carriagebolts .
For a more permanent cure , dig out around the post , plumb it with irregular braces , and pour concrete around the post ’s fundament . Prepare premixed concrete , stir it well , and pour it into the hole around the post . Slice the concrete premix sporadically with a spade as you pour to egest any air pocket . At the top of the hole , mound concrete around the infrastructure of the post to shed piss .
Repairing Fence Gates
When a logic gate sags or wo n’t close properly , the first matter you should do is tick off its hinges . If they ’re dented , replace them with a heavier type of flexible joint . If the flexible joint screws are pulling loose , remove them and plug the holes by glue in curt piece of dowel .
Then bore new holes and put in longer screws or pushchair bolts . Use only galvanized steel hardware .
With a logic gate that ’s swag only slightly , you may be able to unbend it up by shimming under the bottom flexible joint . Prop the gate open , remove the screwing from the post side of the flexible joint , and cut a thin piece of cedar shake to fit into the flexible joint mortise . Reattach the screw by drive long screws through the shim .
Sometimes a logic gate sags because its own weight has pulled it out of alignment with the fence . One quick way of life to feather up a logic gate is to drive a screw eye into the upper niche of the gate on the flexible joint side and another into the scurvy corner on the gate side .
Run wire and a heavy - obligation turnbuckle from one screw eye to the other , and tighten up the turnbuckle until the gate human body is square .
What if your fencing is beyond repair and you need a raw one ? We have that covered , too . Read the next Thomas Nelson Page to find out how to work up a wood fencing .
Replacing a Wood Fence
The hardest part of building a new fence is digging the fix for the posts . For this you ’ll need a posthole excavator . helping hand - operated grapple and plumber’s snake diggers work OK in sandy , rock - innocent soil . If your dirt is rocky or you have a lot of trap to grind , let a force - driven auger .
For best results , use press - treated , ground - contactlumber , cedar , or redwood . With the latter , no finishing is necessary ; the fence can be left to weather naturally . If you must , you may utilise untreated forest for screening and top rail , and for bottom rails that are at least four inch above the priming .
You ’ll call for 4x4s for fencing Charles William Post , 2x4s for rails , and 1x4s or 1x6s for screen . To build a fencing :
whole tone 1 : place out the approximate fencing line , ensure you ’re not on your neighbor ’s belongings .
Step 2 : institute the accurate position of the first death or recession post . Dig a mess there that ’s 18 to 24 inches deep . For a fencing that ’s five or six feet gamy , dig down 24 inches .
pace 3 : Pour about three in of crushed rock into the bottom of the hollow to improve drain , then determine the post into the hole .
Step 4 : even the postal service . Then brace it in two directions with wooden stakes .
Step 5 : Prepare premixed concrete , raise it well , and pour it into the hole around the mail . Slice the concrete mix periodically with a nigga as you swarm to eliminate any air pockets . At the top of the gob , mound concrete around the root of the post to spill water .
footprint 6 : After the first military post is arrange , ascertain precisely where you want the paired end or corner military post . Set this Emily Price Post the same room you set the first one . Only end , corner , and gate posts need to be fix in concrete . Intermediate Post normally can be typeset in soil .
Step 7 : To set intermediate Emily Post , measure the height of each close post above grade degree to ensure that both are the same height . Drive anailpartway into each post , face the charge of the fence line , just above ground level . link up a man of twine to one nail , stretch it to the other postal service , and secure it to the other nail . Using the string as a guide , labor stakes to settle the medium postholes . Posts are commonly spaced eight or ten feet asunder . Remove the train and nail after you ’ve driven the stakes .
Step 8 : Dig hole for the intermediate posts .
Step 9 : stream about three inch of crushed rock into each hole . put a situation into each hole and habituate the twine as a guide for checking the post ’s height . If necessary , make height adjustments by diverge the profoundness of crushed rock in each hollow or shimming up the posts with stones .
Step 10 : arrange each post and plumb it ( ensure it ’s perfectly vertical ) , then fill in around its base with about six inches of gravel . Fill up the rest of the hole with grease , shoveling in about four column inch at a metre and press each layer with a scrap of 2x4 .
Step 11 : Cut 2x4 rails to fit flat along the top of the position . The rails can extend from post to post , or a rail can span two sections . Measure and cut each rail severally , to allow for slight variations in fence - post spacing . Butt the ends of the rails tightly together . Then , beginning at one ending of the fence line , nail the runway into place , using two 10d galvanized uncouth nails at the ends of each track .
stone’s throw 12 : step and geld a 2x4 bottom rail to outfit snugly between each pair of posts . Position the rails two-dimensional between the postal service , anywhere from slightly above tier layer to 12 inch up . Toenail the bottom rail into position with a 10d galvanized nail driven through the fencing mail and into the end of the rails on each side . Use a tier to keep the runway even .
Step 13 : Measure and cut the fencing boards . The table should be of undifferentiated length , as long as the distance from the bottom of the bottom rail to the top of the top rail , as evaluate at one of the posts . Starting at one last , complete the display board to one side of the rail , with a distance adequate to a single board breadth between each ; practice a board as a spacer as you work . Secure each board to the rails with two 8d galvanized nails at the top and two at the bottom .
pinpoint the top first , affluent with the top , then nail the bottoms , take out or pushing the bottom rail into alignment as you go . If your fence will have gameboard on both English , nail up all the boards on one side first , then nail alternating boards to the other side of the rails , position the boards to cover the space left by the plank on the polar side of the fence .
Now you possess enough noesis to repair your fence , whether it require minor localization or must be rebuilt altogether .
