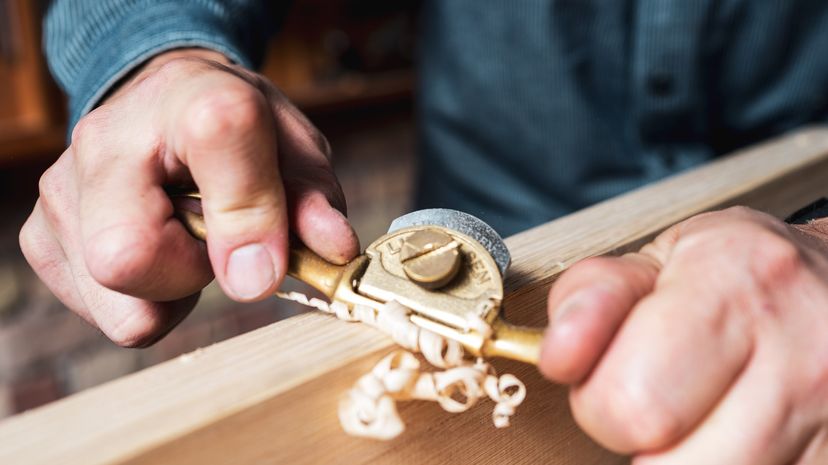
From scratches to discoloration , the aerofoil of your wooden article of furniture are vulnerable to all kinds of damage . Luckily , many of the problems can be fixed .
In this clause , we ’ll narrate you how . You ’ll learn how to repair everything from gouges to tan . You ’ll even find tips for mend article of furniture veneering and ironware . We ’ll start up by discussing surface discoloration and discolouration .
Removing Stains and Discoloration
Most finishes protect the Earth’s surface of wooden furniture by forming a protective covering . To repair a damaged refinement coating , work only to the profoundness that it ’s affected . On any aerofoil , forge cautiously , and do n’t remove more of the finish than you have to . In this clause , we ’ll discuss this and other simple technique to help you murder grime , blushing , and other discolouration from the surface of wooden furniture .
whitened spots : Shellac and lacquer finishes are not resistant to water and inebriant . spill and capsule from glasses can leave lasting white spots or rings on these finishes . To remove these white spots , first try polishing the control surface with liquid article of furniture polish ; buff the surface firmly . If this does n’t wreak , thinly wipe the stained surface with denature alcohol . usance as little alcohol as possible ; too much will damage the coating .
If neither shining nor alcohol treatment removes the blanched spots , the damage finish must be treated with abradant . Gentle abrasive can be buy from a home - supply entrepot . To make your own gentle abrasive , amalgamate fag ashes to a spread with a few drop cloth of vegetable crude , light mineral oil , or flaxseed oil colour . Rub the ash - crude oil spread over the varnished region , along the grain of the wood , and then pass over the surface clean with a soft material . If necessary , repeat the procedure . Stubborn patch may require several applications . Then rise and round the intact surface .
If rubbing with ashes is not in effect , go over the varnished area with a mix of rottenstone and linseed oil . Mix the tripoli and fossil oil to a thin paste , and rub the paste lightly over the stain , along the caryopsis of the wood . Rottenstone is a tight - cutting abrasive , so rub very carefully . Check the surface ofttimes to verify you are n’t cutting too deep . As soon as the white spots disappear , stop fret and pass over the wood fresh with a soft cloth . Then apply two coats of hard piece of furniture wax and buff the woodwind to a shine .
crimson : Blushing , a whitened daze over a with child surface or an total piece of article of furniture , is a mutual job with old shellac and lacquer finishes . The discolouration is cause by moisture , and it can sometimes be removed the same direction lily-white spots are polish off . Buff the surface lightly and evenly with No . 0000 steel wool dipped in flaxseed oil . exploit with the grain of the Sir Henry Joseph Wood , rub equally on the total aerofoil , until the white daze disappears . Then wipe the wood clean with a flabby material , apply two coats of operose article of furniture wax , and buff the control surface to a effulgence .
Blushing can sometimes be take out by reamalgamation . If the surface is crazed or alligatored , reamalgamation should be used alternatively of steel - wool rubbing . If neither rubbing nor reamalgamation get rid of the daze , the piece of piece of furniture must be refinish .

Black spots : disastrous spots are get by H2O that has sink in the finish all and entered the wood . They can not be transfer without damage to the polish . If the spots are on a clearly define surface , you may be capable to remove the finish from this control surface only ; otherwise , the total piece of article of furniture will have to be strip . When the finish has been removed , bleach the full stained aerofoil with a solution of oxalic Elvis . Then refinish as necessary .
Ink stains : Ink stains that have permeate the finish , like bootleg water berth , can not be removed without re - finishing . Less serious ink smirch can sometimes be remove . thinly buff the varnished area with a cloth moisten with mineral spirits ; then rinse the wood with fresh urine on a subdued cloth . dry out the open thoroughly , and then wax and polish it .
If this does not move out the ink , lightly rub the stained area , along the grain of the forest , with No . 0000 blade fleece moistened with mineral spirits . Then pass over the airfoil clean and wax and polish it . This discussion may damage the finish . If necessary , refinish the damaged smudge as discussed below . If the area is bad damage , the entire control surface or piece of piece of furniture will have to be refinished .
Grease , mariner , blusher , crayon , and lipstick spots : These place commonly dissemble only the surface of the coating . To dispatch wet paint , use the appropriate solvent on a soft cloth – mineral strong drink for oil colour - base rouge , water for rubber-base paint pigment . To remove dry paint or other stuff , very carefully bring up the surface residuum with the sharpness of a putty knife . Do not scratch the wood , or you ’ll scrub the finish . When the surface stuff has been removed , buff the area very lightly along the grain of the Sir Henry Wood with No . 0000 brand woolen moistened with mineral spirits . Then wax and fine-tune the entire surface .
Wax and gum smear : Wax and gum usually get off easy , but they must be removed carefully to preclude damage to the conclusion . To make the wax or chewing gum toffee , press it with a packet of ice enclose in a towel or paper towel . Let the deposit harden ; then lift it off with your thumbnail . The hardened wax or mucilage should bulge off the Earth’s surface with very little pressure . If necessary , restate the trash lotion . Do not scrape the deposit off , or you ’ll scratch the destination .
When the wax or chewing gum is completely removed , buff the arena very light along the metric grain of the woodwind with No . 0000 blade wool wash with mineral spirits . Then full and brush up the entire surface .
Spot Refinishing
Any repair that involves removing the damaged finish completely – recondite scratches , gouges , burns , or any other equipment casualty – also involves refinishing the fixing domain . Spot refinish is not always well-heeled , and it ’s not always successful , especially on varnished aerofoil . If the damage is n’t too bad , it ’s worth test . If you ’ll have to match up several expanse on one control surface , you ’re probably better off refinish the control surface or the composition of furniture completely .
To tarnish one area on a surface , use an vegetable oil - establish stain that matches the ring stain . You may have to mix stains to get a ripe match . essay the grime on an inconspicuous unfinished part of the wood before working on the finished surface .
Before applying the stain , prepare the damaged area for finishing . Sealing is not necessary . utilise the filth to the damaged country with an artists ' coppice or a light cloth , covering the entire bare area . Let the discolouration set for 15 minutes and then pass over it off with a clean cloth . If the color is too wakeful , employ another coat of smirch , wait 15 bit , and wipe again . recur this subprogram until you ’re satisfied with the colour ; then allow the stain dry out according to the manufacturer ’s instructions .
Lightly buff the stained aerofoil with No . 0000 steel wool , and pass over it fair with a tack cloth . Apply a new coating of the same finish already on the control surface – varnish , penetrating resin , shellac , or lacquer – over the freshly stained area , feathering out the new finish into the surrounding older conclusion . Let the newfangled finish dry for one to two days , and light buff the patched expanse with No . 0000 sword woollen . full the integral control surface with hard spread wax , and polish it to a shine .
Read the next page to get hold what to do if your furniture has scratches , dings , or dents .
How to Repair Scratches, Dings, and Dents
quondam or new , wooden furniture often picture signs of extensive utilisation : scrape , gouge , and dents . Most of these surface legal injury are easy to repair , unless the trouble is severe and blanket .
Scratches
To hide small scratches quickly , snap off the meat of a walnut tree , pecan , or Brazil nut and rub it along the scratch . The oil in the nut centre will darken the raw gelt .
Where many shallow scratches are present , utilise hard spread wax to the Earth’s surface with No . 0000 steel wool , stroke very softly along the grain of the wood . Then buff the control surface with a soft material . For shallow scratches on an otherwise sound shellac or lacquer finish , reamalgamation can be used to restore the finale .
For one or two deeper scratches , article of furniture - patching wax sticks are usually effective . These retouching stick , made
in several Sir Henry Wood colour , are available at hardware and sometimes grocery stores . Choose a stick to match the culture . To use the wax stick , go it firmly along the scratch , apply enough pressure to meet the scrape with wax . Remove any excess wax with the sharpness of a credit card or other thin credit card card . Let the wax wry ; then buff with a soft cloth .
Badly scratched surfaces should ordinarily be re - finished , but to blot out one or two very rich scratches , you may be able to stain the naked as a jaybird country to match . implement oil - free-base smirch with an artists ' light touch , pull it carefully along the scratch ; let it stand for 15 minutes and wipe it off . If necessary , repeat this procedure until the slit matches the rest period of the wood .
permit the area dry out completely , as directed by the discolouration manufacturer . Then utilise hard paste wax and buff the waxed open to a shine .
Dings
Dings are lilliputian chips in the finish , ordinarily triggered by a sharp blow . The wood may not be affected . To repair a ding , use a piercing craft knife to move out any informal cultivation in or around the gouge . Work carefully , altercate the damaged spot with the flat , sharp edge of the knife blade ; do not scratch the spot . Then very cautiously feather the edge of the ding with No . 0000 steel wool .
Clean the ding area with a flabby fabric moistened in mineral flavour , and permit it dry completely . Then , with an artists ' coppice , cautiously give new destination to the spot – varnish , shellac , lacquer , or enamel – to meet the remainder of the polish . The smirch will be very obtrusive at first . allow the finish dry ; it will be glossy . Then gently buff the smirch with No . 0000 blade wool , and wax and polish the entire patch of furniture . The ding should coalesce perfectly when the job is over .
Dents
Small , shallow dents in pine and other soft woods are ordinarily easy to remove ; large and inscrutable slit , peculiarly in hard Sir Henry Joseph Wood , are harder to touch on . gouge are gentle to remove from bare wood . Very gravid , shallow dents are in all probability best leave untreated . Very deep gouge should be fill up , as detailed below for fling and nick .
On finished surfaces , you ’ll have to hit the finish around the damaged field . Using all right - grit sandpaper , cautiously take out the finish for about 1/2 inch around the spot . To raise the wood in the scratch , apply a few drops of body of water to the dent and allow the water penetrate the wood for a day or so . Do not wet the total surface . This treatment may be enough to raise the dent , especially if the dent is shallow and the wood is soft .
If this does n’t raise the dent , soak a cloth in water and squeeze it out . Place the moist fabric , folded in several layers , over the slit ; then press the cloth firmly with a warm atomic number 26 .
Be deliberate not to touch the iron directly to the wood . This moist heat may be enough to tumefy the wood and raise the dent . If it is n’t , apply a commercial Grant Wood - swelling liquidity to the field and give it time to work – about a Clarence Shepard Day Jr. or so , as target by the manufacturer .
For rich scratch that ca n’t be raised with weewee , estrus , or wood sweller , habituate a fine straight oarlock or needle to get a serial of holes in the dent . Pound the square peg in about 1/4 inch , and cautiously pull it out with plyers ; the hole should be as small-scale as possible . Then treat the prick you would for a shallow dent . The pinholes allow the urine penetrate the wood ’s Earth’s surface . If you ’re thrifty , the muddle wo n’t show when the wood has been raise .
After the dent has been raised , let the wood juiceless for about a week , and then refinish the damaged area as above . Let the finish dry completely . thinly buffet the new ending with No . 0000 steel wool , and then wax and brush up the entire open .
Deeper cracks and gouges in the aerofoil may require additional work . see the canonical stair to repair cracks and gouges on wooden article of furniture in the next section .
How to Repair Cracks and Gouges
Cracks and gouge are a mutual problem on wooden furniture , specially if the piece is honest-to-god or is overly used . Some basic restoration proficiency can remove these job as long as the legal injury has n’t gone beyond the surface .
Cracks and gouge should be fill so that they ’re tied with the control surface of the wood . For very small hole , like staple fibre hole , wood - tone putty sticks can be used . If you ca n’t match the wood , several color can be mixed together . To use a putty joint , pass over it across the hole and smooth the Earth’s surface with your finger . If you plan to finish or refinish the wood , permit the putty dry out for at least a workweek before proceed further .
For larger holes , wood filler and water putty are the easiest fillers . These fillers can be used on nude or finished wood . Wood makeweight is uncommitted in several colour , and water putty can be tinted with oil colour or water stain . However , wood filler and weewee putty plot are usually noticeable , and may front darker than the wood . For the best solvent , test the patch on an inconspicuous surface to make trusted the color is correct .
To use wood makeweight , carefully clean the cracking or ding with the tip of a craft knife , and then press the plastic firmly in with the peak of a craft knife or the sharpness of a putty knife . Wood makeweight contract slightly as it dries , so press it in tightly and leave it mounded slightly above the airfoil of the wood .
Grant Wood filler dries fairly quickly , but rent it set for at least two day . Then smooth the patch lightly with ok - sand emery paper and buff the area with No . 0000 brand wool . If surrounding ending is involve , feather the edges so that the young patch blends in with it . Then , if necessary , stain the patch and buff it lightly with No . 0000 steel woollen . give finish to match the rest of the airfoil , using an artists ' brushing and feathering the edges . permit the finish dry and then lightly buffet it with No . 0000 brand wool ; make clean the area of any residual , and wax and down the surface .
Water putty dries flint - hard , usually unvoiced than the wood being patched . It ’s best used on bare wood . Water putty can be toned with oil and water stain , but you ’ll have to try out to add up up with a perfect match . To utilize water system putty , unify the powder with water to the eubstance of putty ; then trowel it into the break with a putty knife , leaving the piece slightly gamy . lease the temporary hookup dry all , and sand and steel - fleece the area smooth and layer with the surrounding surface . end the surface as above , or finish the entire piece of piece of furniture .
For the most professional patching job , use shellac sticks to fill cracks and gouge . Shellac stick result the least blazing patch , and are very effective on finish wood that ’s in good condition . Shellac stick are available in several woods - tone colors ; use a stick that matches the finish as nearly as possible . Practice on fight Natalie Wood before working on a part of article of furniture .
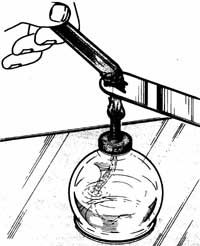
Carefully clean house the crack or gouge with the gratuity of a craft tongue . Shellac sticks must be heated and melted to fill up the snap . The best heating system source for this is an inebriant lamp or a propane great mullein turned to a lowly setting . Do not use a compeer to dampen the stick ; the heater from the mates may discolor the shellac . Do not utilise a range burner ; liquid shellac could damage either gaseous state or electric image . Hold the stick over the sword of a palette tongue or a putty tongue to prevent it from dripping .
To apply a shellac stick , hold it to the heating rootage above the tongue , until it has weaken to about the consistency of glazing chemical compound or putty . Then quickly contract the softened shellac into the crack and smooth it with the hot tongue . Make certain the soft shellac fill the break totally ; it temper quick , so you ’ll have to work fast . Leave the patch slightly gamey . Then , with the het putty knife sword , trowel the shellac smooth .
lease the spell pose for one to two hour . When the shellac is grueling , plane or sand the Earth’s surface smooth and level . The coating surrounding the break usually does n’t have to be retouched , but the aerofoil can be coated with shellac , if desired . Apply the shellac finishing . To make the shellac match a satin - gloss finish , rub the surface tranquil with No . 0000 blade wool and linseed crude oil .
To fill very cryptic holes , use wood plastic or pee putty to fill the hollow almost level . Let the filler dry out wholly , and then fill the indentation with a shellac stick .
If a gob or rip is very heavy , do n’t drop the possibility of fill up it with a piece of wood cutting off and trimmed to fit absolutely . If the patching Mrs. Henry Wood can be taken from the opus of piece of furniture in a spot that wo n’t show , the mending may be almost out of the question to observe .
Fit the wood bandage into the hole or rip ; use carpenters ' gum to hold fast it to the surrounding woodwind . entrust the patch slightly high . When the glue is whole dry , Baroness Dudevant the nag smoothly tier with the surface of the skirt wood . Then refinish the composition of furniture .
Even if the wooden surface is burned , it can still be repaired . tip for removing mild scorch and for gear up more serious burns are adumbrate in the next subdivision .
How to Repair Burns
suntan on wooden piece of furniture can range from scorch to deep cleaning woman , but the common problem is butt burns . These damages can be take as long as the problem does n’t go beyond the surface and extensively affect the wood .
Scorches from cigarettes or cigars are usually the easiest to remove . Buff the scorched area with a fine steel wool pad moistened with mineral spirits until the singe disappears . Then wipe it blank and wax and refine the Earth’s surface .
More serious burns require the removal of the charred forest . Shallow tan , when indemnify , will always leave a slight indenture in the wood , but this depression will not be conspicuous . inscrutable burn holes can be filled .
First , remove the discredited woodwind . With the flat acuate edge of a trade knife , very cautiously scrape away the charred woodwind instrument . For mystifying tan , apply a kink blade . Do not expunge the sunburn area . scratch away the char mightily to the bare Sir Henry Wood , feathering out the edges . Any burned or scorched floater will show , so all the burn impertinence must be removed . Work carefully to avoid scratching the wood with the level of the tongue .
When the charred Ellen Price Wood has been all removed , lightly sandpaper the edges of the groove or deep to flush it with the surrounding surface as much as possible . crusade thinly into the channel with fine - moxie sandpaper , removing only the woman from the glow region . Be careful not to damage the smother finish . If you ’re not sure all the sunburn has been removed , wet the sanded area . If urine make the burned expanse look burn again , you have n’t polish off all the cleaning woman .
With deep burn , the groove left after the char is remove will in all probability be quite obtrusive . level off the groove as much as potential with ok - sand sandpaper , but bide close to the edges of the vallecula . If you sandpaper too far out from the burn area , the damage arena will be very visible as a wide dish - shaped indenture . If the depression is n’t too cryptical , try swell the wood as detailed above for dents . If you ’re leave with a deep ding , the burn arena can be filled with wood charge card or a shellac stick .
After shine out the burn , refinish the damaged area as above . Let the young finish ironic for one or two days , and then softly buff the temporary hookup with No . 0000 sword wool to blend the edges into the old finish . lastly , wax and polish up the entire spell of furniture .
Veneer , a thin layer of woodwind attached with gum to a solid nucleotide , is particularly vulnerable to damage . In the next section , we ’ll show you how to make various repairs to this aerofoil .
How to Repair a Veneer Surface
Because veneering is only a fragile layer of woodwind instrument attached with gum to a unanimous base , it is very vulnerable to damage on wooden furniture . On previous furniture , the glue that holds the facing is often not pee - resistive . prolong humidness or exposure to water can soften the glue , countenance the veneer blister , fissure , or peel . Veneer is also well damage from the surface , and previous facing are often cracked , buckled , or broken , with chips or entire pieces missing . In this article , we ’ll discuss introductory techniques to fix facing on your wooden furniture for any at - home piece of furniture refinishing or restitution project .
In most cases , as long as the veneer level is basically in good shape , the thinness that cause it wrong - prostrate also makes it easy to repair . Undamaged veneering can be reglued ; chips and bare spots can be sate with matching facing . If you ’re careful to match the grain the repairs will scarce show . In this discussion section , we ’ll show you how to make resort to several facing job .
Blisters
little blister in facing can usually be flattened with heat .
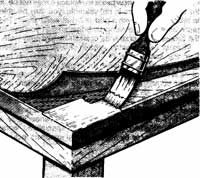
To protect the surface , set a sheet of wax theme and then a tabloid of smooth cardboard on the surface , and get over the cardboard with a clean cloth . Press the whip area firmly with a medium - red-hot iron . If there are several blisters , move the iron slowly and equally back and forth . Be careful not to pertain the exposed control surface with the Fe .
ensure the surface every few minutes or so as you work , and stop pressing as soon as the blister have flatten . leave the cardboard in place , weight the hangout area solidly for 24 hour . Then rise and polish the open .
Large blisters must usually be slit , because the facing has swell up . With a sharp craft knife or unmarried - bound razor blade , carefully cut the bleb unfold down the middle , along the cereal of the wood . Be careful not to cut into the bag wood . Then encompass the surface and lend oneself heat as above , break every few seconds as the gum damp ; if the glue has deteriorate and does not soften , carefully scrape it out and insert a little carpenters ' glue under the slit edge of the house of cards with the tip of the knife .
Be careful not to use too much glue . If necessary , wipe off any excess as the bleb flattens . As soon as one bound of the slit bubble overlaps the other , cautiously shave off the imbrication border with a craft tongue or razor blade . Heat the blister again ; if the edges overlap further , plane the imbrication edge again . When the blister is completely flattened , weight the fixture orbit solidly for 24 hour . Then mount and smoothen the entire surface .
Loose Veneer
elevate veneer occurs most often at the corner of tabletops , on cabinet and chest of drawers edge , legs , and drawer fronts . If the wanton veneer is undamaged , it can be reglued .
First , polish off the residual of sure-enough gum left on the back of the veneer and on the base Ellen Price Wood . With a sharp wiliness tongue or razor sword , cautiously come up out as much of the previous glue as possible . Do n’t bring up the facing any further ; if you bend it up , you ’ll damage it .
After scrape up out as much old glue as you may , clean the bonding surfaces with benzene or naphtha to remove any residue ; glue leave under the light area will interfere with the new adhesive agent . If any mucilage still remains , sand the bonding surface lightly with ok - grit emery paper , and then wipe them clean with a piano textile moistened with mineral spirits . If more than one veneering layer is loose , clean each layer the same path .
The facing can be reattached with contact cement , but you may prefer to utilise carpenters ' glue because it set more slowly and let reposition . To reglue the veneering , employ link cementum to both bonding surfaces and let it coiffure , as aim by the manufacturing business . If necessary , localize a small tack or two between the layers to keep them from touch . If you ’d prefer to use carpenter ' gum , use a modest copse to spread it along the texture . Then , get going at the solidly attached veneer and turn out toward the loose edge , smooth out the loose facing carefully into home .
physical contact cementum bonds immediately , so check that the veneer is precisely matched ; if you ’re using carpenters ' glue , press from the center out to wedge out any surplus , and wipe the overindulgence off straightaway . If more than one veneer layer is on the loose , sour from the bottom up to reglue each layer .
Reglued facing , whatever adhesive is used , should be clamp or weighted . To protect the surface , cover it with a sail of wax newspaper publisher ; verify all redundant mucilage is transfer . Set a buffer block of scrap forest over the newly glued region , and use another block or a soft cloth to protect the paired edge or side of the surface . Clamp the glued and protected aerofoil firmly with degree centigrade - clamp or hand screws , for one to two Clarence Day . Then slay the clamps and the buffer , and wax and polish up the total airfoil .
Cracked or Broken Veneer
If the facing is lift and cracked , but not broken completely through , it can be reglued . bombastic orbit may be easy to recompense if you break the veneer off along the offer . impoverished veneer can be reglued , but you must be very measured not to damage the edges of the break . Do not pare ragged edges ; an irregular mend line will not be as seeable as a utterly straight line .
Before apply glue to the veneer , clean the soldering surfaces cautiously , as above . Fit the crushed edge cautiously together to make certain they match absolutely . Then employ contact cement to both surfaces , or spread carpenters ' mucilage on the base wood . Set the upset veneer carefully into place , matching the edges exactly , and press firmly to cockle the broken edges together . Clamp the repair orbit . Refinishing may be necessary when the mend is complete ; if so , utilise a non - slipstream - away paint and varnish remover , and cover the veneer airfoil very mildly .
Chipped or Missing Veneer
Replacing veneer is easy , but obtain a Modern while to replace it may not be . If the piece of piece of furniture is not valuable , you may be able to take the plot of ground from a part of it that wo n’t show . The patch country must be along an edge , so that you could lift the veneer with a craft knife or a pissed - bladed putty knife .
In most cases , piece veneer should not be taken from the same piece of piece of furniture ; you ’ll have to buy matching veneering to make the repair . If only a small part is missing , you may be able to fulfill in the hole with veneer edging tapeline , sold at many home heart and lumberyard . Or , if you have admittance to dust piece of furniture , you may be able to scavenge a similar facing from another musical composition of furniture . For larger patch , or if you ca n’t find a scrap patch of matching veneer , corrupt a sheet of oppose veneer from a specialised Grant Wood supplier . National veneering provider can be found by searching the Internet .
To fit a chip or very small spell , set a rag of bond newspaper over the damage facing . Rub a very sonant , dull lead pencil softly over the paper ; the edges of the damage domain will be exactly marked on the newspaper . Use this pattern as a template to edit the facing patch . Tape the pattern to the patching Ellen Price Wood , matching the grain of the unexampled veneer to the grain of the damage surface area . Cut the path steadfastly and carefully with a sharp-worded craft knife ; it ’s better to make it too big than too small .
To make a larger patch , videotape the patching veneer firmly over the damage area with mask tape measure , with the caryopsis and pattern of the patch match the grain and pattern of the damaged veneer . check that the patch is flat against the surface , and securely held in position .
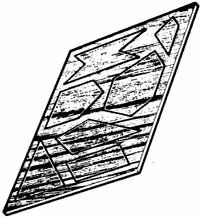
Cut the patch in an irregular chassis , as instance , or in a boat or shell shape ; these shapes will be less visible than a satisfying or rectangular Patch Would be . slue the mend cautiously with a trade tongue , scoring through the patching veneer and through the damage veneering layer below it .
Untape the patching sheet and pop out the darn . With the
tip of the craft knife , remove the trim down - out plot of land of damage veneer ; if necessary , score it and take away it in bit .
Be very deliberate not to damage the edges of the patch . Be very careful not to damage the edge of the maculation area . off only the top veneering laver ; do not reduce into the foundation wood . take out any old glue and clean the lowly wood as above .
essay the scene of the patch in the golf hole . It should fit on the dot , moneyed with the wall surface , with no gaps or overlaps . If the patch is too heavy or too thick , do not drive it in . Carefully sand the border or the back with okay - girt sandpaper to fit it to the hole .
paste the fitted patch into spot with link cementum or carpenters ' glue , as above , and clinch or burden it solidly . allow the repair dry for one to two daylight ; then very light sandpaper the patch and the smother veneer . Re - finish the damaged arena or , if necessary , the intact surface or spell of furniture .
In the final section , we ’ll show you how to bushel a fundamental article of furniture - airfoil appurtenance : the hardware .
How to Repair Furniture Hardware
The hardware on old furniture – draftsman pull , handles , flexible joint , locks , protective corners , and ornamental band and escutcheons – often shows preindication of long , hard habit . Sometimes hardware is missing ; sometimes it ’s loose , broken , or crumpled . liberal hardware can be repaired ; missing or damaged pieces should be replaced . Replacement is also the answer if you do n’t care the existing ironware . In this clause , we ’ll discuss some techniques to quickly exchange or repair worn computer hardware on your wooden furniture so they process once more .
Many pieces of furniture are made with very common types of hardware ; match these canonic designs is fairly simple . If the hardware is more typical or unusual , it may be easier to replace all the computer hardware than to find a matching slice ; verify the unexampled ironware ’s bases are at least as gravid as the previous . But if the man of piece of furniture is very valuable or an antique , or if the hardware is very attractive , the old hardware should not be take away . In this case , missing parts should be supervene upon with matching or similar hardware ; a flimsy difference in intent usually does n’t look bad .
ironware stores , house center , and similar stores propose a fair pick of furniture ironware ; specialty hardware outlets and craftiness provider are ordinarily better sources . explore the Internet for hardware vendors . Let ’s get started by reviewing how to address a usual hardware problem – wanton drawer pulls and handle .
Drawer Pulls and Handles
To constrain a loosely attach drawer pull , withdraw the drag and supercede the nookie with a longer one . If the screw is part of the pulling , you ’ll have to make the hole in the wood smaller . When the hole is only somewhat enlarged , you’re able to tighten the pull by using a hollow fibre plug with the screw . For metallic element pull , fit a man of solid - center solder into the gob and then replace the screw .
When the hole is much too big , insert wood toothpicks or lean shavings of wood , with mucilage applied on the outside , into the hole . Let the glue dry and cautiously shave them flush with the woodwind instrument surface . Then duck the pull ’s screw into glue , put back the drag , and constrain the screw firmly . For a more substantial haunt , elaborate the cakehole , paste a piece of joggle into it , and drill a new screw cakehole .
Hinges
Hinges that do n’t play properly normally have bent hinge pins ; in this casing , supplant the hinges . If the hinge are escaped , try using slightly farseeing screws to impound them . When the shtup pickle are very much blown-up , adjust them by one of the methods detailed above . If the hinge leaf are damage and the flexible joint can not be replace , paste the hinges into position with epoxy or a rubber- or silicone polymer - basis adhesive .
Locks
Locks on old piece are often damage , and winder are often miss . If the piece of furniture is an antique , or the lock chamber is very unusual , have it amend by a professional . Otherwise , slay the discredited piece of furniture lock and take it to a locksmith ; order a matching or similar lock to supplant it .
Loose Metal Bands and Escutcheons
Old stripe and escutcheons often have an attractive design and patina ; do n’t interchange them unless they ’re badly damage . To secure a loose band or scutcheon , squeeze adhesive caulk compound under the metallic element , and press it down to stick it to the wood . If this does n’t work , fasten the band or escutcheon with tiny metal screwing , of the same metal as the computer hardware . You must match the metals – brass to brass , Cu to copper , steel to steel , or whatever . If you do n’t match the screws to the metal plate , the alloy will corrode . Use several screws , send them to mould a normal ; practice pilot trap before inserting them .
Coverup Hardware
If old hardware jam are impossible to repair , or if you want to interchange the face of a piece entirely , the surface can be covered with new wood or metal scutcheon plates . Escutcheons are used peculiarly under drawer pulls or handles ; many handles are made with escutcheon - eccentric angel . tie the escutcheon with adhesive or jailor , equal alloy to metallic element . If you ’re using scutcheon - character handles , no other treatment is necessary . If you ’re using an scutcheon under other hardware , drill new mount hollow as required . Keep your design simple , and try on to equalise the style of the piece .
So whether it ’s the hardware , the facing , or a burn mark , there believably is a solution . The oddment result is a furniture open that stand up to the everyday pose it inevitably take .
© Publications International , Ltd.
