You might occasionally require to capture the effigy on your estimator screen so you’re able to bring through or share it . If you ’ve used aPCdesigned to run Microsoft Windows , you ’ve probably used the Print Screen Francis Scott Key on the keyboard to do this . If you ’re using a Mac , though , you ’ll notice Apple does n’t include such a key . Do n’t worry , though , because we ’re about to look at the keyboard combinations and progress - in creature you could use on your Mac to enchant what you need from the CRT screen .
First , let ’s count at the keyboard combinations you may use to capture the image on your screen . The keystrokes for screenshots are multiple keys that should be press together . When you do this , press and hold the first key , then the second , and so off , and immediately release all keys after urge the net one in the sequence . The following are the keystroke to recall for CRT screen capturing :
Command+Shift+3captures the intact screen and saves it to a file on your desktop .
Command+Shift+4temporarily replaces yourmousecursor with a tool to pick out any rectangular portion of the screen . snap and drag the putz to make your pick . Your cursor right away render to normal after that option .
Controladded to the scratch of either of these sequence saves the image to the clipboard temporarily instead of to a permanent filing cabinet . That allows you to copy and paste what you see on the screenland into an program , such as image editing software .
If you do n’t apply the Control samara , your Mac saves these key stroke captures to your desktop by default . When you ’re enamor images this way , you wo n’t see any system or app notification to affirm achiever . Instead , the system just plays a chime that fathom like a film camera snapping a photograph . To see the files you ’re economise , you ’ll have to either open your Finder or minimize your windows to find the trope preserve on the desktop .
Mac OS X traditionally saved keyboard - generated screenshots astagged image file format(TIFF ) file . Macs switched toportable document format(PDF ) starting in the 10.2 release of OS X , and toportable web graphics(PNG ) single file by 10.6 . after , we ’ll take care at how you’re able to convert any of these figure of speech to other file cabinet formats .
While key stroke let you get a straightaway capture from the projection screen , they have restrain pick for what you ’re capturing . That ’s where the Grab utility comes in . Next , permit ’s take a look at how to habituate Grab , admit how to capture a specific window and how to time the capture to include things like shiner - over text edition or drop cloth - down menu .
The Grab Utility and Converting Screenshot Files
Grab offer more feature than keystroke alone when enamour figure of speech from your Mac ’s computer screen . To open up Grab , open up your Finder , select " applications " under " places , " and boom " utilities . " Grab should be one of the utilities list there . Double - chatter to reach the app from there in the Finder .
When using Grab , you wo n’t see an lotion window on the screen until you ’ve conquer something . or else , you ’ll just have the Grab icon in your Dock , show that the app is unravel , and the Grab bill of fare across the top when the app is in the forefront . When you ’re quick to take a screenshot , click the Grab ikon to fetch it to the forefront .
With Grab participating , choose one of the following options under the Capture menu :
Selection — This forge like to the Control+Shift+4 keystroke , in that you ’re remind to select a orthogonal portion of the cover .
Window — When you select this , Grab prepares a " choose window " release you may habituate when you have the window quick to capture . Click that button , then immediately click anywhere inside the window you want to capture . Even if the window is partially hide by other windows , Grab will appropriate it as if it was the top windowpane . However , any portion of the window that ’s off - screen probably wo n’t be in the shot .
blind — This work like to the Control+Shift+3 key stroke in that it captures the entire silver screen as you see it .
Timed Screen — This lets you stage something on your concealment that only come out when you have yourmousein a certain position , such as a cliff - down menu or black eye - over text crest . The timekeeper is about 10 seconds long , and Grab play a beep with one second remaining .
After you capture a new image , Grab opens that picture in a new windowpane rather than save it to a lasting Indian file . Unlike an image editor , this window , called the Inspector , is only for previewing the image so that you’re able to decide whether or not you want to keep it . Since the Inspector ’s contents are the same as part of your sieve , keep a crisp feeling out for the edges of the Inspector so your eye do n’t mistake them for your main screen .
If you require to redo an image , just fill up the examiner with that image in it and click " do n’t keep open " when prompted . If you require to keep it , use one of the save options under the " filing cabinet " menu as you would in other apps . Grab saves file in the TIFFfile formatonly .
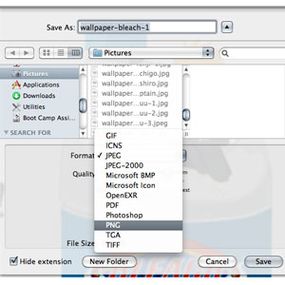
you’re able to well convert a fuss or other image file to a different file format using the Preview utility in Mac OS X. Preview is the default app for opening images , so you’re able to spread Preview just by doubly - clicking the image you want to exchange . With the range open in Preview , select " save as " from the " file " menu , and then utilize the " format " drop - down menu in the save duologue to choose which data formatting you want to convert to .
We just front at two choice for capturing image on your Mac screen door . Both choice — key stroke combining and the Grab public-service corporation — are built into Mac OS X. get more on taking screenshots on a Mac by delay out the connexion that come .
