You may have seenTVcommercials and magazine articles that utter about the " dawning of the new age of personal video . " It is an long time in which anyone can sit down at ahome computerand produce a studio apartment - quality movement pic . All you necessitate is avideo photographic camera , the proper software and a desire to create something . With today ’s television camera and computer technology you could :
That ’s the approximation , anyway . If you have ever judge to model down and do it yourself , however , you know that it ’s not as easy as it looks . In fact , with the more advanced software packages , it can be almost impossible to get start up because they are so complicated . For exercise , when you open Adobe Premiere – a video redaction software package – you are faced with this initial dialog loge :
If you have ever thought about producing your own high - timbre videos on your computer , but have n’t gotten started either because you did n’t know where to take off , or because it all seemed WAY too complicated , then this clause is for you ! In this article , we will dive deep into the domain of home video redaction . You will memorise :
Plus , you will learn how to download and set up a spare demo translation of Adobe Premiere so that you may sample out all of these concepts on your own ! At the end of the process , you will be surprised to see just how much you’re able to do with today ’s technology and how comfortable it is to get started .
Video Standards
If you have acamcorder , then you love that it is comfortable to produce dwelling house video . You simply point and charge . However , if you have ever played back what you dash and looked at it , then you know how severe it is to creategoodhome video with nothing but a camera . Even if you are extremely careful when shooting , you usually cease up with a lot of " junk " on the magnetic tape . When you play it back , it looks like a " home motion-picture show " – amateurish , disjointed , puzzling , lousy audio …
Because most of us watch so much tv and see so many movies , we lean to have pretty high standard when we look on anything on video . We now expect the following features in almost everything we watch :
Ashotis a specific subject film from a specific angle . For lesson , if you are telling the tarradiddle of your son ’s birthday political party , dissimilar guesswork from the event might include a dead reckoning of the bar , face before they are opened , kids at the party seat at the tabular array , your son blowing out the candles and disclose a present tense .
If you watch any regular boob tube show , you will see that it is rarefied for the camera angle to appease the same for more that 10 or 15 seconds . The theatre director will slue between different angles to keep things interesting or to make different point . For example , the screen might show a man ’s face while he ’s talking for five seconds , and then switch to a shot of his custody holding a tissue paper ( while the sound track keep continuous with him talk ) to show the emotion .
Even if you are essay to present something as childlike as your family trip to the menagerie , it is nice to include as many of these features as possible in your interpretation of it . The more feature you add , the more professional your body of work looks and the more attractive it is to your audience .
The well news is that , with just a camera , a information processing system and a bit ofvideo editing software program , you could make video masterpiece that include all of these features .
There are a million different ways to do video redaction . you may grease one’s palms a complete solution from a society likeAvidat the eminent end , and at the broken goal you may use your television camera and aVCRto trim back things together . The resolution that we are going to discuss in this clause involve three different parts :
countenance ’s await at each of these parts in turn .
Digital Camcorders
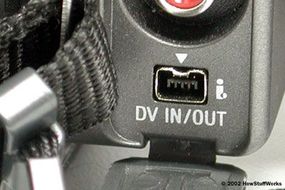
There are 100 of digital video recording cameras , orcamcorders , on the market today from producer like Sony , Panasonic , JVC andCanon . Most of them expend what are known asMiniDVtapes like the one show on this Thomas Nelson Page .
Just about every camcorder free-base on the MiniDV tape format includes aFireWire(IEEE 1394 ) embrasure on the camera so that you could laden the video onto your estimator quickly and easily . The follow three camera are typical of digital camcorders on the market place today .
Whichever type of camera you pick , it need to have a FireWire connective so you’re able to hook it to your data processor . A FireWire connection normally looks like this :
Next , we ’ll ascertain about computing equipment requirements and the software .
Video-Editing Computers
you’re able to use just about any background computer for picture redaction , as long as it has :
telecasting processing in general uses lots of CPU exponent and moves tons of datum on and off the laborious magnetic disc . There are two different places where you will most finger the benefit of a fast machine and the sluggishness of a slow one :
I have one Pentium 3 auto running at 500 MHz , with 512 MB ofRAMand a decent 20 - GB hard drive . It is right on the bound of being able to handle the datum stream from the FireWire connexion . It can not handle it if any other program ( like ane - mailprogram ) are go . A Pentium 4 machine or a recent - model Mac with 512 MB or 1 GB of RAM and a big hard disk is a nice auto to have when you are rendering and pen file cabinet .
The SoftwareThere are many package packages available for redact video on your computer . Windows XP even ships with package that ’s built into theoperating system . Machines from Sony and Apple have software package that amount with the machines .
In this article , we will employ a software package calledAdobe Premiereto demonstrate the television redaction process . We are using Adobe Premiere for two reasons :
to use a bundle like Adobe Premiere , you need to understand several canonical concepts . Once you understand those introductory concept , however , the whole operation is remarkably easy . After you are conversant with the basic principle , it is extremely easy to lucubrate your repertoire to include all form of innovative techniques .
Next , we ’ll expect at the four most important concepts you need to translate from the jump .
Video Editing: Basic Concepts
So far , we ’ve discussed the equipment you will need to edit video recording . Now lease ’s learn the introductory concept you will ask to know in society to use that equipment .
Capture
The first construct is calledcapture . You have to move all of the footage out of the tv camera and onto your estimator ’s backbreaking platter . There are three way to do this :
If you have just a few instant of footage , proficiency # 1 is the mode to go . If you have an hour of footage , techniques # 2 and # 3 are useful .
AVI and MOV filesThe capture process will create AVI ( on the PC ) or MOV ( on the Mac ) file on your voiceless magnetic disc . These files contain your footage , systema skeletale by human body , in the maximum firmness of purpose that your camera can produce . So these file are huge . Typically , three minutes of footage will squander about 1 GB of quad . you may never have enough disk space when you do a mess of TV editing . The Mac we use here at HowStuffWorks for most of our editing has almost 300 gigabytes of fastSCSIdisk space , and Roxanne is always deliver to archive stuff off of it to make way for the newfangled stuff we are working on .
ShotsOnce you have all of your footage into your machine , you need a way to choose the part that you are move to apply . For model , let ’s say that you require to include a scene in your birthday motion picture that bear witness the candles on the natal day bar being ignite . You filmed this activity from three angles and have three minutes of naked as a jaybird footage total . But in the last movie you are going to have 15 seconds of the flick devoted to this scene , in the flesh of three shot :
Out of the big data file of all the footage , you need a way to mark the beginning and end of these three little clip so that you may move them around as single unit of measurement and stick to them together into the last fit .
You do this by search at the naked as a jaybird footage and cross out an IN and OUT pointedness for the little sections that you want to use . Then you tangle these little clips onto thetimeline .
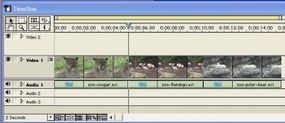
TimelineOnce you have your shots figured out , you need a plaza to arrange them in the proper purchase order and surcharge them together . The position where you do that is called a timeline . You line the gibe up in sequential gild . Then you may dally them as a succession .
With just three concepts – capture , shots and timeline – you’re able to make a film . It will not be fancy , but it will be 10 times better than watching crude footage . Let ’s lam through these steps and make a movie with them .
Running Adobe Premiere
Once you have installed Adobe Premiere on your PC or Mac , ( seethis pageto download a spare demonstration version ) , start up the program . The first affair that you will see is this dialog :
you’re able to click OK here and move on to the next step , but if you ’d like to sympathize what this dialogue is babble out about , here ’s a agile verbal description :
If you are using a MiniDV television camera in the United States and you are germinate received rather than widescreen , then the nonremittal that Premiere select is correct . Otherwise , choose an appropriate alternative for your situation .
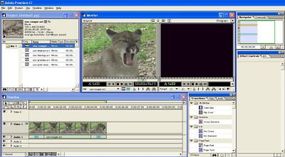
Once you get past the Project configurations dialogue , you come to the principal workings sieve of Premiere , which looks something like this :
There are five different areas on the screen that are of import .
have ’s calculate at the process of editing a TV with Adobe Premiere .
Editing a Video: Capture and Clips
After you pullulate raw footage with your camera , you need to lade that footage into your computer . To do this , connect your camera to your estimator with a FireWire cable . Select the Capture … choice in the File bill of fare of Adobe Premiere . You will see a windowpane like this :
The restraint at the bottom of the Capture dialog permit you moderate your camera . you may rewind , fast forward and play . Typically , what you would do is :
you’re able to either capture all of your footage in one giving single file , or your can capture it in a turn of smaller files . ( mark that some operating systems and video editing software packages limit file sizing to 2 GiB . Other packages fix Indian file sizing to 30 hour . You also require to check that that you have enough destitute disk space to hold all the catch footage . )
Premiere will create AVI ( on the personal computer ) or MOV ( on the Mac ) file on your hard disk at a pace of about 1 gigabyte per three minutes of raw footage .
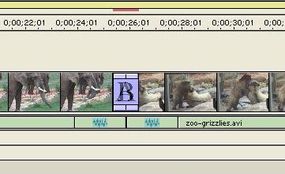
As an example , calculate at this small-arm of sore footage from the zoo :
The footage is 35 seconds long , and the AVI file that Premiere produce when it captured the footage is 130 megabytes . We ’ve convert the raw footage into an MPG file so that you’re able to view it on the entanglement . It is typical " raw footage " with all sorts of dust and problems that you find in most raw footage . In the next section , we ’ll see how to clip out one usable piece from the raw footage .
Clipping
Let ’s take the blastoff of the cougar from the old department as an representative . It ’s a decent shot of a cougar lying on the ground for 30 mo . In the middle of the shot the mountain lion yawn . allow ’s say that you would wish to clip out the yawn and use it in your movie . To do this , take the next steps :
There are several ways to mark the IN and OUT stop . As you are playing the video recording , probably the easiest way is to hit the I and O key on thekeyboardwhen you see the IN and OUT point . Once you rough in them in , you could fine - tune them with the mouse by dragging them .
Now that you have selected a clip , you could add it to the timeline .
Editing a Video: Timeline and Transitions
Once you have marked a magazine by selecting the IN and OUT points in the Source windowpane , you may add the clip to the timeline . Simply drag out the image from the Source window down to the timeline . You will see something that looks like this :
What the timeline now shows is that your flick contains one clip , about five seconds long .
Now what you may do is reprise this process and drag several more clips onto the timeline . You will terminate up with something like this :
This is the unsubdivided possible movie – a bunch of clips string up together on a timeline . But it is a movie nonetheless , and it is 10 times good than sore footage because you have chosen the best parts of the crude footage to assemble on the timeline . To play your movie , you may clack the romp clit on the program portion of the monitor area , or you may get across in the clock time portion of the timeline country to move the arrow and then press the space streak to start act as from that peak .
Let ’s say that you would care to change the length of a clip once you have it on the timeline . There are several agency to do this :
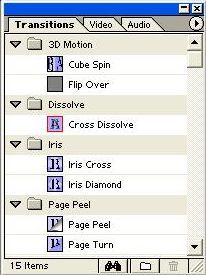
TransitionsSometimes simple cuts from one clip to the next body of work well , but other times you might want to use fancier changeover from view to conniption . For example , you might want to practice adissolve , or awipeor afade . Premiere has all sorts of transitions uncommitted . only choose one from the transitions area and sweep it to a blot between two clips on the timeline :
Once in place on the timeline , right - snap on the passage to adjust it if you like . The transitions will look like this on the timeline :
When you play your motion-picture show , you will not be able to immediately see how the conversion will in reality look . That ’s because transition take some extra processing to complete the effect . Premiere tell you that extra processing still demand to be done by putting a modest crimson bar above the modulation , as construe in the previous example . To trip the superfluous processing , youRenderthe timeline . From the Timeline menu , choose Render Work Area . When the processing is polish off , you may playact your movie to see the passage .
In the next section , we ’ll learn how to add euphony and sound effects to your movie .
Background Music and Narration
When you shoot your bare-assed footage with your camcorder , it has a sound track . There are three cause why you might require to supplement or replace the existing sound track :
To handlemusic , you have several choice :
you may import many different type of sound file ( including WAV , AIF , etc . ) into a Premiere undertaking and then position it on the timeline in Audio Track # 2 . Now when you play your movie , Premiere will automatically mix the original well-grounded course of your picture with the new audio track and play it .
To handlenarration , probably the well-off thing to do is simply understand your narration into the camera , and then charm the picture as you usually would . you may come apart the narration effectual cart track from the television data track and use the sound track . Simply omit the raw yarn footage onto the timeline , right - tap it and select " Split Video and Audio . " tick on the telecasting portion and edit it . Now you have the narration heavy track that you may set on the timeline at the proper decimal point .
Particularly with narration , timingthe telecasting with the audio recording becomes crucial . Once you have the narration sound track on the timeline , you may slice it up with the razor blade tool to either append break or delete sections to assist with timing .
In a big project , it is not strange to be work with half a dozen sound tracks . Premiere can manage an unlimited number of audio recording ( or television ) caterpillar tread . To add a novel sound track , all you involve to do is aright - select the timeline and select the Track alternative . Select to add a Modern rail .
Split-edits
Any telecasting programme or movie that you see today containsB - roll . In the vernacular , A - rollis in the buff footage where there is a person on - screen talking . B - roll is everything else . If you were to shoot a high school gambling , the raw footage would be almost stark A - roster . On the other hand , a nature documentary can be make with nothing but B - bankroll , and then a narration is laid over the top of it . If you are creating a movie that explains something , it is very common to habituate atomic number 5 - roll to provide unaired - ups of the thing you are explain . You see this technique all the metre in any video that HowStuffWorks make .
The process of cutting a small-arm of B - roll into a piece of A - curlicue is often referred to as asplit - edit . For exercise , in the first place in this article we talk about a view where someone is talking on camera about an aroused issue . In the middle , the director cuts to a stiff shot of the soul ’s handwriting bear a Kleenex . During the scene , you see the mortal talking , then the Kleenex , and then return to the person ’s fount , and the sound rails is uninterrupted by the B - peal .
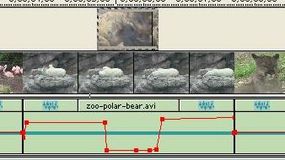
To add boron - roster and create a rip - edit in Premiere , you simply add the B - pealing footage to the time telephone circuit using picture track 2 . Premiere ’s protocol is to use whatever video is in the mellow numbered track when play the movie . For exercise , let ’s say you set this up :
You have the shaft of the polar bear lying around . For contrast , you want to cut to a shot of two grizzly bears wrestling . You simply place the grizzly on video track 2 . When Premiere act as the pic , you will see the polar bears , then the grizzlies and then back to the polar bears .
In some cases , you want to completely cast aside the sound track of the type B - roll . Right - select the B - gyre and prime " Split Video and Audio . " Then tap the audio frequency portion and delete it . Or you may want to decimate the sound in the original footage . We ’ll see how to do that well in the next section .
Adjusting Video Sound
If the visual part of a movie is perfect but the sound is not , then the movie look amateur . Fortunately , Premiere offers advanced dick for receive the sound correct . We ’ve already discussed how to add raw sound tracks to the timeline . Now you need to empathize how to adjust each sound cut so that everything sound perfect .
On every sound trail , there is an pointer image . Clicking it will flourish the view and make an fitting sphere for the legal track available , as you may see here :
In this adjustment area , you’re able to add new control point simply by clicking anywhere along the red line . Then you move the control points by drag them with the mouse . The control point control the tier of the strait . For example , in the following illustration , the story of the audio in television track 1 has been taken to zero so that the strait on a tear - edit is used instead :
What you will normally do is listen to the sound lead and " even out " or " sweeten " the sound by adjust things so that the sound is undifferentiated throughout your integral piece .
It is important to mention that having a goodmicrophonecan really help sound quality , especially when you are film someone sing . A good lavaliere microphone ( the form that you clip onto the front of the talker ’s shirt ) can make a huge difference . lavalier hail in both pumped-up and wireless version . You will especially point out the advantages of lavalieres when you are filming indoors – a lavalliere will wholly wipe out the echoes and " booming " speech sound that you will often get from recording someone indoors with the camcorder ’s built - in microphone . Check out Shure ’s Wireless Microphone Systems for detail .
For more information on digital television editing and related matter , check out the links on the next Sir Frederick Handley Page .
